How to restore a full backup of Concrete5
Updated on Dec 10, 2015
You may need to restore a full Concrete5 backup if there is an issue with your website and you want to restore it to the last operational point. The actual process includes three simple steps.
To restore your Concrete5 Backup, you will have to:
Restore the Files
The first step of the process is to restore the files of your Concrete5 backup. There are two important things to consider here so pay attention.
Where would you like to restore the backup? If you would like to restore it to the previous position and access your Concrete5 website via the same URL, you will have to clear up the old contents of your website from the server and then upload the files from your backup. However, if you would like to restore it on a different location, simply create it and then upload the files in there.
Upload Files
There are two ways of uploading your files to the server - using an FTP client, following our FTP tutorial, or uploading directly through your cPanel account > File Manager, following our cPanel tutorial.
Is the location cleared up? It is important to ensure that the location, where you are restoring the Concrete5 backup files, is all clean. You need to remove all files that were previously occupying the same folder.
Restore the Database
The first thing is to create a new and empty database on your hosting package and a user for it. This user must have all privileges to your database.
MariaDB Configuration
You can create a new database and a user assigned to it via cPanel. Simply follow our Database Wizard tutorial for information on that.
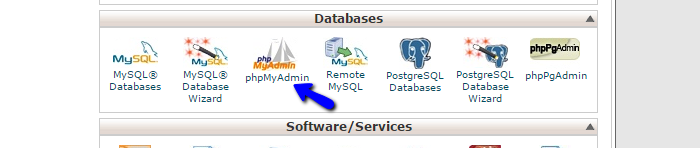
Once you create a new database, you are ready to proceed with the actual restore of your database backup. To complete that, please access your cPanel account and navigate to the Databases tab. From there, click on the phpMyAdmin icon.
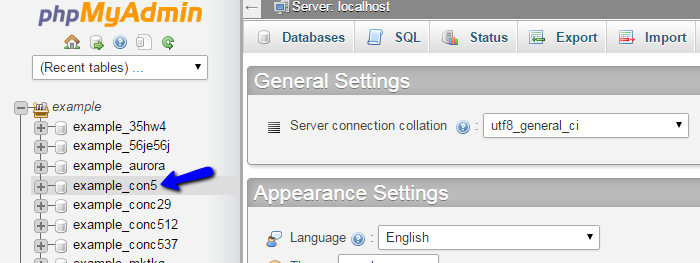
Select the database that you have just created from the list on the left-side of the screen.
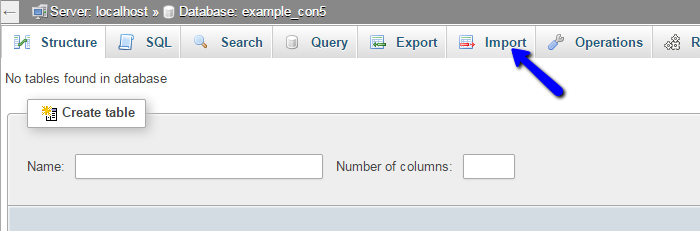
Click on the Import button at the top menu.
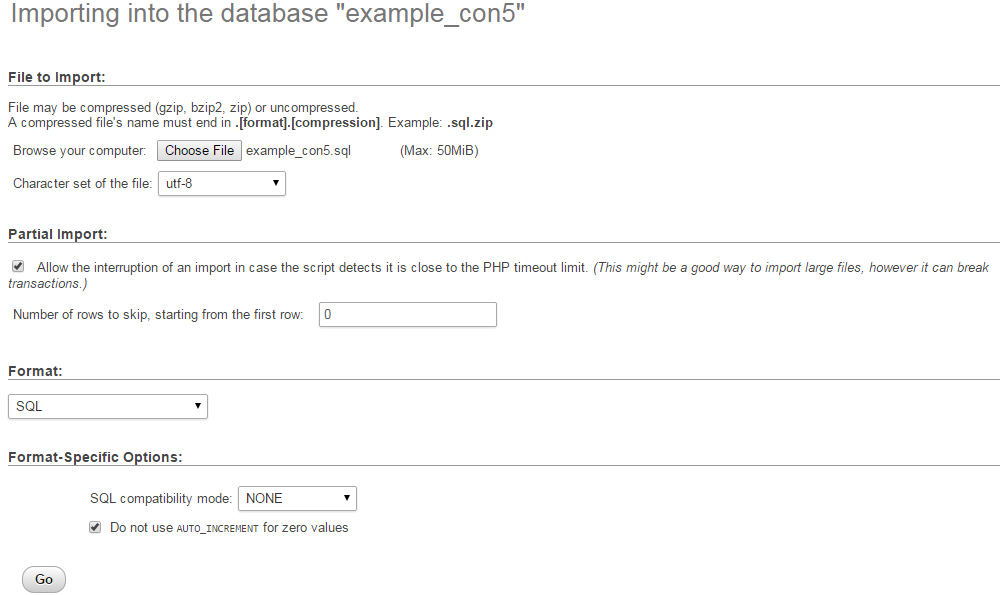
In the File Importsection, you need to select the dump backup file of the database that you wish to restore. When you complete that, simply click on the Go button below to proceed with the process.
Link the Files and the Database
By completing the steps above, you should have a location on your account, which contains all of the files and folders of your Concrete5 website. You should also have a database, which contains the backup of your Concrete5 database. Now, it is time to configure them together via the configuration file of your website.
Configuration File
If you are not able to complete that, we recommend reviewing our tutorial on how to locate and edit the Concrete5 Configuration file.
You can edit the file and enter the details for your new database using your favorite FTP client or directly via the File Manager service within your cPanel account.

Concrete5 Hosting
- Free Installation
- 24/7 Support
- Free Domain Transfer
- Hack-free Protection
- Fast SSD Storage
- Free Transfer
- Free Cloudflare CDN
- Immediate Activation