How to Install CodeIgniter on Shared Hosting
Updated on Jan 27, 2025
We all know that speed and efficiency are two of the most desired characteristics a website can possess in the world of web development. If you are looking for a lightweight PHP framework that will allow you to create web applications that are fast and efficient but also feature-rich, then CodeIgniter is what you are looking for.
This post includes:
What is CodeIgniter?
Whether you're a seasoned developer or just starting out, CodeIgniter's streamlined approach provides a powerful toolkit for creating robust and maintainable applications. Unlike some larger frameworks (like Laravel), CodeIgniter prioritizes simplicity, making it a favorite among developers who want to get up and running quickly without sacrificing functionality.
As with any other piece of software, CodeIgniter has several key features that define it.
- MVC Architecture - Like many other frameworks, CodeIgniter uses the Model-View-Controller architecture. It helps to separate the application logic from the presentation layer, keeping the code structure much easier to maintain, test, and extend;
- Lightweight and Fast - CodeIgniter's footprint is tiny, making it the perfect framework for projects where speed is crucial. Because of its low resource consumption, it is also excellent for Shared Hosting environments;
- Built-in Libraries - CodeIgniter provides a range of libraries and helpers, including those for form validation, database access, file uploading, session management, and more. This built-in functionality reduces the need to write code from scratch;
- Flexible Routing - CodeIgniter's routing features allow developers to manage URLs flexibly, making creating clean, user-friendly, and SEO-optimized links easy. Instead of binding URLs directly to file paths or PHP files, CodeIgniter lets users map URL patterns to specific controllers and methods;
- Templating - While CodeIgniter uses PHP itself for its templating engine, keeping things simple and lightweight, it is also fully compatible with Blade and Twig;
CodeIgniter is a good choice for developers who prefer a streamlined, no-frills approach to PHP development.
How to Install CodeIgniter on Shared Hosting?
Installing CodeIgniter on a Shared Hosting environment is very easy and straightforward. There are three ways to do it: via Composer, with an application installer, and manually. All three methods work on our Shared Hosting servers, and we will show you exactly how.
Composer
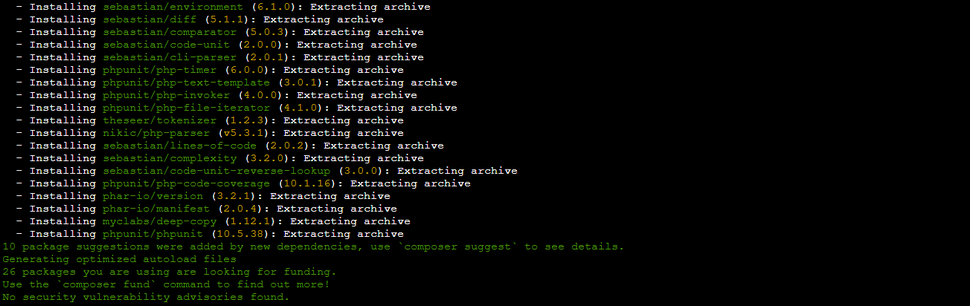
To install CodeIgniter on your Shared Hosting account via Composer, all you need to do is run a single command. Of course, you must first ensure the server has Composer 2.0.14 or newer available for the framework to work.
If it does, then use this command in your terminal of choice:
composer create-project codeigniter4/appstarter project-root
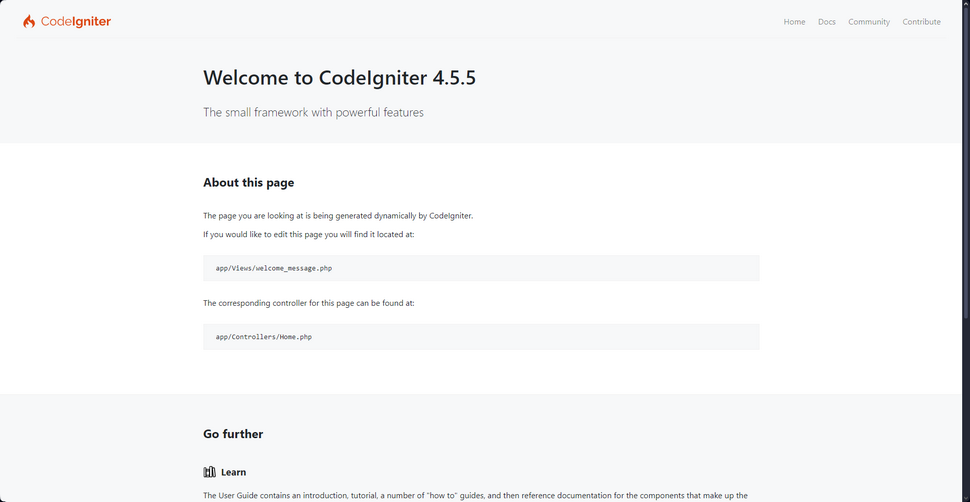
The command will create a project-root directory and install CodeIgniter. You can change project-root to whatever you want. But that is it! All it takes is that one command. When the process is complete, your terminal should look like this.
Remember to create a database for your application if it needs one! The database configuration file is here: app/Config/Database.php.
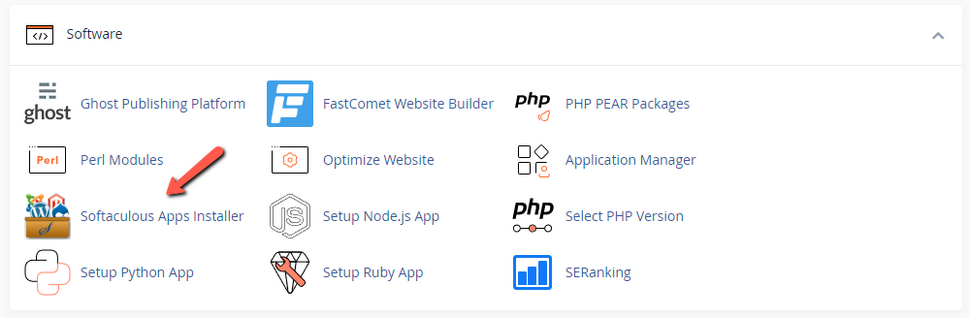
Application Installer
Our Shared Hosting services all come with the Softaculous Applications Installer. Our customers can install a wide range of applications with just a few clicks. To install CodeIgniter via Softaculous, first log into your cPanel account. Then, locate the installer in the Software section.
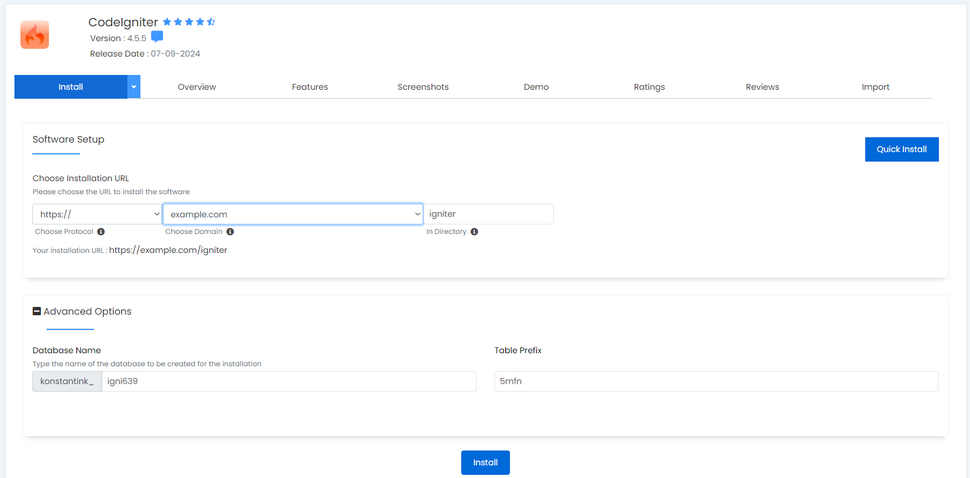
Then, search for CodeIgniter, select it, and click Install. On the installation page, you can select which domain the framework installs on and which directory it is in for that domain. Also, you can choose the database name and table prefix under Advanced Options. Finally, you can learn more about the framework from the Overview and Features tabs at the top. When you are ready, click Install at the bottom of the page.
The process will last a few moments, after which you should see this successful message.
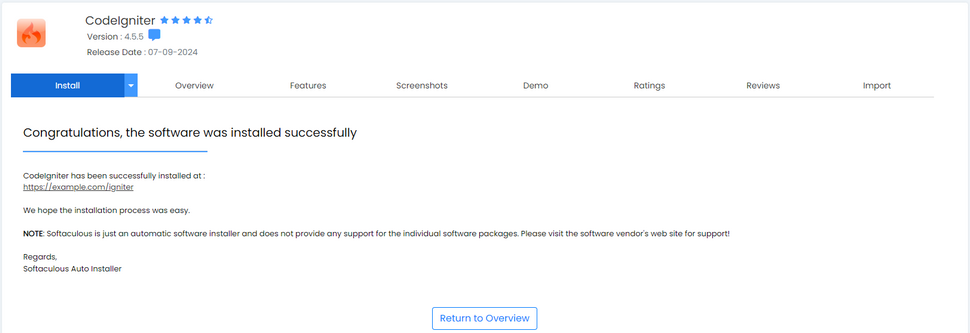
You can click the URL to take you to CodeIgniter's homepage by default.
As you can see, installing CodeIgniter via Softaculous is straightforward, and it even creates a database for you!
Manual
Finally, you can install CodeIgniter manually on your Shared Hosting environment if the other two methods are unavailable.
To begin, download the latest framework version directly from the website. When you have the archive, extract it into the root directory of your project. If you are using our services, you can check out our File Manager and FTP tutorials to learn how to upload and extract the archive to your account. Ideally, the directory should be for a domain you have pointed to our services so that you can access the framework immediately after the installation.
Once you have the files, you must complete a few configuration steps.
- Set Your Base URL - This can be done in the app/Config/App.php or .env file like this: app.baseURL = 'http://example.com/' Always use a trailing slash!
- Optional Index Page - If you do not want to use an Index page, set the $indexPage page value in the app/Config/App.php file to ''(single quotes with no space between them);
- Database Configuration - To set your database, open either the app/Config/Database.php or .env file and input your database details.
With these steps completed, you should be all set to go! We do not recommend manually installing CodeIgniter because the previous two methods are much more straightforward. Composer automatically downloads and installs the files for you; all you need to do is configure your database. Softaculous, however, handles the database as well and sets it up wholly after just a few clicks.
Whichever method you choose, though, should work on any Shared Hosting environment.
Example Application
To round out this tutorial we are going to show you how to create a quick and easy to-do list application. It will showcase the MVC architecture and prove just how easy it is to set the framework up on a Shared Hosting server and that it works perfectly fine.
To start, we need to install CodeIgniter on our Shared Hosting environment. Use any of the methods you prefer from above, however, we recommend installing it on a domain that is already hosted on your Shared Hosting. Additionally, we will be using our hosting services for this example, but the general steps should work for any other. It will make accessing the application much more easy. For this example we will use the Composer method and this command.
composer create-project codeigniter4/appstarter project-root
Next, create a database. You can refer to the tutorial we linked earlier for further details on how to do it in cPanel. Remember to note down the database name, user and password as you will need them. If you used Softaculous to install CodeIgniter, though, you can skip this step.
However, since no matter which method you used the database will be empty, we have to add a table for our to-do tasks. In cPanel find phpMyAdmin.

Find your database then click on SQL at the top. Place this in the empty field then click Go.
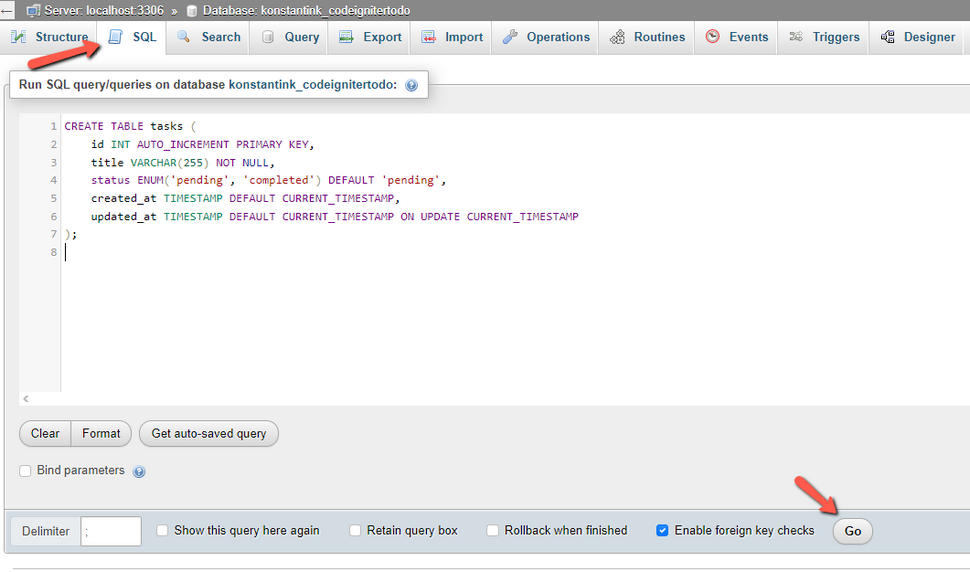
That will create the necessary table and configuration for our tasks to have somewhere to live.
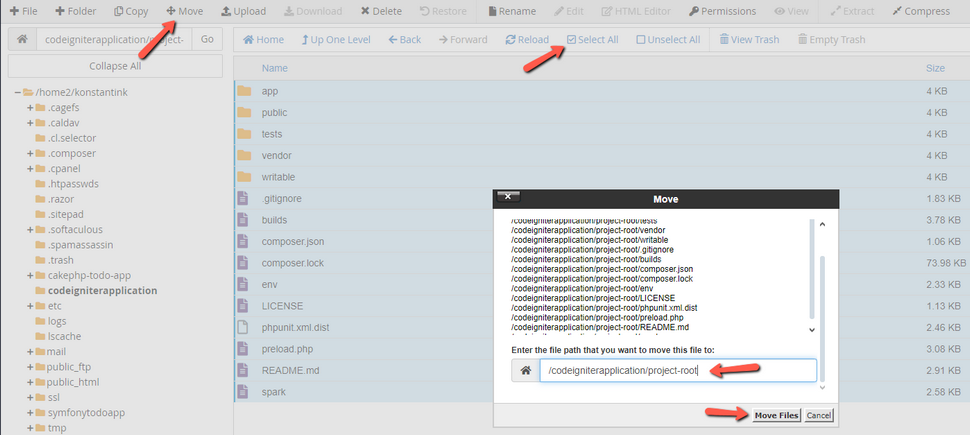
Now, we need to move some files around. Since we used Composer, the application is in a subdirectory. We should move the files from the subdirectory to make accessing the application more straightforward. We recommend using the File Manager in cPanel, as it is the easiest way to do that. Simply open it, head to your application’s directory and then the newly created subdirectory. Click on Select All (ensuring hidden–dot files–are visible) and then Move. Delete the subdirectory’s name in the window that appears and click Move Files.
Of course, if you used the Softaculous or manual method, you can skip this step as well. Same for the next two, actually!
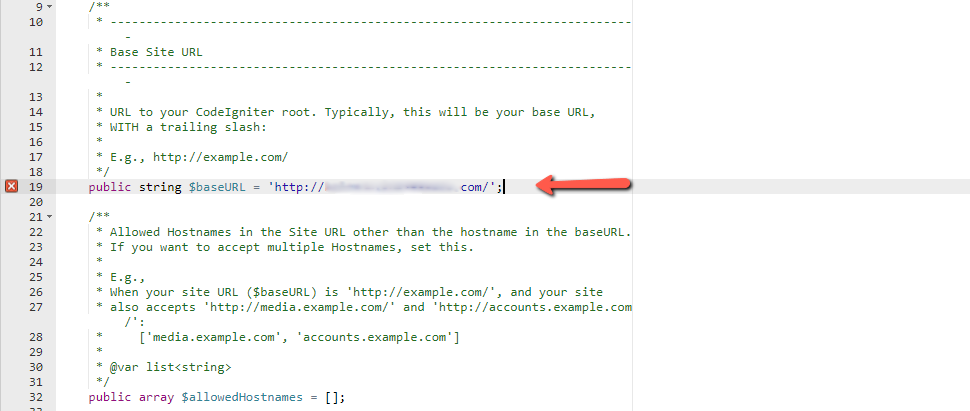
With our files in the right place, we have to do a bit of a setup to ensure our application connects to the right domain and database. Head to the app/Config directory and open the App.php file. In it, find the base URL line. Change it to the domain you installed the application under, but ensure https:// is also present.
With that done, time to connect the application to the database you created. Still in the app/Config directory, open the Database.php file. In it, input the name, user and password of your database.

With all this preparation done, it is time to build our application. We will give you all the code you will need as this is simply a showcase of CodeIgniter’s functionality. To start, open the app/Config/Routes.php file and replace the code you see in it with this.
Routes.php
<?php

use CodeIgniter\Router\RouteCollection;

/**

 * @var RouteCollection $routes

 */

$routes->get('/', 'Tasks::index');

$routes->post('tasks/create', 'Tasks::create');

$routes->post('tasks/update/(:num)', 'Tasks::update/$1');

$routes->post('tasks/delete/(:num)', 'Tasks::delete/$1');
This will route our application properly, so that the correct code is executed when we open it in a browser and interact with it. Speaking of that code, time to add it. Head to the app/Controllers directory and create Tasks.php. This is the code that goes in it.
Tasks.php
<?php

namespace App\Controllers;

use App\Models\TaskModel;

class Tasks extends BaseController

{

    public function index()

    {

        $model = new TaskModel();

        $data['tasks'] = $model->findAll();

        return view('tasks/index', $data);

    }

    public function create()

    {

        $model = new TaskModel();

        $model->save([

            'title' => $this->request->getPost('title'),

        ]);

        return redirect()->to('/');

    }

    public function update($id)

    {

        $model = new TaskModel();

        $model->update($id, [

            'status' => $this->request->getPost('status'),

        ]);

        return redirect()->to('/');

    }

    public function delete($id)

    {

        $model = new TaskModel();

        $model->delete($id);

        return redirect()->to('/');

    }

}
This controller is basically the logic behind our application. It dictates how it behaves. Since CodeIgniter uses the Model-View-Controller architecture, a Model and View are also necessary. Head to the app/Models directory and create TaskModel.php. Place this code in it.
TaskModel.php
<?php

namespace App\Models;

use CodeIgniter\Model;

class TaskModel extends Model

{

    protected $table = 'tasks';

    protected $primaryKey = 'id';

    protected $allowedFields = ['title', 'status'];

}
Finally, go to the app/Views directory and create a new one called tasks. In it, create index.php with this code. It is the front-end of our app.
tasks/index.php
<!DOCTYPE html>
<html>
<head>
<title>To-Do List</title>
</head>
<body>
<h1>To-Do List</h1>
<form method="post" action="/tasks/create">
<input type="text" name="title" placeholder="New task" required>
<button type="submit">Add</button>
</form>
<ul>
<?php foreach ($tasks as $task): ?>
<li>
<form method="post" action="/tasks/update/<?= $task['id'] ?>">
<input type="checkbox" name="status" value="completed" <?= $task['status'] === 'completed' ? 'checked' : '' ?> onchange="this.form.submit()">
<?= $task['title'] ?>
</form>
<form method="post" action="/tasks/delete/<?= $task['id'] ?>" style="display:inline;">
<button type="submit">Delete</button>
</form>
</li>
<?php endforeach; ?>
</ul>
</body>
</html>
That is all the code we will need for our application to work! The last step is to head to the public directory and move both the .htaccess and index.php files to the root directory of your application. Firstly, open the .htaccess file and replace the code in it with this.
.htaccess
# Disable directory browsing

Options -Indexes

# ----------------------------------------------------------------------

# Rewrite engine

# ----------------------------------------------------------------------

# Turning on the rewrite engine is necessary for the following rules and features.

# FollowSymLinks must be enabled for this to work.


 Options +FollowSymlinks

 RewriteEngine On

 # If you installed CodeIgniter in a subfolder, you will need to

 # change the following line to match the subfolder you need.

 # http://httpd.apache.org/docs/current/mod/mod_rewrite.html#rewritebase

 # RewriteBase /

 # Redirect Trailing Slashes...

 RewriteCond %{REQUEST_FILENAME} !-d

 RewriteCond %{REQUEST_URI} (.+)/$

 RewriteRule ^ %1 [L,R=301]

 # Rewrite "www.example.com -> example.com"

 RewriteCond %{HTTPS} !=on

 RewriteCond %{HTTP_HOST} ^www\.(.+)$ [NC]

 RewriteRule ^ http://%1%{REQUEST_URI} [R=301,L]

 # Checks to see if the user is attempting to access a valid file,

 # such as an image or css document, if this isn't true it sends the

 # request to the front controller, index.php

 RewriteCond %{REQUEST_FILENAME} !-f

 RewriteCond %{REQUEST_FILENAME} !-d

 RewriteRule ^([\s\S]*)$ index.php/$1 [L,NC,QSA]

 # Ensure Authorization header is passed along

 RewriteCond %{HTTP:Authorization} .

 RewriteRule .* - [E=HTTP_AUTHORIZATION:%{HTTP:Authorization}]


 # If we don't have mod_rewrite installed, all 404's

 # can be sent to index.php, and everything works as normal.

 ErrorDocument 404 index.php


# Disable server signature start

ServerSignature Off

# Disable server signature end
Finally, open the index.php file and replace the code in it with this.
index.php
<?php

/*

 *---------------------------------------------------------------

 * CHECK PHP VERSION

 *---------------------------------------------------------------

 */

$minPhpVersion = '8.1'; // If you update this, don't forget to update `spark`.

if (version_compare(PHP_VERSION, $minPhpVersion, '<')) {

    $message = sprintf(

        'Your PHP version must be %s or higher to run CodeIgniter. Current version: %s',

        $minPhpVersion,

        PHP_VERSION,

    );

    header('HTTP/1.1 503 Service Unavailable.', true, 503);

    echo $message;

    exit(1);

}

/*

 *---------------------------------------------------------------

 * SET THE CURRENT DIRECTORY

 *---------------------------------------------------------------

 */

// Path to the front controller (this file)

define('FCPATH', __DIR__ . DIRECTORY_SEPARATOR);

// Ensure the current directory is pointing to the front controller's directory

if (getcwd() . DIRECTORY_SEPARATOR !== FCPATH) {

    chdir(FCPATH);

}

/*

 *---------------------------------------------------------------

 * BOOTSTRAP THE APPLICATION

 *---------------------------------------------------------------

 * This process sets up the path constants, loads and registers

 * our autoloader, along with Composer's, loads our constants

 * and fires up an environment-specific bootstrapping.

 */

// LOAD OUR PATHS CONFIG FILE

// This is the line that might need to be changed, depending on your folder structure.

require FCPATH . './app/Config/Paths.php';

// ^^^ Change this line if you move your application folder

$paths = new Config\Paths();

// LOAD THE FRAMEWORK BOOTSTRAP FILE

require $paths->systemDirectory . '/Boot.php';

exit(CodeIgniter\Boot::bootWeb($paths));
And that is all! You are set! The last step is to open the URL for your application and add, mark or remove some tasks! It should look like this.

While it is not a flashy application, it is perfectly functional (you can even use it yourself if you need a to-do list). The most important thing is, though, that it showcases core CodeIgniter functionalities and proves the framework works perfectly well on a Shared Hosting environment.
We hope you find this article useful. Discover more about FastCloud - the top-rated Hosting Solutions for personal and small business websites in four consecutive years by the HostAdvice Community!

SSD Cloud Hosting
- Free Domain Transfer
- 24/7 Technical Support
- Fast SSD Storage
- Hack-free Protection
- Free Script Installation
- Free Website Transfer
- Free Cloudflare CDN
- Immediate Activation