How to Install Symfony on Shared Hosting
Updated on Dec 17, 2025
When it comes to the development world, choosing the correct framework for a project is one of the first and most critical steps. This article will cover one of the most popular PHP frameworks: Symfony.
Known for its reusable components, adherence to best practices, and robust ecosystem, Symfony has become a go-to choice for developers seeking flexibility and efficiency. Understanding Symfony's features and capabilities can open the door to building scalable, maintainable, and high-performance web applications.
Read on as we tell you about the framework and, more importantly, how to install it on your Shared Hosting account and begin your programming journey.
This post includes:
What is Symfony?
Originally released in 2005, Symfony is one of the most popular PHP frameworks online, and for good reason. As a framework, Symfony focuses on speed and efficiency, not just in website performance but also in the development process. It is a highly customizable framework, compatible with many components and third-party libraries used throughout PHP development.
To elaborate further, here are the key features that make Symfony stand out and define its capabilities and purpose.
- Modularity - Symfony is a highly modular framework. By default, it provides a collection of reusable components for performing specific tasks within the application (routing, templating, form handling, etc.). Additionally, these are components that are already tried and tested because they are also used in other popular frameworks, like Laravel;
- MVC Architecture - Symfony uses the famous Model-View-Controller architecture, which helps keep its code organized and tidy. By separating the business logic from the presentation, Symfony's code is much cleaner and easy to maintain and change;
- Flexibility - Well known for just how customizable it is, almost everything within Symfony can be configured and adapted to suit the development team or the application's needs. From the directory structure to third-party libraries, developers can work with Symfony in a way they prefer;
- Symfony Flex - Flex is a dependency manager based on Composer–PHP's own dependency management tool. It builds upon Composer to provide tools and features that automate the installation and configuration of Symfony plugins. It cuts down on repetitive tasks by creating "recipes" for the installation of plugins and all the necessary configurations they may need;
- Twig Templating Engine - Symfony uses the popular Twig engine for templates and rendering its views;
Scalable - Projects created with Symfony are highly scalable due to the nature of the framework and its modularity. It is often chosen for large-scale operations.
If you are looking for a PHP framework that can be molded to your precise requirements, is highly modular and scalable, and will ensure your project receives long-lasting support while maintaining its speed and efficiency, then Symfony is an excellent choice.
How to Install Symfony on Shared Hosting
Installing Symfony on a Shared Hosting environment is extremely easy. Because it is a PHP framework, it can be installed using Composer. Additionally, our Shared Hosting services offer the Softaculous Apps Installer, making the installation process even more straightforward.
Before installing Symfony, you must ensure the following are available.
- PHP 8.2+
- Composer
- Ctype
- iconv
- PCRE
- Session
- SimpleXML
- Tokenizer
Our Shared Hosting environments cover those requirements, making installing Symfony a breeze.
Composer
Here is how to install Symfony via Composer first. You will need access to a terminal, which your cPanel account comes equipped with on our services. Once your terminal is open and you have connected to your Shared Hosting account via SSH (or are using the Terminal in your cPanel account), run this command.
composer create-project symfony/skeleton:"7.2.x" my_project_directory
This will download the latest Symfony version and create a my_project_directory folder on your system. You can change that name to anything you like. When the installation is completed, you should see this on your terminal.

However, that will only install the essentials. Things like the Twig templating engine, Doctrine ORM, Symfony Webpack Encore and the Security Bundle do not come packaged with the minimal install. Not every project needs those. That is why we recommend you then run this command to get the “full” install.
composer require webapp
And that is it! Symfony is now installed in your shared hosting environment.
Softaculous
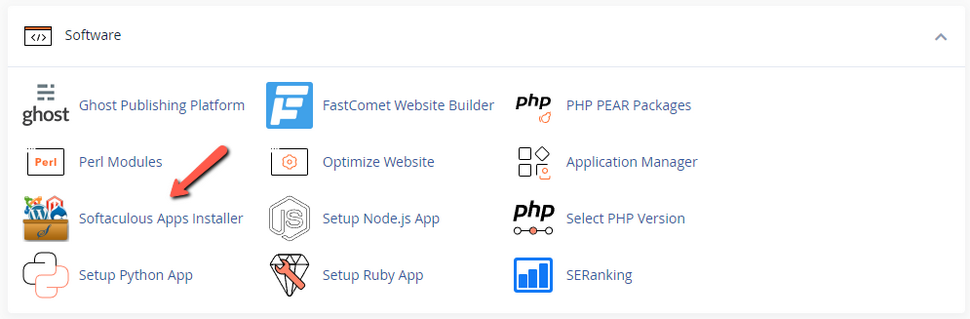
Next, let us take a look at how to do it via Softaculous. Firstly, find the installer in the Software section of your cPanel account with us.
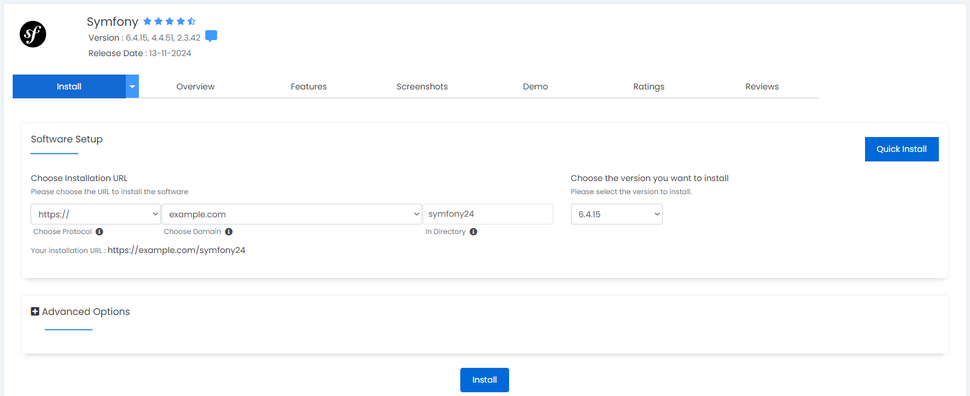
Then, via the search bar on the left, find Symfony. Click Install. You will see this page, where you can choose which domain and directory it will be installed on. You can also pick the version. We always recommend using the latest one. Finally, you can click on the Overview and Features tabs to learn more about the framework.
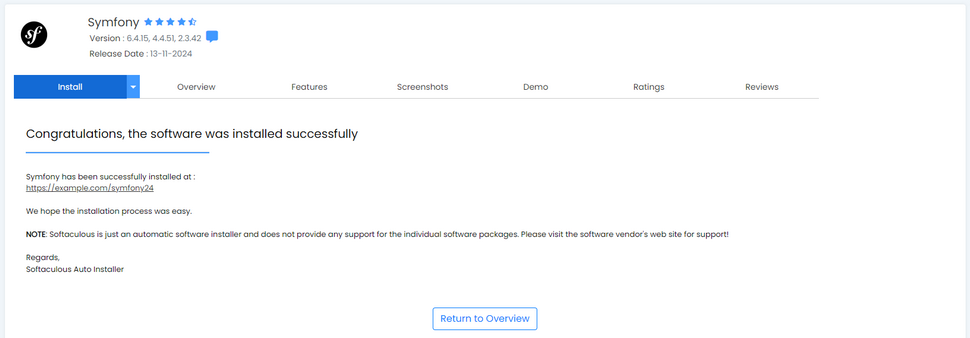
When ready, click on Install at the bottom of the page. The process will last a few moments, after which you will see this page, which will inform you of the successful installation.
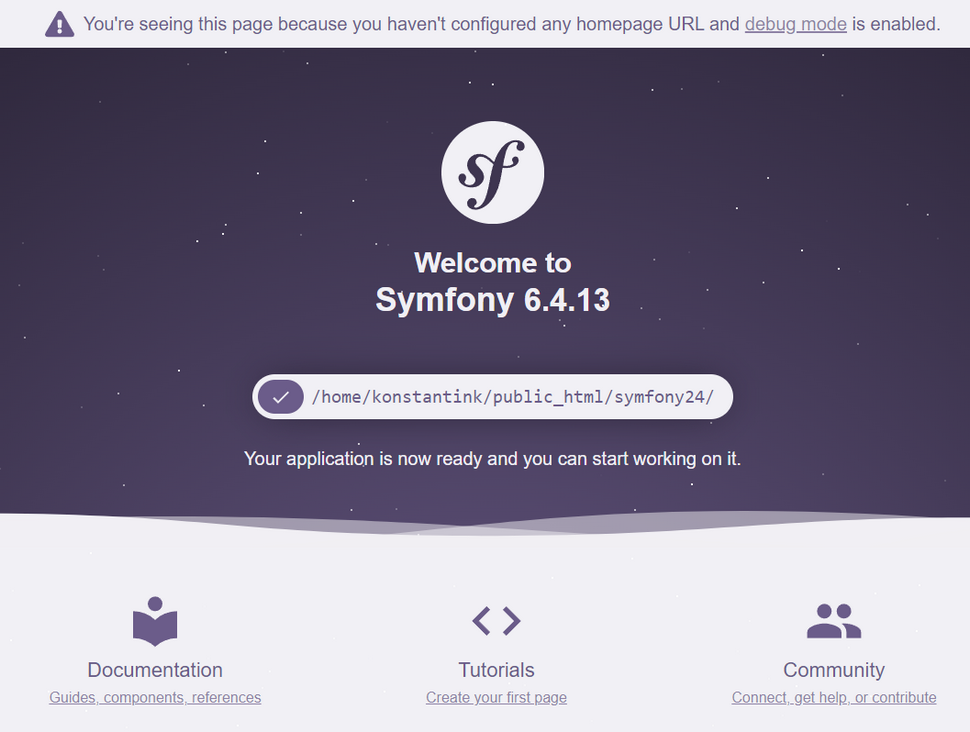
You can then click on the provided URL, which will take you to your Symfony project's default homepage.
And there you have it. Installing Symfony on your Shared Hosting environment is as easy as running a command or clicking Install in Softaculous!
Example Application
Now here is a quick and easy to-do list application that will show off the MVC architecture of Symfony and a few CRUD operations. This way we can not only showcase how the framework functions in a Shared Hosting environment, but it should also give you a very good idea how programming with it generally works.
Firstly, we have to install Symfony, so feel free to use either method we described above. We prefer using the command and terminal one since we will be running a few commands to get everything set up; may as well install it with a command (including the additional features from the composer require webapp command). We recommend installing it on a domain that is hosted on your Shared Hosting account for ease of access. Once the installation is done move the files from the directory it created to the root directory of your domain. Our customers can use the File Manager to move that easily.
Next, create a database. We have an excellent tutorial on how to do that for cPanel users here. Note down the name, user and password and then head to your application’s directory. We prefer using the File Manager for its graphical user interface. Find the .env file and open it. Then, locate the database section.
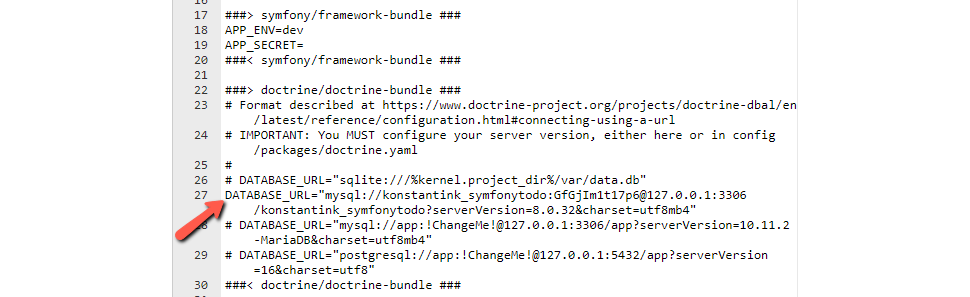
As you can see in the screenshot above, there are multiple lines for a database connection. In our example the only one that does not have a hashtag in front of it is for MariaDB. Ensure that only one line is missing this hashtag, otherwise the application will default to PostgreSQL which will not work on our Shared Hosting environment. We have already filled in our details, but you can see from the other lines where your database details go. Here is a quick explanation.
- First “app” - Delete “app” and place your database user here;
- !ChangeMe! - Delete !ChangeMe! and place your database password here;
- Second “app” - Delete this and replace it with your database name.
When you are all set, save your changes. The next step is to create the Entity which will be the core of our application. To begin, run this command.
php bin/console make:entity Task
When the command executes you will be prompted to add fields to the Entity. It will look like this. You will have to enter a name and a field type. For all the other options you can simply hit Enter to proceed.
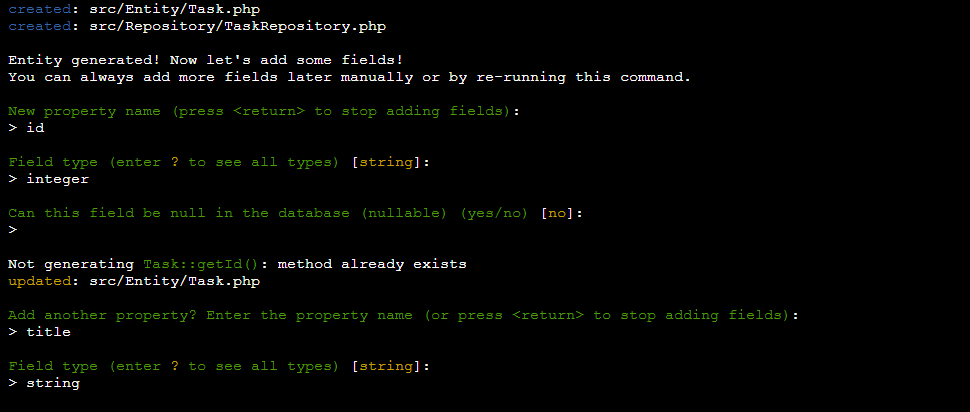
Here are the fields you will need.
- ID
- Name - id
- Type - integer
- Title
- Name - title
- Type - string
- Completed
- Name - isCompleted
- Type - boolean
When you have created your last field hit Enter again to finish the setup. That will create the Entity. Next, we need to migrate these changes to the database, so run this pair of commands one after the other.
php bin/console doctrine:migrations:diff
php bin/console doctrine:migrations:migrate
Now we need to create the Controller that will hold the application logic. Fortunately, creating and setting it up is just as easy as all the other steps so far. Run this command first.
php bin/console make:controller TaskController
That will create a controller called TaskController.php. It is located in the src/Controller directory. Open the file and replace the code in it with this.
TaskController.php
    <?php

namespace App\Controller;

use App\Entity\Task;
use App\Form\TaskType;
use Doctrine\ORM\EntityManagerInterface;
use Symfony\Bundle\FrameworkBundle\Controller\AbstractController;
use Symfony\Component\HttpFoundation\Request;
use Symfony\Component\HttpFoundation\Response;
use Symfony\Component\Routing\Annotation\Route;

class TaskController extends AbstractController
{
    #[Route('/', name: 'task_list')]
    public function index(EntityManagerInterface $em): Response
    {
        $tasks = $em->getRepository(Task::class)->findAll();
        return $this->render('task/index.html.twig', ['tasks' => $tasks]);
    }

    #[Route('/task/add', name: 'task_add')]
    public function add(Request $request, EntityManagerInterface $em): Response
    {
        $task = new Task();
        $form = $this->createForm(TaskType::class, $task);

        $form->handleRequest($request);
        if ($form->isSubmitted() && $form->isValid()) {
            $em->persist($task);
            $em->flush();
            return $this->redirectToRoute('task_list');
        }

        return $this->render('task/add.html.twig', ['form' => $form->createView()]);
    }

    #[Route('/task/edit/{id}', name: 'task_edit')]
    public function edit(Task $task, Request $request, EntityManagerInterface $em): Response
    {
        $form = $this->createForm(TaskType::class, $task);

        $form->handleRequest($request);
        if ($form->isSubmitted() && $form->isValid()) {
            $em->flush();
            return $this->redirectToRoute('task_list');
        }

        return $this->render('task/edit.html.twig', ['form' => $form->createView(), 'task' => $task]);
    }

    #[Route('/task/delete/{id}', name: 'task_delete')]
    public function delete(Task $task, EntityManagerInterface $em): Response
    {
        $em->remove($task);
        $em->flush();
        return $this->redirectToRoute('task_list');
    }

    #[Route('/task/toggle/{id}', name: 'task_toggle')]
    public function toggle(Task $task, EntityManagerInterface $em): Response
    {
        $task->setIsCompleted(!$task->getIsCompleted());
        $em->flush();
        return $this->redirectToRoute('task_list');
    }
}
Save your changes then go back to the terminal and run this command to create a form which will be used to hold the tasks in our application.
php bin/console make:form TaskType
As with the previous command, that one created a new file. This time it is in the src/Form directory, called TaskType.php. Replace the code in it with this.
TaskType.php
<?php

namespace App\Form;

use App\Entity\Task;
use Symfony\Component\Form\AbstractType;
use Symfony\Component\Form\Extension\Core\Type\TextType;
use Symfony\Component\Form\Extension\Core\Type\CheckboxType;
use Symfony\Component\Form\FormBuilderInterface;
use Symfony\Component\OptionsResolver\OptionsResolver;

class TaskType extends AbstractType
{
    public function buildForm(FormBuilderInterface $builder, array $options): void
    {
        $builder
            ->add('title', TextType::class, ['label' => 'Task Title'])
            ->add('isCompleted', CheckboxType::class, [
                'label' => 'Completed?',
                'required' => false,
            ]);
    }

    public function configureOptions(OptionsResolver $resolver): void
    {
        $resolver->setDefaults([
            'data_class' => Task::class,
        ]);
    }
}
We are almost done, just a few more files to create and edit! All that is left is to create the Views for our application. That will give us a graphical representation of the application, so we can use it directly in the browser. Firstly, go to the templates/task/index.html.twig file. Delete the code in it and replace with this.
index.html.twig
<h1>To-Do List</h1>
<a href="{{ path('task_add') }}">Add Task</a>
<ul>
{% for task in tasks %}
<li>
{{ task.title }} - {% if task.isCompleted %}Completed{% else %}Incomplete{% endif %}
<a href="{{ path('task_edit', {id: task.id}) }}">Edit</a>
<a href="{{ path('task_delete', {id: task.id}) }}" onclick="return confirm('Are you sure?')">Delete</a>
</li>
{% endfor %}
</ul>
Finally, in the same directory, create two files: add.html.twig and edit.html.twig. They will both have the same code in them, so go ahead and add it.
add.html.twig and edit.html.twig
<h1>{{ task is defined ? 'Edit Task' : 'Add Task' }}</h1>
{{ form_start(form) }}
{{ form_widget(form) }}
<button type="submit">Save</button>
{{ form_end(form) }}
And that is it! You are all set! All you need to do is save any unsaved changes and then open your domain in a browser. You should see a rather simple interface to which you can add a task.

You can also edit your task to mark it as completed or delete it entirely.
There you have it. A quick and easy application to show off a few fundamental Symfony operations and functions. It also proves that the framework is perfectly fine on a Shared Hosting environment like our FastCloud plans.
We hope you find this article useful. Discover more about FastCloud - the top-rated Hosting Solutions for personal and small business websites in four consecutive years by the HostAdvice Community!

SSD Cloud Hosting
- Free Domain Transfer
- 24/7 Technical Support
- Fast SSD Storage
- Hack-free Protection
- Free Script Installation
- Free Website Transfer
- Free Cloudflare CDN
- Immediate Activation