How to Split a Subsite From a WordPress Multisite Network
Updated on Jul 5, 2023
The Multisite feature of WordPress is excellent if you want to manage multiple WordPress websites from a single dashboard. It is perfect for users who wish to have all their websites under one administrative account. It is handy if you want to install plugins and themes on all of your websites at once, even though you still have to enable them one by one on each different website. The WP Toolkit is better in that regard, but we are not here to discuss that.
Instead, we are here to discuss splitting a subsite from a Multisite network. Sometimes it is necessary to turn a subsite into its own standalone website; this guide will help you easily achieve that.
This post includes:
Why Split a Subsite From a Multisite Network?
You might want to split a subsite from a Multisite Network to a single WordPress installation for a variety of reasons, including:
- It has outgrown the Network and requires its own space;
- You want more control over that particular website;
- You want to improve the site's performance because it isn't performing as well as it should;
- You want to transfer control of the website to a user external to the Network.
How to Split a Subsite From a Multisite Network?
Before you proceed with the process, we strongly recommend backing up your Multisite Network first. It is always good to have a backup when performing tasks like these. Our services offer automated daily backups, which can be used to restore the Network if necessary. Additionally, if your subsite is complex and intricate, we suggest you actually talk to a website developer instead. The process below is simple and reliable, but it is always better to consult with a professional for big websites. With that said, let's begin.
This procedure would have been challenging, but it is rather simple nowadays. While there are more complicated ways to do that, we will discuss the easiest and fastest process. It does not involve plugins or external services and utilizes only WordPress' built-in functionalities. These are the steps you'll need to take.
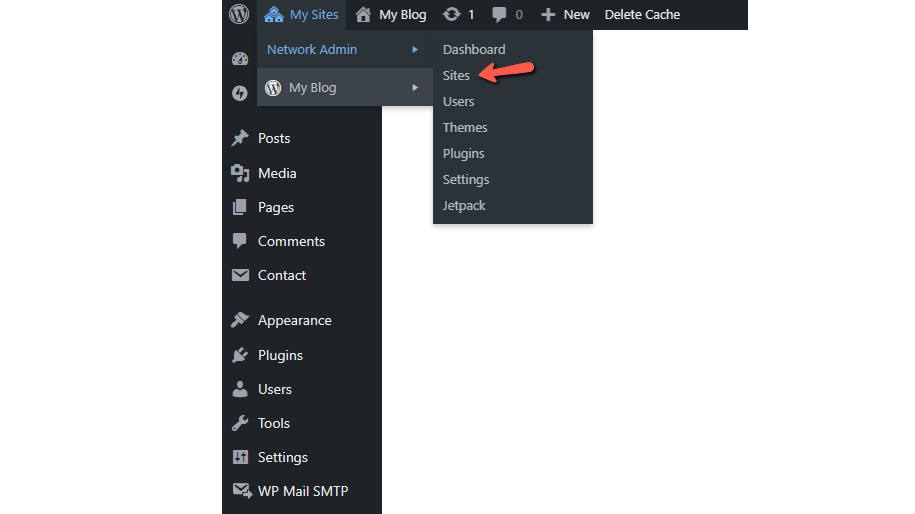
- Log into your WordPress multisite dashboard, hover over My Sites, then select Network Admin → Sites;
- Click the Dashboard button under the website you want to split from the Network. Alternatively, you can log in directly to that website's dashboard with your user and password;
- Go to Tools → Export;

- The next page will allow you to export your website's data: posts, pages, comments, media, contact forms, categories, and so on.
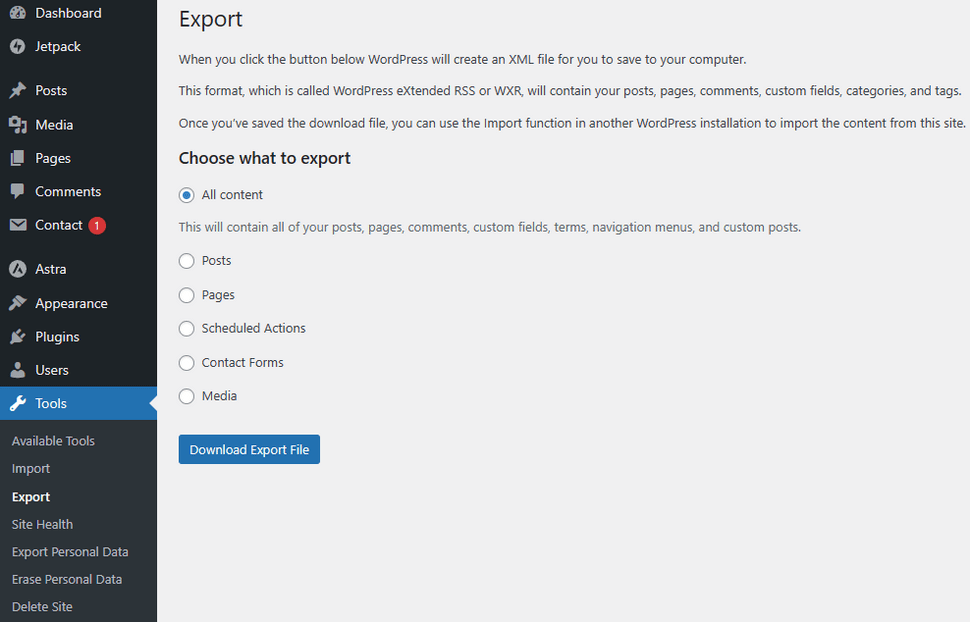
Typically you can export all the data in a single file, but we suggest you split them up if you have a large website. The reason for that is when importing the data, there will be a limit on how big the imported file can be. That limit is dictated by the server your website is hosted on. The post_max_size and upload_max_size values of your PHP version are what determine that limit. If you can increase them, then you can import bigger files. If not, split your exports into categories. In either case, when you have selected what you wish to export, click Download Export File. That will download an .XML file.
That is it for all the work that needs to be done on the Multisite Network side. From here on, all steps will be related to the new website.
- Install WordPress on your new domain. We have guides on how to do that via the Softaculous Apps Manager or the WP Toolkit and how to do it manually. Our services support all three methods, and if you need additional help, don't hesitate to contact us;
- Log into your new WordPress website and install all the plugins and themes the subsite used while it was a part of the Network. You don't need to install all the plugins that the Multisite Network had installed on it, just the ones that particular website used. Additionally, you can delete the default Hello World post and Sample Page that come with WordPress by default;
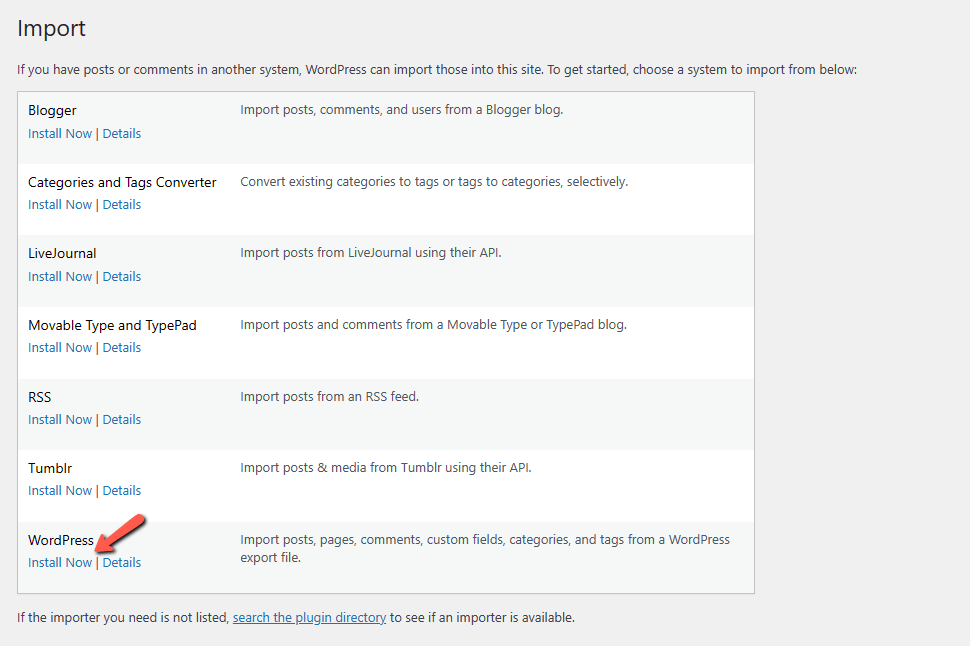
- Time to import the data you got earlier. Go to Tools → Import and install the WordPress importer;
- Run the importer once it is installed and select your file;
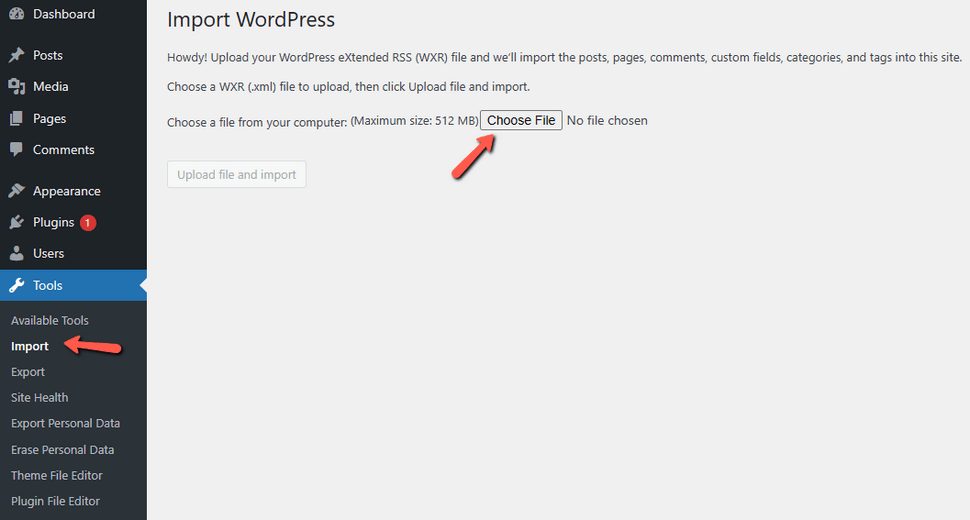
- Click Upload file and import. On the next page, you can choose if you want to create a new user to author the imported items or assign them to the current administrator of the website. Make your choice, then tick the Download and import file attachments and Submit.
And that is it. You have successfully imported all the data from the subsite to your new, separate WordPress website. You will see a message about what was imported, so feel free to continue working on the website from this point forward.
Additional Procedures
We will outline a few more things you can do in this guide section, which should help ensure that everything is transferred completely to the separate website.
Import Users
If you have any users you want to export from the Multisite Network and move them over to the split website, then we suggest you use a plugin for that. WordPress doesn't have a native functionality for that process specifically. We recommend the Import and export users and customers plugin.
It is a straightforward and intuitive plugin to use. The steps are similar to what you did to export your website's data. Install it on your Multisite Network, enable it for the desired website, and go to the Tools section of said website. Go to the Export tab. You can look through the filter options or export everything. Once you have the .CSV file, go to your separate website, where you have installed the plugin as well, and import your users from the file via the Import tab.
Set Up Redirections
Something else you might want to do is set up a redirect. That way, users who visit the old website, which is still under the Multisite Network, will instead be redirected to the split website. There are a couple of ways to do this:
- If your hosting has an in-built tool to create redirects, you can use that. Our services utilize cPanel, which does have a Redirect tool, and we have a tutorial about it;
- Alternatively, you can use the Redirection plugin to set up the redirect for you. You will have to install and activate it on the Multisite Network and enable it on the subsite as well. Once that is done, it will appear in the Tools menu.
- If your Multisite Network is using a subdomain structure, then click on the Site tab and enter the domain or URL of the new website you want to redirect to;
- If the Network uses a subfolder structure, click on Add New on the plugin's main page. Enter the Source URL of the website and then Target URL. There are a few other options you can check out if you want, but those two are the main ones. Click on Add Redirect when you are done, and that's it!
Post-Migration Checklist
Finally, spend some time checking if everything has been imported successfully. Make sure you look at each separate element that should have been imported to save yourself any possible headaches down the road. Here is an example list of what you can take a look at:
- Posts, custom post types, and pages;
- Media attachments;
- Plugins;
- Themes;
- Comments;
- Settings;
- Folders and files;
- WordPress Database.
Conclusion
In the past, splitting a website from a Multisite Network would have involved database editing, manually moving files around, and a lot more effort. Nowadays, it can be done in a couple of hours with WordPress' in-built functionalities.
We hope you find this article useful. Discover more about FastCloud - the top-rated Hosting Solutions for personal and small business websites in four consecutive years by the HostAdvice Community!
Related articles

WordPress Hosting
- Free WordPress Installation
- 24/7 WordPress Support
- Free Domain Transfer
- Hack-free Protection
- Fast SSD Storage
- Free WordPress Transfer
- Free CloudFlare CDN
- Immediate Activation