How to Back Up WordPress to DropBox
Updated on Jun 19, 2023
One of the best ways to ensure the security of your WordPress website is to back it up. If something goes wrong, restoring a recent version of your content, extensions, and settings is often much faster and easier than fixing a broken site - the keyword here is "recent."
If you don't have time to back up your site every day manually, you can automate the process. In this article, we will discuss why regular backups are essential. Then we'll show you how to save a WordPress backup to Dropbox in three steps.
Let's get to work!
This post includes:
Why Backup WordPress Often
Whether you use WordPress or not, you should back up your website regularly. Having backups of your site on hand can help ensure that your data is safe in case of a critical error or security breach.
You can easily restore your site if you have a backup. This failsafe, however, is most useful when the copy you've saved is recent. To that end, making a backup schedule is a good idea. How frequently your site changes determines how often you create a new copy. Large, dynamic sites may require this task to be performed daily or multiple times per day. Smaller static sites may go up to a month without needing to be backed up.
Many hosting companies can perform regular backups for you. Here at FastComet, we offer daily backups with all our services. Nonetheless, if you want to be even safer with your website's data, you can save your backup to an external location, such as Dropbox. This article will discuss how to do that in WordPress, so let's go!
How to Save a WordPress Backup to Dropbox
Automating WordPress backups to Dropbox can save you from doing this important task manually. It can also help you recover your site if it is compromised. Fortunately, you can accomplish this in just three steps.
It's important to note that the steps below assume you already have an active Dropbox account. Setting one up is very easy if you still need to do that.
Choose a WordPress Backup Plugin
A plugin is the most convenient way to automate WordPress backups on your own. Several options are available, but the most popular is UpdraftPlus. It allows you to create backups of your WordPress files and database quickly. It also allows you to schedule backups and is compatible with various cloud storage platforms, including Dropbox.
A few other plugin choices are BlogVault, BackWPup, and BackupBuddy.
The remainder of this tutorial will concentrate on how UpdraftPlus interacts with Dropbox. The process is similar for most plugins and storage platforms, so even if you use a different solution, you should be able to follow along.
Connect UpdraftPlus With Dropbox
After installing and activating UpdraftPlus, you must configure it to work with Dropbox. To begin, navigate to Settings → UpdraftPlus Backups in your dashboard and click the Settings tab.

Scroll down and select Dropbox. You can also select how often the plugin will back up your website and its database on this page. You can also choose how many backups it will keep at all times.
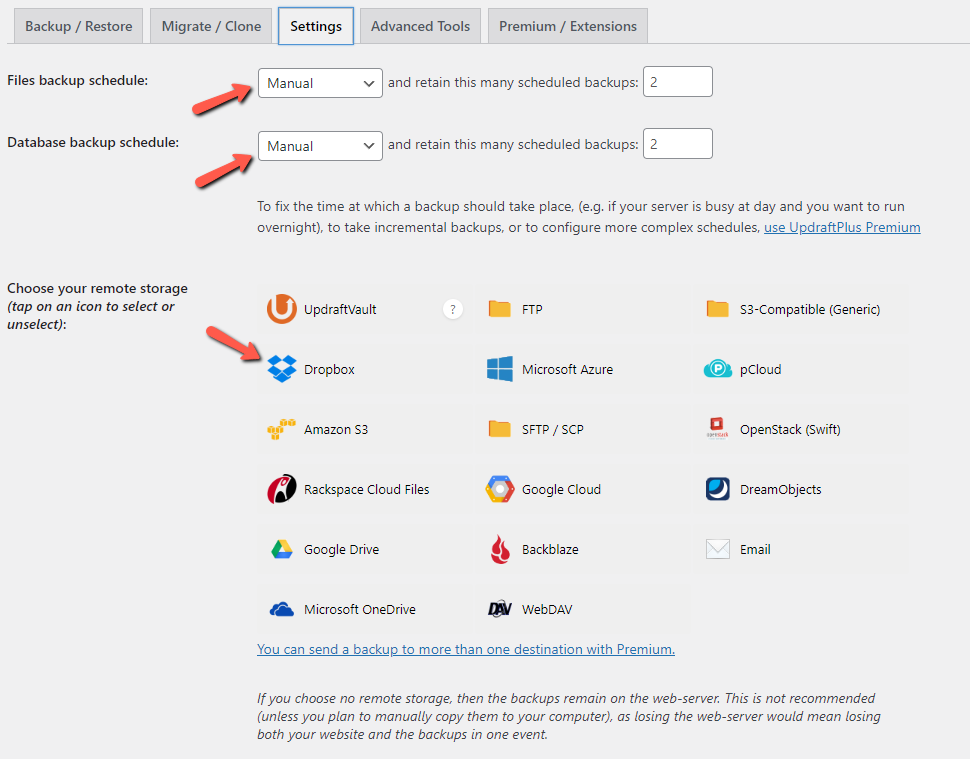
Further down the page, you can select which files to back up. You can also use exclusion rules to exclude specific ones.
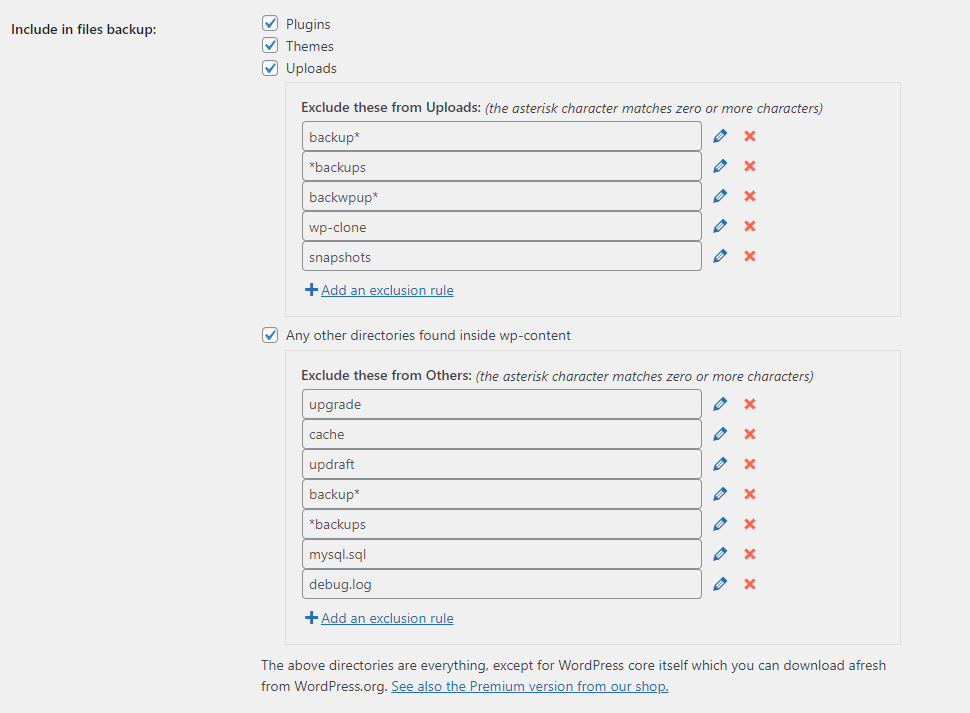
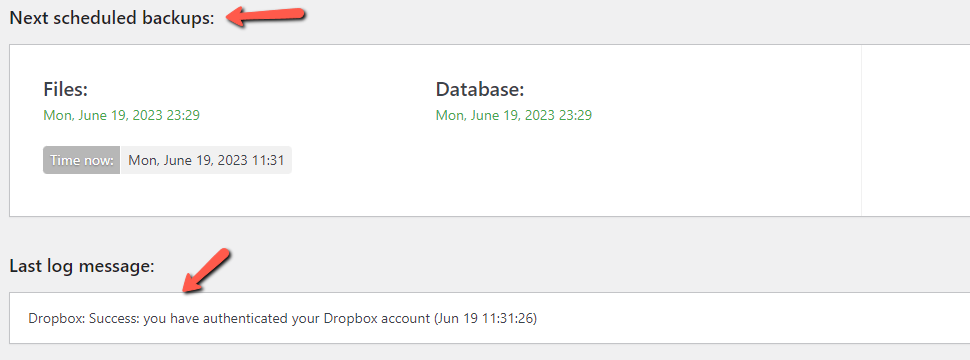
Aside from its own backups, UpdraftPlus will include all files and folders within your WordPress installation by default. Save the changes to your preferences. Then you'll be asked to confirm your Dropbox account, so click on the link in the popup. On the next page, log in to Dropbox, and confirm you want to authorize the plugin to save data to your account. Dropbox will then send you back to WordPress. You should see this success message and when your next backup will occur.
Automate the Backup Process
You can create a complete WordPress backup and save it to Dropbox by going to Settings → UpdraftPlus Backups → Backup/Restore and clicking the Backup Now button. Depending on your website's size, the process may take a few minutes or longer. Once it's done, you'll see your recent copies under Existing Backups. Notice the Dropbox icon, which indicates your backup was stored successfully.

If you click on the Restore button, UpdraftPlus can access the necessary resources without requiring you to leave WordPress. However, you can also view your backups in your Dropbox account.
All that is left is to return to your UpdraftPlus Settings page and automate the process if you didn't do it when choosing Dropbox as your location earlier. Look for the Files backup schedule and set the dropdown to the appropriate interval, then do the same for your database.
If you're concerned about running out of storage due to frequent backups, you can limit the number of copies UpdraftPlus keeps simultaneously. However, remember that it's wise to have a few of your most recent copies handy. Remember to save the changes to your settings when you're done.
Wrapping Up
Automating WordPress backups to Dropbox is a wise decision for the security and longevity of your website. Fortunately, you can do so with little effort if you use a plugin like UpdraftPlus.
As we discussed in this post, there are three steps to backing up your WordPress site to Dropbox:
- Choose a WordPress backup plugin.
- Connect your backup plugin with Dropbox.
- Automate the backup process.
These steps should apply to almost any plugin which provides remote backup functionality.
We hope you find this article useful. Discover more about FastCloud - the top-rated Hosting Solutions for personal and small business websites in four consecutive years by the HostAdvice Community!

WordPress Hosting
- Free WordPress Installation
- 24/7 WordPress Support
- Free Domain Transfer
- Hack-free Protection
- Fast SSD Storage
- Free WordPress Transfer
- Free CloudFlare CDN
- Immediate Activation