How to Safely Migrate WordPress to a New Host or Server (3 Methods)
Updated on Dec 15, 2025
In this tutorial, we will show you how to migrate a WordPress website to a new host safely. In general, the task is easy and if you have been using WordPress for a while, you should have no problem performing it correctly. There are three main methods to do that – with the Duplicator plugin, manually via FTP, and by using the WordPress Command Line (WP-CLI).
Our goal with this guide is to help you avoid every possible mishap while easily moving your WordPress website from one web host to another.
Keep in mind that the guide is not entirely beginner-friendly. It’s for users that prefer to do things on their own (do-it-yourself style). If you don’t have the time for that, you can always request it from our technical support team via a support ticket. We will gladly move your WordPress site to the FastComet servers.
Now, let’s have a look at what we will cover:
Back up is Essential
The first step you take with projects of this type should always be backing up your site completely. It’s not only good practice, but also a required one before any major changes, and moving an entire WordPress site counts as such.
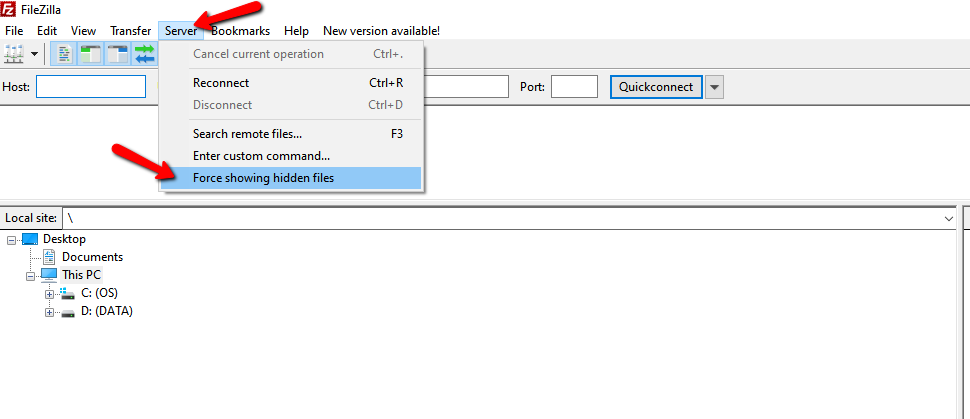
While there are more than enough plugins to help you by backing up the whole website for you, for this post, we will cover the manual method. We will use an FTP client like FileZilla. Connect to your current web host and copy all files (including the hidden .htaccess file) in your website directory to your local computer.
To see hidden files in FileZilla, on the top menu bar, go to Server → Force Showing Hidden Files:
Depending on the size of your site, the backing up process may vary.
Choose your New Hosting Provider
There are multiple reasons to decide to move your WordPress site to a new hosting provider:
- For improved page loading speed;
- Extra features that will benefit you;
- Improved uptime;
- Better customer support;
- More affordable plans.
After you have purchased a hosting package with your new web host, don’t rush into installing WordPress. You are going to do that, of course, but a bit later on.
FastComet Managed WordPress Hosting Service Offers:
- Free Domain Transfer;
- SSD Only-Cloud;
- Free Cloudflare CDN;
- Powered by cPanel;
- Daily and Weekly Backups;
- Free 24/7 Priority Support;
- Free Managed Migrations;
- Money-Back Guarantee.
Keep in mind that our migration experts provide fast managed transfers on all plans, including moving of all your files, databases and emails. If you wish to become a FastComet client (or you already are) and transfer your WordPress site to our servers—feel free to submit a support ticket.
Also, if your previous host was cPanel based, you can migrate your cPanel account with FastComet with no data losses and zero downtime.
Migrate WordPress via the Duplicator Plugin (Beginner)
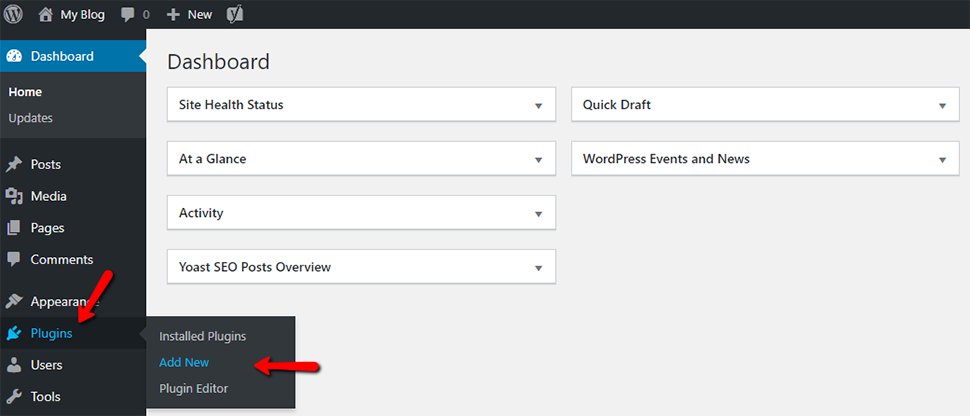
There are various excellent WordPress plugins for migration, all of which would take care of each necessary step of the moving process, ensuring that your website gets migrated swiftly. For this guide, we will be using the Duplicator plugin. We start by adding and activating Duplicator on the WordPress site that needs moving.
Add the plugin from your WordPress Dashboard, navigate to Plugins → Add New:
Duplicator is one of the top plugins for moving a WordPress site, and it’s also free to use. You can use the plugin for moving your WordPress website to another domain name, too. However, this post will teach you how to use Duplicator for your WordPress site migration from one web host to another without any downtime.
1. Setup Duplicator for Easy Migration
Once you’ve installed and activated the plugin:
- Go to Duplicator → Packages in your WordPress Dashboard;
- Click the button Create New, which is in the top right corner:
- Click Next and follow the steps to create the package:
- Be sure that all the scan results are saying “Good,” and follow that by clicking on Build:
- Leave the browser open while the plugin is working, since it could take several minutes;
- You will be able to see the download options for both the Installer and the Archive packages after the process is complete;
- Click on the link One-click download to download the files: The archive is a copy of your complete WordPress site, while the installer will automate your installation process.
2. Import the WordPress Website to Your New Hosting Server
After you have downloaded both the installer and archive files, the following step is uploading those files to your new web host. You need to connect to your new hosting provider via an FTP client like FileZilla, or by using the cPanel File Manager.
Typically, you’d be entering your site’s domain name as a host when using an FTP client.
In this case, though, your domain name is not yet pointing to your new web host, so you need to connect to the FTP client by entering your new server’s IP address hostname. This information can be found from the cPanel dashboard of your new web host:

While in the FTP client, upload both the archive .zip and the installer.php files into your site’s root directory.
Typically, the directory that you are looking for should be the /username/public_html/ folder. It stores all HTML files and other web content, therefore each of your site pages loads from the public_html directory.
You do that if the site you are moving will be the primary site for the domain. If not, you will need to set up an addon slot and upload the files on the addon domain folder.
Some web hosts preinstall WordPress as a part of their services. If you have this type of WordPress installment, check to see if it’s active. Once you find out it’s not, you can delete it before you continue.
Now upload both the archive and the installer files to the root directory of your site.
3. Change The Hosts File to Prevent Downtime
Once you have uploaded both these files to your new host, go ahead and access the installer.php file in any browser.
Normally, you can access the installer file using a URL like:
http://www.example.com/installer.php
However, if you try this URL, it will take you to your old host, resulting in a 404 error. That happens because your domain name still points to your old web host.
If you change your domain nameservers and point it to the new hosting provider, your visitors are going to see a broken site during its migration. Since we promised no downtime, we will show you how to access your new website temporarily on your computer.
You do this with a hosts file on your computer. This hosts file is to map domain names to particular IP addresses. Simply said, the file helps you trick your computer that the WordPress site is moved, even when it’s not.
Use Hosts File for No Downtime
Next, we will go over how you can use the ‘hosts’ file to include an entry for your domain name, making it point to your new web host.
Such changes are going to allow you access to the files on your new web host using your domain name, while all users will still access your site from your old host. This guarantees 0% downtime.
Now, the first thing to do is finding the IP address of your new hosting server. To do this, log into your cPanel dashboard, and then click on the link that says ‘expand stats’ in your left-hand sidebar. When using shared hosting, the address of your server will be listed as Shared IP Address.
Next, Windows users have to go to Programs → All Programs → Accessories, right-click on Notepad and select the option Run as Administrator:
A Windows UAC prompt will appear, where you need to click on Yes to launch Notepad with administrator privileges:
On the Notepad screen, go to File → Open and then navigate to C:\Windows\System32\drivers\etc. From thеre, select the hosts file and open it (via Notepad).
When using Mac, you need to open the Terminal app. To edit the hosts file there, enter the following command:
sudo nano /private/etc/hosts
For both Windows and Mac users, you have to enter the IP address (the one you have copied from the cPanel), and then enter your domain name:
192.168.1.22 www.example.com
Make sure that you replace the IP address with the one you have copied from cPanel and example.com with your own domain name.
Once you have finished, don’t forget to save all the changes:
- For Windows users - just use the Notepad and save when closing;
- For Mac users (NANO) - you save (write out) the file with ^O (CTRL + O). Then you will be asked for confirmation, for which you need to hit Y (for YES), and then press enter.
Now you can use your domain name on your computer to access your files on the new web host.
Note:
Do not forget that after you finalize the migration, you need to undo all the changes you have just made.
4. Create a MariaDB Database on Your New Host
Before running the installer on the new host, you have to create a MariaDB database on the new hosting account. If you’ve already created a MariaDB database, then you can skip this step and jump to the next one.
Creating a Database in cPanel
- Go to the cPanel Dashboard on your new hosting account and scroll down to find the Databases section. Click on Database Wizard;
- You will be presented with a field to create a new database. Use the field to enter the name of your database, and then click on ‘Next Step’;
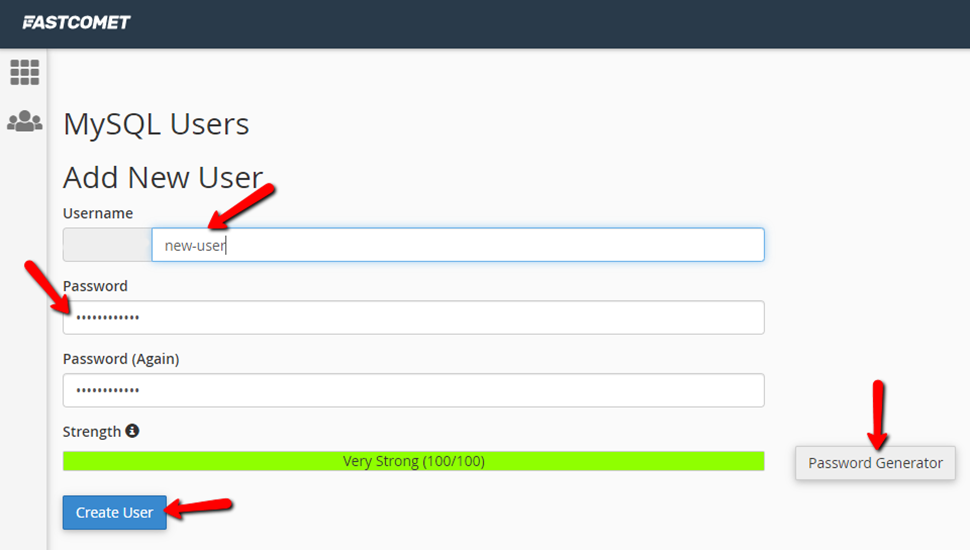
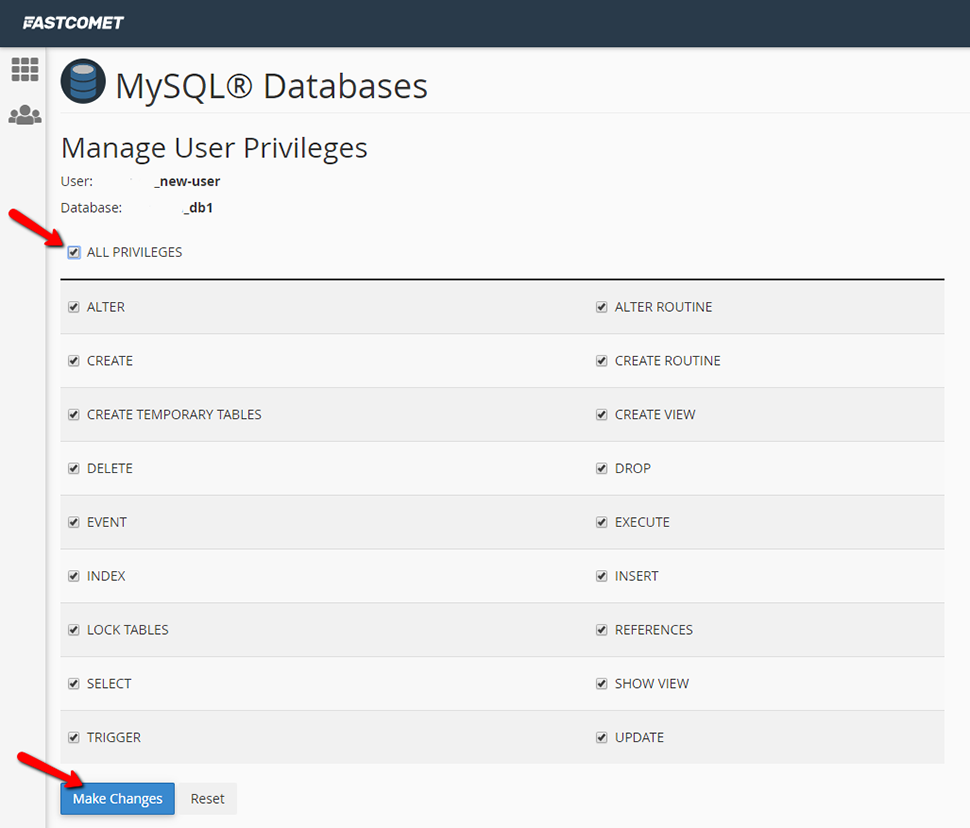
- In the next screen, create a database user by entering a username and password, then click Create User.;
- After the user is created, you will be asked to assign privileges to the user for the database. Select All Privileges to ensure the user has full access, and then click Next Step.;
- Once completed, you will see a confirmation message indicating that the database and user have been successfully created and linked.
Your database is ready to be used with WordPress now. Make sure that you create a note of the database name, username, and password. The next step will require that information.
5. Begin the Duplicator Migration Process
We are now ready to run the installer:
- Go to the following address in your browser:
http://www.example.com/installer.php
Of course, you will need to replace example.com with the name of your website;
- The installer will then run some tests and then show you Pass next to archive and validation tests;
- You have to check the Terms & Conditions checkbox to continue via the Next button;
- Now, you are going to be asked to enter your MariaDB credentials (host, database name, username, and password). Your host will most likely be localhost. After that, enter the details of the database you created in the previous step;
- Click on the Test Database button to be sure that you have entered the correct information;
- If the Duplicator plugin connects, you should see a string that starts with Pass. Otherwise, you are going to see the database connection error details;
- Click Next to continue;
- Duplicator will import your WordPress database from the archive zip into your new database;
- You will be asked to update the site URL or Path. Since you are not changing domain names, you don’t have to make any changes here;
- Click Next to continue;
- Duplicator will run the final steps and show you the Login button.
Now you can go ahead and log into your WordPress site on the new host and make sure everything is working correctly.
Migrate WordPress via FTP (Intermediate)
1. Export The WordPress Database
You can start exporting your database while the backup via FTP is in process. Exporting your database is quite simple and requires only a few steps:
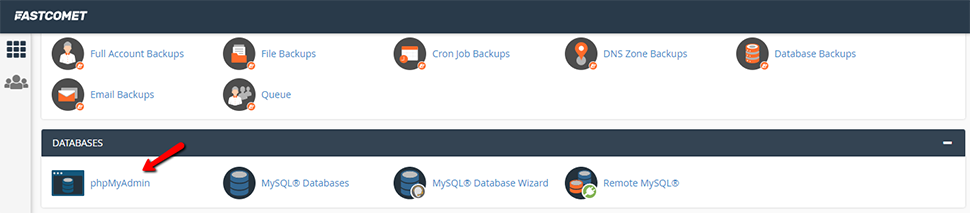
- Login to your cPanel account with the current web host:
- Open the phpMyAdmin application:
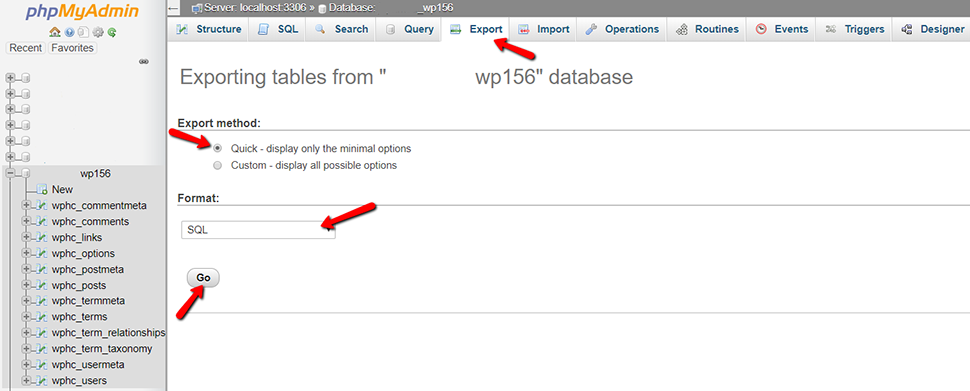
- Select the database with your WordPress installation;
- Click Export on the tab from the navigation menu;
In that case, the default settings (Quick export and SQL format) will suffice for our goal.
- Click Go to start the database export process. The file will then be downloaded on your computer (the folder depends on your browser download settings):
Once both the database export and the FTP transfer of your files have completed, you will be ready to proceed to the next stage.
2. Create The WordPress Database On Your New Hosting Server
Before starting with the migration to your new host, you have to create the environment for your WordPress installation. For that, you will need a database into which to import your SQL data.
Login to the new web host using the credentials they provided for you upon sign up. Once you’re in, connect to the cPanel software. Since FastComet works with the MariaDB Database application, we will be using it for this guide.
There are a few easy steps to create a new database, which are:
- Open the MariaDB Database to create a new database with a proper name for your website;
- Create a new MariaDb user, using a secure password:
- Add the new user account you have just created to the new database, granting it All Privileges:
Don’t forget to write down your database name and the new MariaDB username and password because you will need them quite soon.
3. Upload All WordPress Files To The New Host
You can begin uploading your website’s files to the new host:
- Connect to the new web host by using your FTP client once again;
- Browse to the folder where your site is about to be held. If this is the primary or only website that you are installing on the server, then the public_html is the typical directory to choose for uploading your files.
Do not delete the backup from your local machine even after the upload finishes. Those files are still needed until the whole migration process is completed.
4. Edit the wp-config.php file
Browse your WordPress site’s folder on the new web host and find the wp-config.php file. This file controls the access between WordPress and your database. Since you already made a copy of the file on your computer, which is in case something goes wrong, you don't need to create another.
Now, you need to open the wp-config.php file and make the following changes:
4.1. Change The Database Name
Locate the line:
define('DB_NAME', 'db_name');
The db_name portion of this line will currently be set to the database name of your previous web host. Change this to the name of the new database that you’ve just created.
4.2. Change the Database Username
Below the line with the database name, you will find:
define('DB_USER', 'db_user');
Here you need to change the db_user part from the username of your previous host and make it match the new username you’ve just created.
4.3. Change the User Password
What’s left is editing the third line:
define('DB_PASSWORD', 'db_pass');
Again, as with the other lines, change the db_pass part of this line, using your new secure password for your MariaDB user.
That’s it! Save the wp-config.php file and close it.
5. Import Your Database
Since you have a new database, you can begin with the importing process:
- Launch phpMyAdmin from your cPanel on the new server;
- Select your new database from the list and open it;
- Select the Import tab from the navigation menu;
- There is a File to Import section. Click on the Choose File button and select SQL file that you previously exported;
- Remove the tick from the Partial import checkbox, while also making sure that the format is set to SQL;
- Click the Go button.
Keep note: There is a chance that your internet connection times out if the database that you are importing is too large. In that case, the import can be done via SSH and you should best contact your new web host’s technical support team.
That’s all. The database upload will now begin. The time the import takes is based on the size of your database. You should get a message once the process is complete.
6. Define New Domain & Search/Replace Old Domain
If you are moving your WordPress site to a different domain, you should read what this step contains. Otherwise, you can skip it, because you don’t need to update your website, making it point to a different domain.
A common issue when moving a site is that there are links to posts on it or images that point directly to a URL on the previous server. Those links will break if the WordPress site is moved to a new domain.
If you want a swift search for all instances where your old domain name is included and replace it with the new one, we suggest using the Search Replace DB script on GitHub. It has everything explained and allows you to do what you need quickly.
However, for security reasons, make sure that you delete this script when the job is done. Also, do not place the script in your root domain, but rather create a temporary folder for it.
Migrate WordPress via the WordPress Command Line (Advanced)
1. What is WordPress Command Line?
WP-CLI, similarly to SSH, is a command line interface. The main difference is that WP-CLI is specific only to WordPress. This tool is simple yet powerful because it allows the user to operate WordPress in the same manner as with the frontend. Many WordPress developers prefer using the WP-CLI, precisely because of its flexibility.
WP-CLI can be used for:
- Transferring WordPress sites (our case);
- Installing plugins;
- Managing entire multisite networks;
- Accessing databases;
- Upgrading core files.
While all of the above can be done via the web interface, it is still a preferred way of performing tasks without distractions.
2. Installing WP-CLI
To make sure that WP-CLI is installed, open your SSH (FastComet has a custom SSH port - 17177) and type the following command:
wp --info
When you do not have WP-CLI installed, the following error is going to appear:
-bash: wp: command not found
That can be fixed by installing the WP-CLI. Run the following command in the SSH terminal of your old server. cd back to the opt folder by going all the way to the root location. Just keep run the ‘cd /’ to get there.
Install WP-CLI with the following command:
curl -O https://raw.githubusercontent.com/wp-cli/builds/gh-pages/phar/wp-cli.phar
This should install the WP-CLI. Next, confirm this typing the wp –info command.
After that, change the file’s permissions to make it executable:
chmod +x wp-cli.phar
sudo mv wp-cli.phar /usr/local/bin/wp
Then, go back to the main WordPress folder and run the following command to see the version of the WordPress installation:
wp core version --allow-root
All good now! Let’s go ahead and take the backup of our WordPress site using WP-CLI.
3. Back up WordPress Files Using WP-CLI
Creating a backup using WP-CLI is quite similar to the SSH-based process:
- Go to the www folder and then create a zip file of your WordPress site by executing the following command:
zip -r wordpress.zip wordpress
- Then, move the zipped folder inside your WordPress site folder. Use the command:
mv wordpress.zip
- Keep in mind that wordpress is a placeholder name for the name of your WordPress site.
- Now, go to the WordPress folder by running the cd command, and you will find the wordpress.zip folder.
4. Take the Database Backup
The database can be backed up easily:
- To create the .sql file for your WordPress MariaDB database, run this command:
mysql -u ewscfaavrd -p ewscfaavrd < site.bak.sql
This is to create the backup file that can be exported easily to the FastComet server using the Terminal.
The command line for exporting the database is:
wp db export
5. Import WordPress Files to FastComet
- Log into your cPanel with FastComet and launch the terminal:

- Navigate to the new WordPress site and inside the public_html folder, type the following command:
wget http://[serverIP]/wordpress.zip
This command will fetch the zipped folder from your old server through a URL.
Note:
There is a slight chance that the wget command does not work. If that happens, you can use the cPanel File Manager and upload the file.
- Once the transfer has finished, unzip the content of the folder via the following command:
unzip wordpress.zip
- You can move all the content back to the parent directory (public_html) by running the following command:
mv * ../
There you go! I have successfully fetched the zipped folder and moved the WordPress site to the new host.
6. Search and Replace URLs (When Moving a Site to a Different Domain)
We have covered this subject once, so the rule applies here as well—if you are not moving your WordPress site to a different domain, you can skip reading this current step.
If you are migrating to a new/different domain, you will need to replace the URLs pointed to your old domain through a simple process.
In the Terminal, run the following command:
wp search-replace "http://old-url.com" "https://new-url.com"
Of course, ‘old-url’ stands for your old domain name, and ‘new-url’ stands for the one that you’re moving your website to.
This command will search for all the URLs with your old domain name and then replace them with the new URL provided that you provide.
Test the WordPress Site
If you followed our guide without stumbling upon any difficulties, you should be able to access your migrated WordPress website without issues.
Keep note:
There is always a chance that the migration does not complete properly. In such cases, don’t hesitate to contact the FastComet technical support. You can do that by opening a support ticket.
If everything feels okay after testing, you can go ahead and clean up by deleting all the backups that you had to create. Of course, this is optional, and we actually recommend that you keep the backup, especially if you have plenty of space on your local computer. You cannot be too careful.
Finalize the Whole Process by Changing your DNS
In fact, there are two things to do here.
Before being able to use your site on the new host, you will have to reconfigure your domain’s DNS settings. Currently, they are set to point to your previous host. What you have to do is point the correct records to the new server IP address.
The process is dependent on where you have registered your domain. Your domain registrar should have all the details you need to make the change.
DNS changes could take up to 48 hours to fully propagate, thus you should do this when you expect lower traffic levels. During the 48-hour window, it’s best to avoid making changes to your WordPress website as you could be changing the old version of your site.
After the expiration of those 48 hours, you should be accessing the new web host when going to your website. This is when you can connect back to your old host and delete the files and database.
Conclusion
As you can see for yourself, when explained thoroughly, moving your WordPress site to a new host is not that complicated. Choose one of the three methods we have covered—follow the steps and everything should be just fine.
The success of the whole process comes down to just being careful when executing each step, without skipping them. Even if something goes wrong, you will have the backup to fix it and all will be good. Once again, if you need assistance with moving your WordPress site to the FastComet servers—you can always count on our technical support to help you. Our experts work 24/7 for your convenience.
We hope you find this article useful. Discover more about FastCloud - the top-rated Hosting Solutions for personal and small business websites in four consecutive years by the HostAdvice Community!

WordPress Hosting
- Free WordPress Installation
- 24/7 WordPress Support
- Free Domain Transfer
- Hack-free Protection
- Fast SSD Storage
- Free WordPress Transfer
- Free CloudFlare CDN
- Immediate Activation