How to Properly Move from Squarespace to WordPress
Updated on Jun 14, 2023
People often choose Squarespace because of its ease of use. With the platform, you can easily create a whole new website, pages, and posts and upload different media types, such as images, videos, and audio files. While Squarespace is beginner-friendly, there are limits to its functionality, which may be an issue in the long run.
WordPress, on the other hand, is a much more flexible platform, allowing you to build almost any type of website. In this post, we will guide you on how to move your Squarespace site to self-hosted WordPress effectively.
This post includes:
- Why Move from Squarespace to WordPress
- Can You Migrate Everything From Squarespace to WordPress?
- How to Move From Squarespace to WordPress
- Best WordPress Practices After Site Migration
- Conclusion
Why Move from Squarespace to WordPress
With its drag-and-drop interface, Squarespace makes it easy to create a website. Additionally, there are more than enough templates and customizable features which will help you accomplish a unique look for your website. Squarespace also has an intuitive interface, which makes it stand out from the competition.
However, when you have a growing website, it's bound to need additional features. Features that Squarespace cannot offer. That's when you will have to choose a more comprehensive platform - one like WordPress.
Some of the Squarespace limitations include:
- Limited features - Squarespace does not allow you to add any third-party scripts on your website and thus gradually limits your flexibility;
- Restricted eCommerce features - As your website grows, you can decide to integrate a storefront on your site. Squarespace has a storefront feature, but it's rudimentary, especially when compared to WooCommerce;
- Fewer design choices - As a website owner, you should be able to choose a suitable design for your online project. While Squarespace has a lot of templates, you may be unable to find a suitable one.
With its countless themes and plugins, WordPress will allow you to build almost any website. In addition to customizing your website as you wish, you can extend its functionalities with the correct usage of plugins.
Can You Migrate Everything From Squarespace to WordPress?
Yes, you can! However, not all elements from Squarespace can be migrated to WordPress automatically. There are some things that you need to do manually.
Squarespace lets you easily export your blog content and your regular pages. However, the platform will not allow you to export your:
- Index, product, event, or album pages;
- Some blocks, like audio and product blocks;
- Style changes;
- Additionally, you can't export your actual Squarespace template.
Regarding your blog content and all basic pages, you can use an automated tool to export them from Squarespace and import them to WordPress. You may be missing a few blocks, but most of your content should come through automatically.
For content such as product or event pages, you must manually move them over to WordPress.
As for your template and index page, you will have to choose a WordPress theme that's closest to your Squarespace template. Another option would be using a page builder and mimicking the Squarespace template with its help.
How to Move From Squarespace to WordPress
Before you Start
Doing these few things before migrating from Squarespace to WordPress would be best.
Create a list of your Squarespace URLs
Your URL structure (or permalinks) may change once you move to WordPress. You will optimize your new site entirely, so you want to use short, concise URLs.
If your Squarespace site receives decent traffic, redirecting your old page and posting URLs to their new equivalents may be a good idea.
Go through your site and copy all the URLs for every page and post. Then, paste them as a list in a document. Also, take screenshots of each page or post and put them under each URL in your document. This way, you can easily match up everything once you've created pages and posts on your WordPress site.
If your site on Squarespace received very little traffic, don't even worry about creating a list of your old URLs. Instead, you can focus on growing the traffic to your shiny new WordPress site.
Pick a Web Host
Picking a reliable web host is essential. In fact, your best solution is Managed WordPress hosting, which you can find with FastComet. We are available to help you and answer all your hosting-related questions 24/7.
Register a Domain Name
With FastComet, it's easy to register your new domain name. Make sure you pick a good one because it will be vital to the success of your business. Choosing a domain name that is short and easy to memorize is always a good choice. If you already have a domain name, though, you can use it and transfer it to our services if you would like.
Install WordPress
After signing up with a web host, the next step is to install WordPress. As the most popular CMS in the world, WordPress needs only a couple of minutes to install. With cPanel's Softaculous or WP Toolkit, you can install WordPress with a single click.
Once you have installed the CMS, you can log in to your WordPress Admin dashboard. That will be necessary after you export the content of your Squarespace website.
Export Squarespace Content
To export your content from Squarespace, follow the steps below;
- Open the Squarespace editor. Then, open the Settings area;
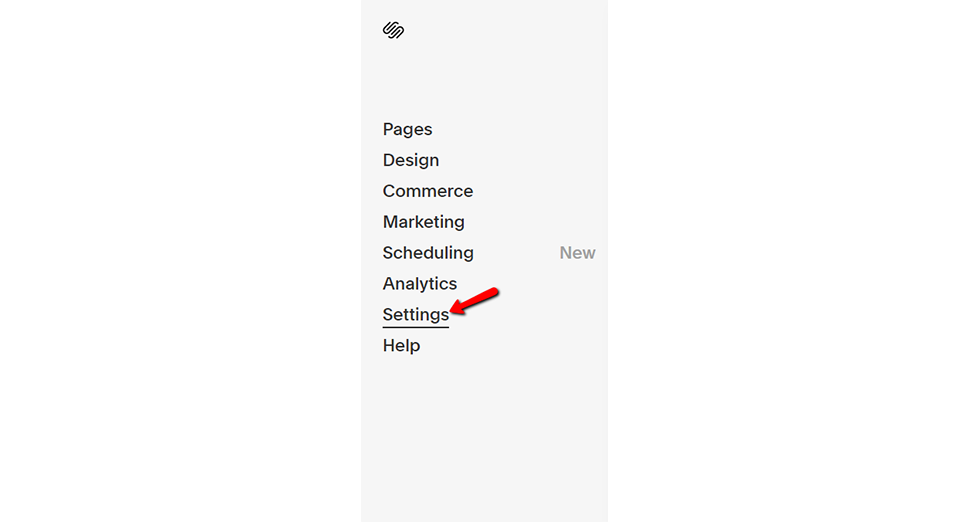
- In the sidebar, navigate to Advanced;
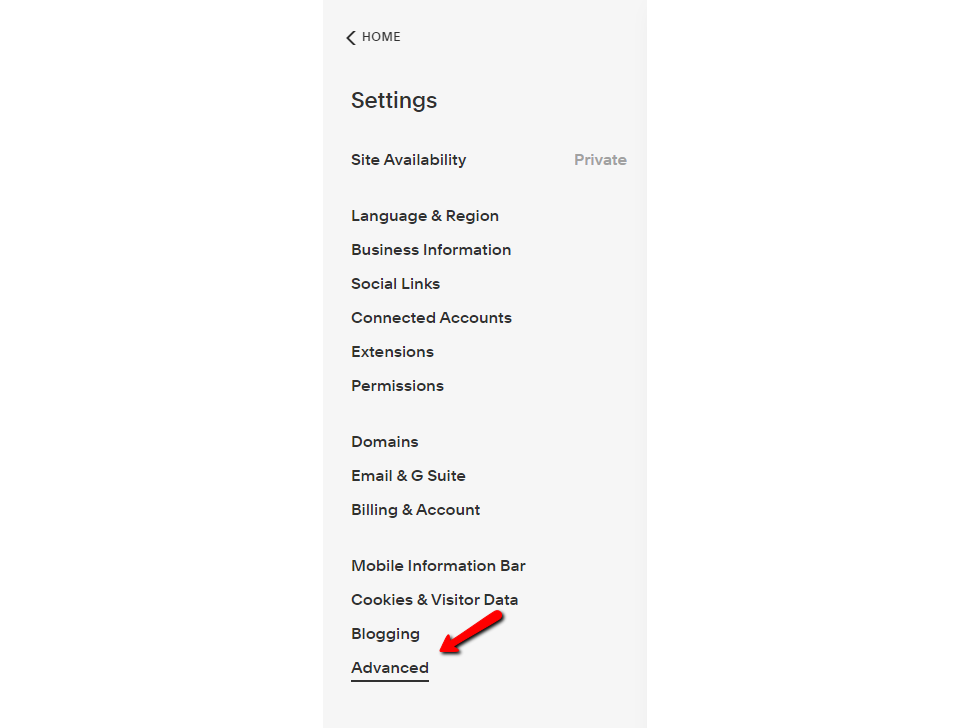
- Click on Import / Export;
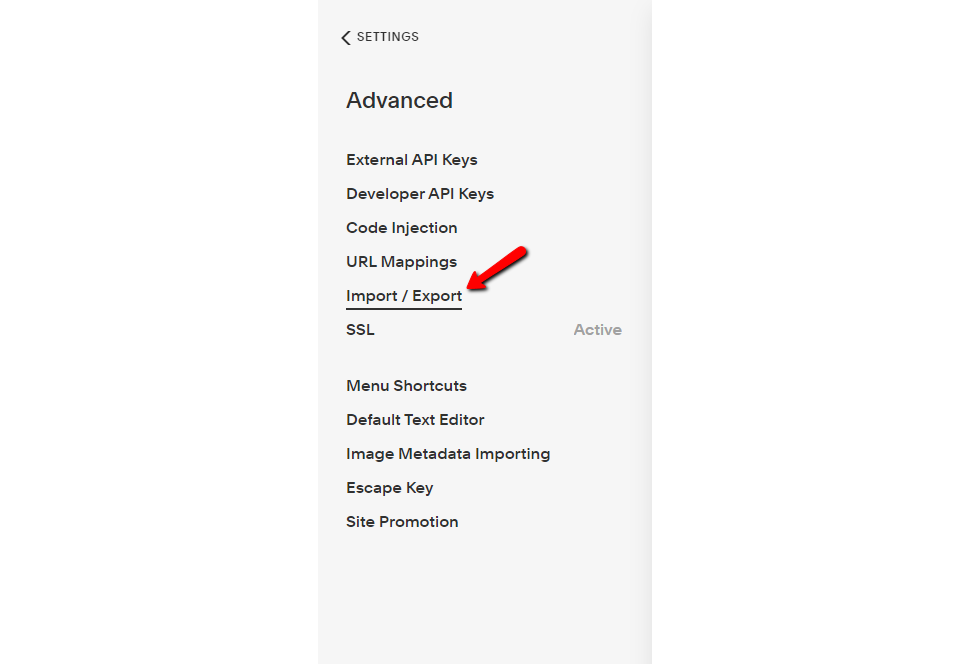
- Click on Export:

- This will open a prompt – select the option for WordPress:

- After a short wait, you should see an option to Download your site's export.
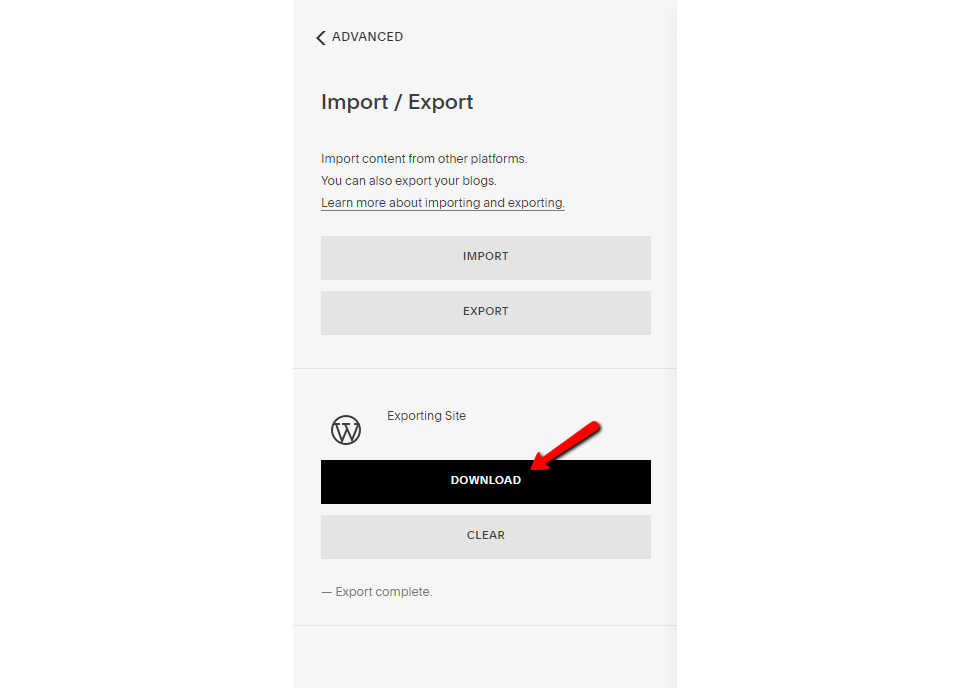
That should download a file named Squarespace-WordPress-Export-DATE.xml. Keep this file handy because you will need it in the following steps.
Change Squarespace Domain to Point to WordPress
If you're using a custom domain at Squarespace and you want to use the same domain name at your WordPress site, you will have to change that domain to point to your WordPress site instead of your Squarespace site.
Remember that doing this means all your visitors will see your as-yet-unfinished WordPress site for now. If you have a busy Squarespace site, it's best to use a WordPress staging site or temporary domain name to get things ready before making the switch. You can ask our technical support for some help on that matter. All you have to do is open a new support ticket.
However, if you don't have a problem with cutting public access to your website, you can immediately make the switch. For that, you will have to change your domain's nameservers to point to your host instead of your Squarespace site.
You can follow their article if you got your domain name through Squarespace. If you got your domain name from a third-party registrar, you must go to them and change the domain's settings.
Import Content From Squarespace into WordPress
Now, you can use that .xml file you downloaded from Squarespace in step one to import your content to WordPress.
- Open your WordPress dashboard and go to Tools → Import. Find the WordPress tool and click Install Now. Squarespace exports your content in a WordPress-compatible format, which is why you can use the regular WordPress importer tool;
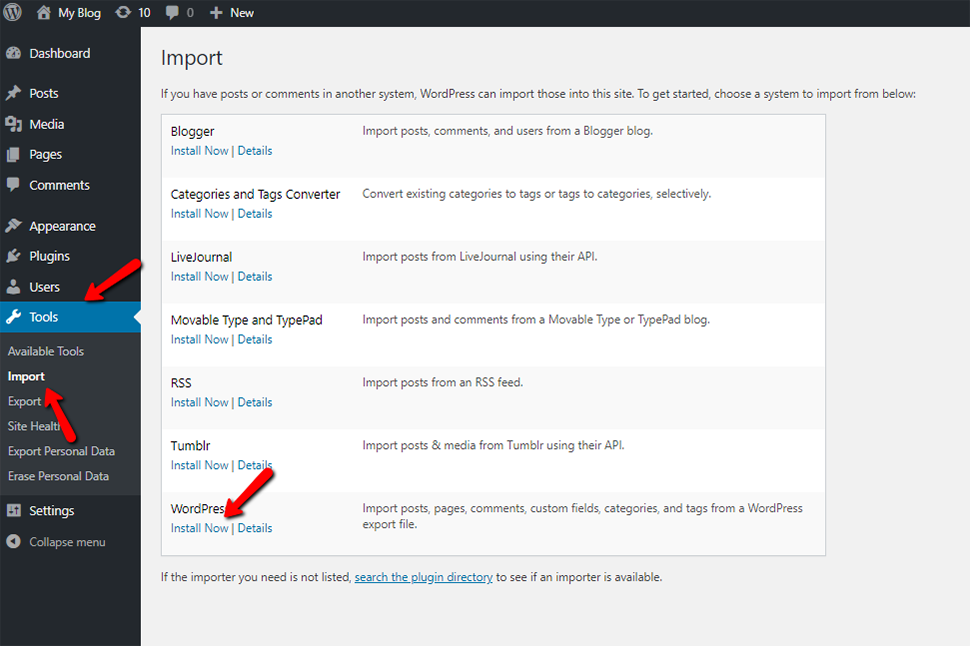
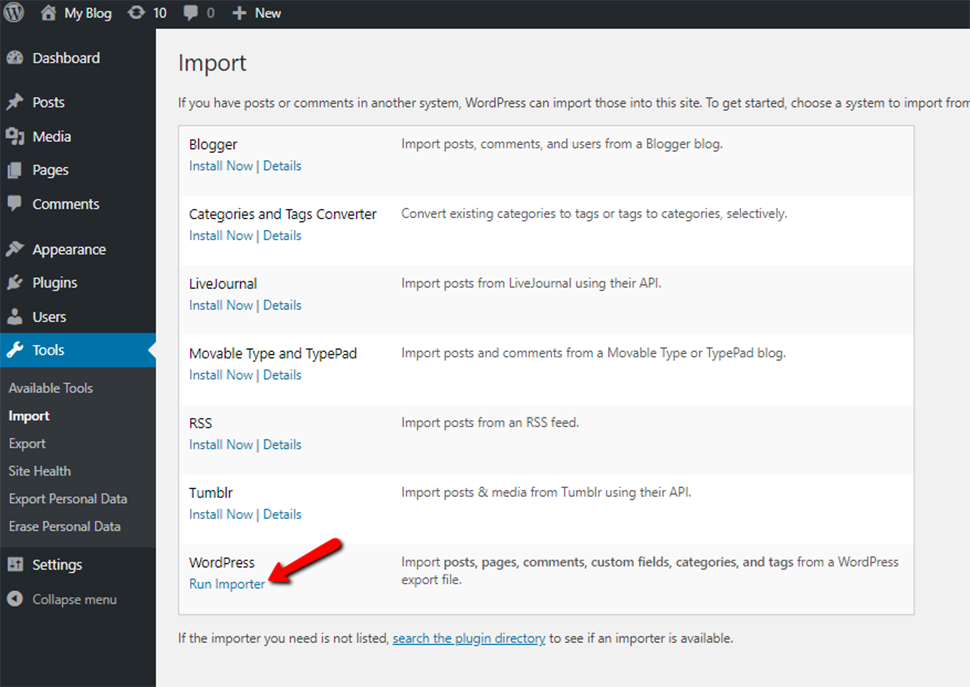
- Once WordPress installs the tool, the link will change to Run Importer. Click that link to start the process;
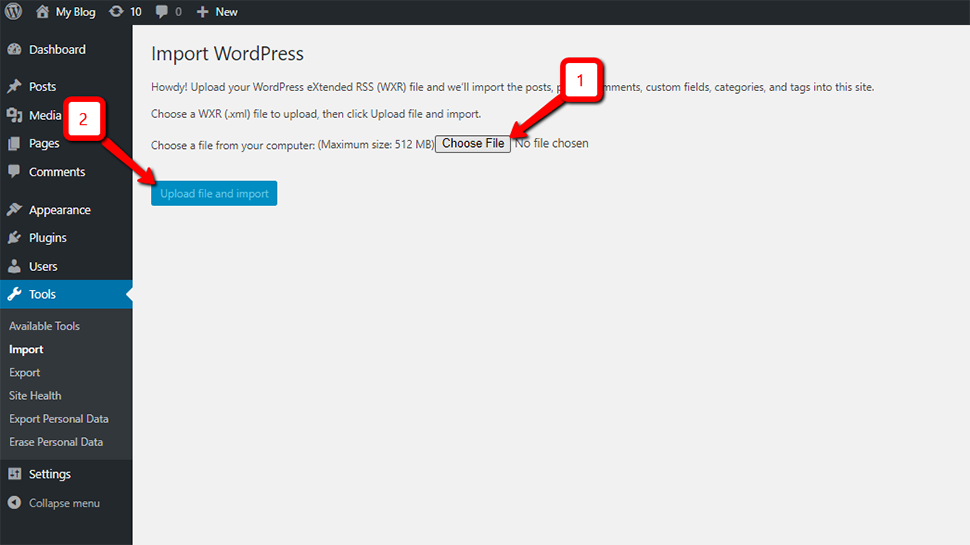
- Use the Choose File button to select the .xml file you downloaded from Squarespace in the first step. Then, choose Upload file and Import;
- Check the box for Download and import file attachments and click Submit;
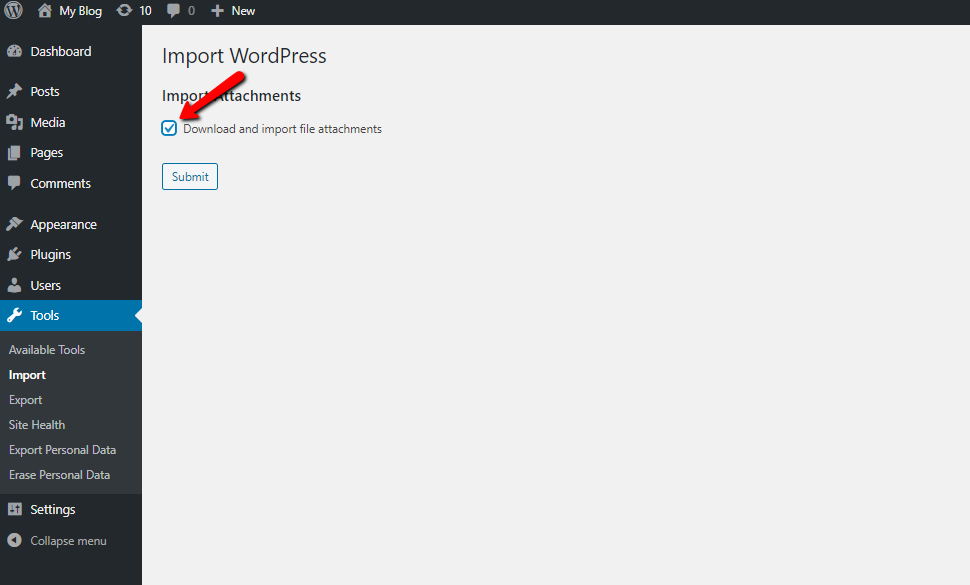
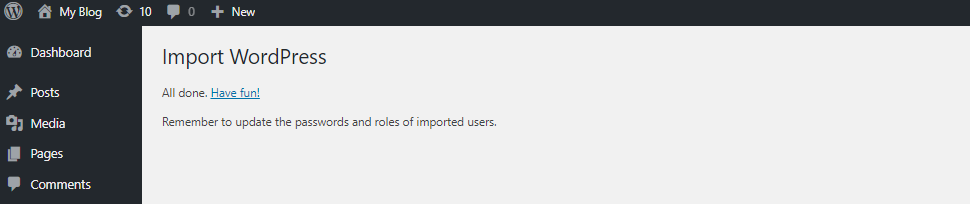
- You should see a success message telling you that the content was imported.
To verify your content was imported, go to your WordPress dashboard's Posts and Pages sections.
While your posts and pages should all transfer over, there's a chance that you might be missing some content from a page. For example, Squarespace doesn't export certain blocks, like audio or video blocks.
If you have any pages that use audio or video blocks, you'll want to manually edit those pages and re-add your audio/video content. WordPress' editor uses a similar block system, so you can add another video or audio block at the right spot.
Import Images from Squarespace
Unfortunately, the WordPress importer cannot import images from a Squarespace website. You will have to import them manually, but there is an easy way to do it via a plugin.
The first thing you need to do is install and activate the Auto Upload Images plugin. Upon activating the plugin, you must edit all posts and pages containing images. When you save a post type, the plugin will trigger the image import process.
Luckily, WordPress allows you to bulk update content, so you can do it with just a few clicks instead of manually doing it one by one:
- Go to Posts → All Posts page and then click on the Screen Options button at the top;
- Increase the number to 999 in the Number of items per page field and click the Apply button. WordPress will reload the page, and this time it will show 999 posts at a time;
- Select all your posts;
- Select Edit under the bulk actions menu;
- Click on the Apply button. WordPress will show you a quick edit box with all the selected posts. You have to click the Update button, and then WordPress will update all your posts.
Remember not to change anything in the box. Just click the Update button. Doing this will trigger the plugin and import external images from your Squarespace website. It will store them in your WordPress media library as well.
Copy and Paste Other Content from Squarespace to WordPress
Unfortunately, as we mentioned earlier, Squarespace will not export your entire content. For example, you could be missing product, event, or album pages. If that is the case, you have to copy and paste everything that was not automatically migrated manually. It's not too hard — you can create new pages in WordPress and copy and paste the content over.
You can use the regular WordPress block editor if your pages are simple enough. However, if you wish for a more visual design experience, you can install the Elementor page builder plugin.
Additionally, if you were selling products at Squarespace, you could use a plugin like WooCommerce to add eCommerce functionality to your WordPress site.
Configure Permalinks
If you want a seamless transition when switching from Squarespace to WordPress, you'll need to create the same URL structure your Squarespace site used. That ensures that any links from other sites will still take people to the right spot on your site.
By default, Squarespace uses the following structure for your blog post URLs: example.com/BLOG-PAGE-NAME/BLOG-POST-TITLE
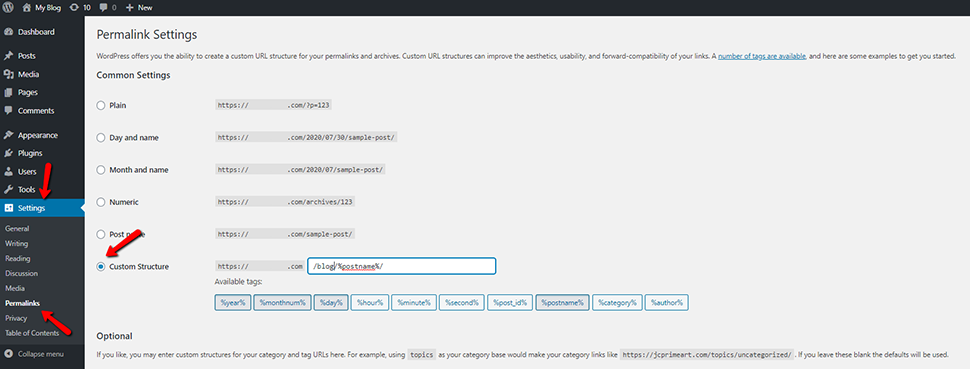
You can use the WordPress permalinks feature to recreate this on your WordPress site. To do that go to Settings → Permalinks. Use the Custom Structure option to create your structure. For example: /blog/%postname%/. That will dynamically insert the post title after blog.
Recreate Squarespace Template on WordPress
At this point, you should have all of your Squarespace content on your WordPress site. However, the design of your website still needs to be fixed. It is entirely different, and you don't have the index page from your Squarespace site.
Unfortunately, there are no ways for you to get the same design as your Squarespace site because all available templates are unique to Squarespace.
That said, there are more than enough WordPress themes to choose from; thus, you can find something similar to your Squarespace template.
Beyond the WordPress theme you choose, you can also use a WP Page Builder plugin to help you design your content.
Explore WordPress
WordPress is a powerful platform with incredible flexibility. There are thousands of professionally designed free and premium WordPress themes that you can use on your site. The real power of WordPress comes from the thousands of plugins you can use. These plugins add more features to your WordPress site.
WordPress is simple and easy to use. However, you may have to look for a WordPress tutorial online. Feel free to check our knowledge base. You can find helpful information about the CMS.
Best WordPress Practices After Site Migration
After transferring your Squarespace site to WordPress, the next thing to do is follow WordPress's best practices and keep your website secure while growing your audience.
We have compiled some examples of good practices for you:
- Add a contact form to your WordPress site by using a plugin like WPForms;
- Add Google Analytics tracking on your WordPress site by installing the MonsterInsights plugin;
- Provide bulletproof security to WordPress by installing some of the best WordPress security plugins, such as Sucuri and WordFence;
- Boost your SEO by using the best WordPress SEO plugins, such as Yoast SEO;
- Schedule a backup of your WordPress website with a WordPress backup plugin like UpdraftPlus;
- Install the Akismet plugin to prevent spamming comments on your site;
- Improve your WordPress performance by installing a WordPress caching plugin, such as W3 Total Cache;
- Grow your visitors and customers using a WordPress lead-generation plugin like Icegram.
Conclusion
Moving a website from one platform to another can be a daunting task. Hopefully, with our guide, we have provided the help you need when migrating from Squarespace to WordPress. The CMS is powerful and flexible and will surely cover all your needs as a website owner.
We hope you find this article useful. Discover more about FastCloud - the top-rated Hosting Solutions for personal and small business websites in four consecutive years by the HostAdvice Community!

WordPress Hosting
- Free WordPress Installation
- 24/7 WordPress Support
- Free Domain Transfer
- Hack-free Protection
- Fast SSD Storage
- Free WordPress Transfer
- Free CloudFlare CDN
- Immediate Activation