How to Speed Up WordPress with Redis Caching
Updated on Dec 17, 2025
Redis and object caching will exponentially speed up your WordPress page load time with every subsequent visit.
In this guide, we will cover how to configure Redis as a cache for WordPress to lessen all redundant and time-consuming database queries that are used for rendering a WordPress page. The result of this will be a WordPress site that is exceptionally faster, uses much fewer database resources, in addition to providing a tunable and persistent cache. Keep in mind that the guide applies to CentOS 6 and cPanel.
What you can find in the post:
How Does Caching Work?
Whenever a web page is cached, the elements of that particular page such as images, stylesheets, and other content, are loaded once, and then stored in what we call a “cache.” The cache memorizes everything that was loaded, creates a static version of it, and then can serve that version much faster the next time the page loads. The result is a much faster page load time and fewer server resources being used.
Every time we access a WordPress page, a query is being executed to the WordPress database to fetch the page’s content. By using Redis caching, the results of this query are stored into the Redis-managed block. Upon additional requests of the same page, the data will be retrieved from the Redis cache, eliminating the need for execution of the SQL query, which could be essential even if we have only a few visitors on our WordPress site. Retrieving the data via Redis directly from the memory can make our page load speed blazing fast.
The solution above is most beneficial for WordPress sites with a large number of simultaneous requests as reducing the number of concurrent queries dramatically improves the performance, provides better utilization to the server, and eliminates the MariaDB bottleneck. This way, the site can handle more traffic without the need for more powerful hardware.
Also, caching with Redis eliminates any need for flushing the cache whenever we publish new content manually. In case we edit a page, or we post new content to our WordPress site, the Redis cache for the posted content would be invalidated to avoid “dirty” cache. The content will be updated after the next page load.
What Exactly is Redis?
Redis is an open source advanced key-value cache store. It can operate as both cache and an in-memory store. Usually, Redis is referred to as a data structure server, and it’s known for having outstanding performance as it works with an in-memory dataset. Although similar results can be witnessed with some other cache software like Memcached, Redis is one of the best choices. It’s not too hard to set up and use. Additionally, we are going to cover how to set up Redis on CentOS 6 server with cPanel, how to set up php-redis, as well as perform the needed configuration settings on our WordPress installation and boost its performance exponentially.
Benefits of Redis
Websites that are highly dynamic and cannot make good use of page caching are a good target for the persistent object caching* option that is Redis. Generally, Redis would not help the load time of static blogs, news websites, and informational business websites, unless those sites use page caching poorly. However, Redis offers a great deal of support for developing efficient caching mechanisms. It takes just a couple of minutes to implement a cache mechanism and get it working with the chosen application. The outcome we get is a high-performing cache system. With it, you can have huge keys and values of objects.
*Object caching - involves storing database queries. When enabled on a WordPress site, it helps in speeding up PHP execution times, reduces the load on the database, in addition to delivering content to the site's visitors faster.
WordPress also has object caching built-in with the WP_Object_Cache class.
While on a WordPress context, we can use Redis to store the values generated by the native object cache of WordPress. We can do that in a persistent manner so that all cached objects would be reused between page loads.
Installing Redis, PHP-Redis, and WordPress
In order to complete the steps below, we would need root access to the server, or a user with sudo privileges. The steps explain the installation and configuration processes on CentOS 6 with cPanel 11.48, but should also work on other cPanel versions.
1. Prerequisites
- Using Linux for deploying is recommended;
- PHP version 7.0 or higher - at FastComet, we support PHP versions 5.6, 7.0, 7.1, 7.2, 7.3, 7.4. Every client can choose one of these PHP versions. All you need to do is go to your cPanel (my.fastcomet.com → cPanel). Once you are there, type PHP in the search bar, and click on MultiPHP Manager:
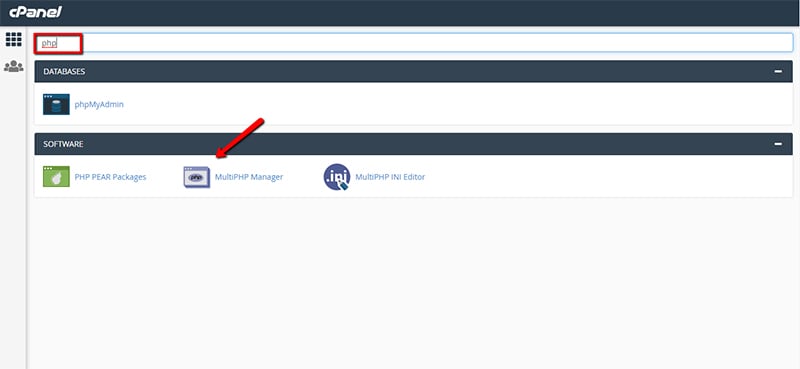
After you click on MultiPHP Manager, you will see a menu where you can find your domain names. Choose the domain on which you want to switch the PHP version. Follow the instruction below: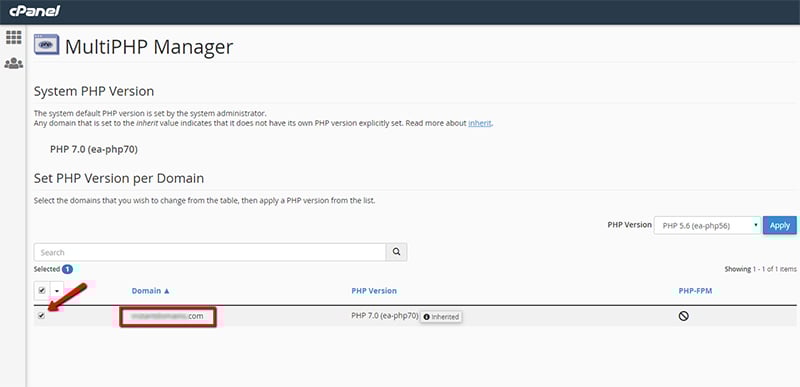
Next, you go to the PHP Version dropdown menu which is still on the same page. That's where you choose your desired PHP version and click on the Apply button after: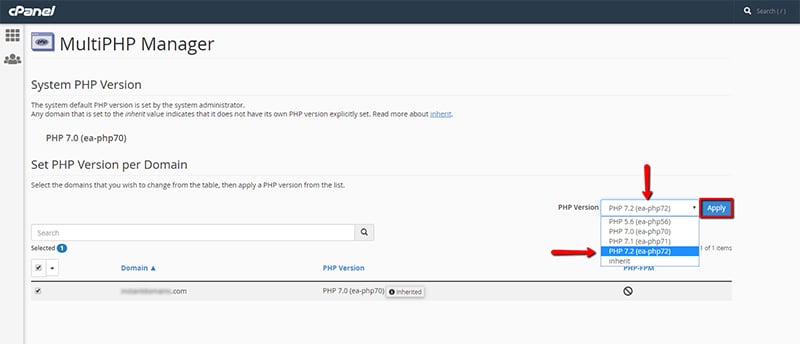
It's highly recommended by WordPress to use one of the most current PHP versions (PHP 7.0+). Keep in mind that the more up-to-date your PHP version is, the better security you have. We have a blog posts about PHP 7.3 and PHP 7.4 - feel free to check those. - CentOS 6 and above;
- Set up a sudo user;
- Install WordPress - we have a guide on How to Install WordPress. It has been tested with these instructions. Go ahead and check it.
Keep in mind that the following installation steps are only for FastComet Cloud VPS and Dedicated CPU Server users.
2. Install Redis
- Access your server via SSH and download the following two
rpms:wget http://dl.fedoraproject.org/pub/epel/6/x86_64/epel-release-6-8.noarch.rpm wget http://rpms.famillecollet.com/enterprise/remi-release-6.rpm
- Run the following commands to complete the Redis installation:
rpm -Uvh remi-release-6*.rpm epel-release-6*.rpm
yum install –y redis
- To make Redis start automatically upon server reboot, we execute the following command:
chkconfig --level 2345 redis on
3. Configure Redis
Open the Redis configuration file:
vi /etc/redis.conf
and add the following two lines at the end of the file:
maxmemory 256mb
maxmemory-policy allkeys-lru
If we want to allow more memory for the Redis cache, we change the maxmemory value to the desired amount.
4. Install PHP-REDIS
After we install Redis, we would need the PHP-REDIS extension. On a cPanel/WHM server, we can easily install PHP-REDIS:
- Input the following command lines, which are to install PHP-REDIS for the respective versions of PHP:
yes | /opt/cpanel/ea-php56/root/usr/bin/pecl install igbinary igbinary-devel redis
yes | /opt/cpanel/ea-php70/root/usr/bin/pecl install igbinary igbinary-devel redis
yes | /opt/cpanel/ea-php71/root/usr/bin/pecl install igbinary igbinary-devel redis
yes | /opt/cpanel/ea-php72/root/usr/bin/pecl install igbinary igbinary-devel redis
yes | /opt/cpanel/ea-php73/root/usr/bin/pecl install igbinary igbinary-devel redis
yes | /opt/cpanel/ea-php74/root/usr/bin/pecl install igbinary igbinary-devel redis
- After the installation of the PHP extension for Redis, we have to restart PHP-FPM, Apache, and Redis:
/scripts/restartsrv_apache_php_fpm
service httpd restart
service redis restart
- You can verify the installation of PHP extension for Redis with the next commands:
/opt/cpanel/ea-php56/root/usr/bin/php -m | grep redis
/opt/cpanel/ea-php70/root/usr/bin/php -m | grep redis
/opt/cpanel/ea-php71/root/usr/bin/php -m | grep redis
/opt/cpanel/ea-php72/root/usr/bin/php -m | grep redis
/opt/cpanel/ea-php73/root/usr/bin/php -m | grep redis
/opt/cpanel/ea-php74/root/usr/bin/php -m | grep redis
- If Redis is installed successfully, you will see the following output only:
redis
5. Configure WordPress Caching
Setting up WordPress to work with Redis requires just a few changes:
- First, we download the object-cache.php.txt file and place it under our WordPress
wp-content/directory. - We rename the file from
object-cache.php.txttoobject-cache.phpand place the file under yourwp-content/directory. We do not need to perform any modifications on the file to make it work, but we may always review the settings. - Next, we have to open our
wp-config.phpfile and add the following lines at the end of the Authentication Unique Keys and Salts. section:define(‘WP_CACHE_KEY_SALT’, ‘example.com’); define(‘WP_CACHE’, true);
- Change the
example.comwith your actual domain name or any randomly generated string.
6. Restart Redis and Apache via SSH
- To complete the setup, restart the Apache and Redis by executing:
/etc/init.d/httpd restart
/etc/init.d/redis restart
Verify the Setup
- To verify Redis is caching the results for our WordPress installation, we run the following command via the shell:
redis-cli monitor
- We should see similar results to:
OK
1428089226.419271 “monitor”
1428089226.419272 “GET” “example.comwp_:options:alloptions”
1428089226.419479 “EXISTS” “example.comwp_:options:notoptions”
1428089226.419548 “GET” “example.comwp_:options:notoptions”
1428089226.419651 “EXISTS” “example.comwp_:options:alloptions”
1428089226.419729 “GET” “example.comwp_:options:alloptions”
1428089226.422514 “EXISTS” “example.comwp_:options:notoptions”
1428089226.422592 “GET” “example.comwp_:options:notoptions”
1428089226.422701 “EXISTS” “example.comwp_:options:alloptions”
1428089226.422770 “GET” “example.comwp_:options:alloptions”
1428089226.427510 “EXISTS” “example.comwp_:options:notoptions”
To exit - press CTRL-C. - In case we would like to flush the Redis cache execute manually:
redis-cli flushall
Boost your WordPress Site
After you've learned how to install Redis, you are ready to boost the performance of your site with Redis and the FastComet Scalable Cloud VPS Hosting with ultra-fast SSDs. All FastComet WordPress Hosting plans are fully managed with 24/7 Technical Support so you can consult with our experts on how to improve your WordPress performance and get started with Redis. Still, in case there is something that you need help with, always feel free to open a support ticket.
We hope you find this article useful. Discover more about FastCloud - the top-rated Hosting Solutions for personal and small business websites in four consecutive years by the HostAdvice Community!

WordPress Hosting
- Free WordPress Installation
- 24/7 WordPress Support
- Free Domain Transfer
- Hack-free Protection
- Fast SSD Storage
- Free WordPress Transfer
- Free CloudFlare CDN
- Immediate Activation