How to Put Your WordPress Site in Maintenance Mode
Updated on May 25, 2023
In case you wish to make a more significant update on your WordPress site, you might have to put it into maintenance mode. This mode is essentially a state where a website is not available for a specific period.
You might be asking, “What is this maintenance mode, and how do I use it?” We are stepping up with some help. In this post, we will cover everything in regards to the maintenance mode in WordPress. Additionally, we will show you how to edit the default message about the maintenance mode and make it appealing to visitors.
What you will find in this guide:
- What Exactly is WordPress Maintenance Mode?
- When Should I Set the Maintenance Mode?
- What are the Side Effects of WordPress Maintenance Mode to the Site Visitors?
- Methods to Put WordPress into Maintenance Mode
- Method 1: WordPress Maintenance Function
- Method 2: Usе a Code Snippet
- Method 3: Using the .htaccess File
- Method 4: Using a WordPress Plugin
- How to get a WordPress Site out of Maintenance Mode
- How to Prevent your Site from Getting stuck in WordPress Maintenance Mode
- Final Thoughts
What Exactly is WordPress Maintenance Mode?
Let’s start with the basics. The maintenance mode in WordPress is an applied status that is to inform our site visitors about the current maintenance state of our website. Basically, it’s a page or a message that works as a substitute for the actual WordPress site. On that particular page, we may also add an estimation of when the site will be available again.
During the maintenance process, WordPress is going to use the wp_maintenance function, meanwhile creating a .maintenance file with the maintenance message inside. After the procedure is done, WordPress automatically deletes the .maintenance file. Then, the site should be working as usual.
When Should I Set the Maintenance Mode?
First and foremost - we do not have to enable the maintenance mode each time we have to perform changes to our WordPress site. Such small changes include updating pieces of content, fixing minor bugs, or playing around with the color schemes.
With that in mind, as the website grows bigger, it is natural that the changes also become larger, and thus the need for more time to make them. You might have to set maintenance mode when:
- Changing the theme of a WordPress site;
- Major Redesign;
- Adding features;
- Setting up additional services;
- Fixing important security bugs;
- Fixing customer data-related site issues.
All those would generally take an extensive period of time, which would prevent your visitors from viewing the site as intended.
The third reason for using WordPress maintenance mode relates to new websites rather than existing ones. It’s a ‘coming soon’ page, and it helps you build up some hype for your yet-to-launch site.
What are the Side Effects of WordPress Maintenance Mode to the Site Visitors?
WordPress would create a splash page, informing visitors about the maintenance. Keep in mind that this default page is nothing more than a plain white page that has 'Briefly unavailable for scheduled maintenance. Check back in a minute' written over it.
The plain page does not create a pleasant user experience for the visitors. If you don’t modify the page, people would often conclude that your business is not a serious thing, and thus reconsider becoming your clients. Visitors usually don’t care what is behind the curtains. With all of the above in mind, it’s a good idea to learn to modify your maintenance page.
We will help you create an excellent looking WordPress maintenance page. You will learn how to show an estimate of the time period your website is going to be unreachable, how to include alternative links, as well as a chatbot to serve visitors. Also, you will learn how to redirect visitors to another WordPress site during the maintenance period.
Methods to Put WordPress into Maintenance Mode
Method 1: WordPress Maintenance Function
The WordPress maintenance function is a built-in feature made to happen automatically whenever you update WordPress core and run plugin or theme updates. The way this function works is quite simple. When you are running an upgrade, WordPress will display a message in your admin area. This message states that the site is now in maintenance mode. Once the update finished, the maintenance mode would deactivate.
WordPress updates usually don’t take longer than one minute, but during that minute, your website will be replaced by the splash page.
A temporary .maintenance file automatically creates the page. It will appear in your file directory when you run updates. You have limited control over the method, and thus it’s best not to worry about it. The method covers you only while you are running updates via the WordPress update mechanism.
Method 2: Usе a Code Snippet or the WordPress Cli
If you are searching for a method to put a WordPress site into maintenance mode, know that you could use a simple code snippet for that (it’s quick and easy). With it, you do not need additional plugins to put your site under maintenance mode.
Instructions:
What you need to do is just add the code to the theme’s functions.php file or in a site-specific plugin:
function maintenance_mode() {
if ( !current_user_can( 'edit_themes' ) || !is_user_logged_in() ) {wp_die('Maintenance.');}
}
add_action('get_header', 'maintenance_mode');
When you want to disable maintenance mode, just comment out the last line:
// add_action();
Alternatively, you can use WordPress' own Command Line Interface (Cli) to enable or disable maintenance mode. The Cli comes with a plethora of useful commands which can be used via the command line, but we will focus on the ones for maintenance mode here. They are:
wp maintenance-mode activate- This will activate maintenance mode. The--forceflag can, as the name suggests, force the system to turn on the maintenance mode, even if there would be anything that might otherwise prevent it;wp maintenance-mode deactivate- This will deactivate maintenance mode;wp maintenance-mode is-active- This will detect the mode's status;wp maintenance-mode status- This will display the mode's status.
Method 3: Using the .htaccess File
This third method entails changes to the .htaccess file. We strongly recommend backing up your .htaccess file before going forward. For that, go to File Manager on your web host and click on the public_html file in the Home directory. You will see all the files under it. Follow that by simply double-clicking on the .htaccess file and downloading it securely onto your local system.
Also know that when using this method, you will not have access to the WordPress Admin Dashboard. That’s because all the requests are going to be redirected to the maintenance.html file.
When you find the .htaccess file in your website directory, you should rename the current .htaccess file to .htaccess_test and create a new file under the name .htaccess. After creating the new file, you add in it the following code snippet:
RewriteEngine On
RewriteBase /
RewriteCond %{REQUEST_URI} !^/maintenance\.html$
RewriteRule ^(.*)$ https://example.com/maintenance.html [R=307,L]
Now create a maintenance.html with your maintenance message file in your website’s directory.
Method 4: Using a WordPress Plugin
This way is for those who wish to activate maintenance mode without the need to touch a single line of code.
All you have to do is set up the WP maintenance mode plugin (download and install). After activation, you have to configure the plugin settings. Go to the right tab and choose Settings → WP Maintenance Mode.
In the settings page, there are five tabs: General, Design, Modules, Manage Bot, and GDPR.
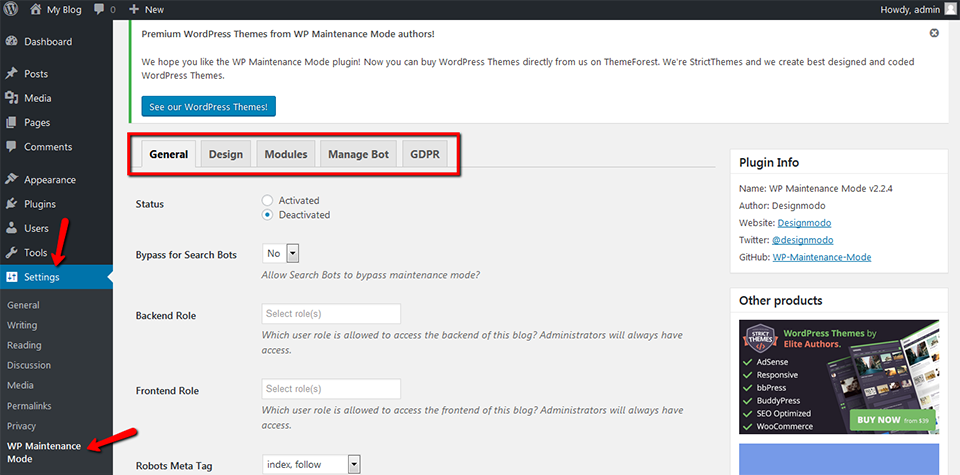
Below, we are going to discuss every tab and some of the essential options in them.
General
First comes the General tab. In its top, you can see Status. To activate the plugin and set your website on maintenance mode, you need to change the Status to Activated. Under the Status options, there is the Bypass for Search Bots feature. There are also Backend Role and Frontend Role options, where you can choose the user roles with access to your backend while in maintenance mode. If you don’t set it, only the will be allowed.
Design
The Design tab is the one where you create an appealing splash page. To start, you can go directly to the Title (HTML tag) option. Here, add the splash page title, the Heading, and the Text.
Once you finished with your message, select the background of the splash page. For example, you can change its color or go even further and use an image as a background.
Modules
In this tab, you set the countdown timer. You can set both the starting and the remaining time. Additionally, you can turn to your visitors and ask them to subscribe and get a notification when your WordPress site is back live.
The following option in the Modules tab is where you can configure your social networks. Everything you have to do is put your social media account link. The plugin will show the button icon for social media on the page.
Manage Bot
Next is the Manage Bot tab. It allows adding a chatbot to the splash page. This way, you can keep interactive communication with your visitors/clients, although your site is in maintenance mode. You can even give the bot a name and an avatar.
GDPR
If you ask your visitors to subscribe in your splash page, you will have to set up your GDPR tab. GDPR stands for General Data Protection Regulation. You can check our blog post for more information about the GDPR. Since you are collecting visitors’ data, activating it is a must.
Once preparations are complete, press Save Settings and visit your website.
How to get a WordPress Site out of Maintenance Mode
Yes, we have discussed how to put a WordPress site into maintenance mode, but what happens when there is a site stuck in maintenance mode? That’s what we are about to go over in the next section. There are various reasons your site could get stuck in this mode, but all of them mostly come down to the following:
- The
.maintenancefile didn’t delete itself after an update completion; - A maintenance mode plugin glitched and retained its data in your site’s cache;
- The
.maintenancefile; - If you were running WordPress updates and are now stuck with that screen, we showed earlier.
Your directory probably did not manage to delete the .maintenance file after the updates have completed. The fix is relatively easy in case you know how to access your site’s file system. If your web host uses cPanel (like FastComet) or a similar control panel, open its file system via the File Manager. Also, you can use an FTP software like FileZilla.
The .maintenance File Solution
The .maintenance file is a “dot file.” In most file managers, such files are hidden by default. You will have to enable a feature named “Make Hidden Files Viewable.” Different file managers label this feature differently.
The file will be located in your main directory, which is the same location as of your wp-config.php file. You have to select the .maintenance file and delete it. Do that by clicking the Delete button in your file manager or right-click (control-clicking on Macs) the file and select Delete.
Maintenance Mode Plugin Solution
Let’s say you have used a plugin to help you put your site in maintenance mode. If you can’t remove the splash screen despite going in the settings and turning the feature off, you will need to deactivate and then delete that plugin. If that does not work, clear your website’s cache. There are two ways to do this:
- Use a Cache plugin – WP Super Cache, W3 Total Cache, WP Fastest Cache, etc. Install one of these and use the Clear Cache feature. It is similar to clearing your browser, phone, or computer cache.
- Your host’s control panel - some hosts (mainly managed WordPress hosts like FastComet) have the control panel option. That option allows you to clear your website’s cache with a click of a button. You will likely need to use it anyway if you use a managed WordPress host. Some of them do not allow you to install caching plugins on your server, because they are already handling caching on your behalf.
Fortunately, it is possible to prevent your site from getting stuck in maintenance mode. The only thing you need to do is follow a few best practices. Let’s cover that topic before we wrap this post up.
How to Prevent your Site from Getting stuck in WordPress Maintenance Mode
Whenever you update your plugins and themes, WordPress maintenance mode kicks in, displaying a message that says your site is temporarily unavailable. Updates take just a few seconds and are too brief to be noticed. However, there are times when the process gets interrupted. This hiccup can come from errors in server connection, or when a browser has been closed during an ongoing update.
We have a post that explains how to manually get out of the unwanted WordPress maintenance mode when your site gets stuck in it.
Final Thoughts
WordPress maintenance mode is a useful feature. It can help one to better communicate with their users when a site goes offline for scheduled or unscheduled maintenance. The mode can even assist in maintaining conversion rates even when a site goes offline. This is especially important when running an online business. Remember that if you need some hosting help, you can always rely on our 24/7 technical support team. Just submit a support ticket and they will answer your call for help as soon as possible.
We hope you find this article useful. Discover more about FastCloud - the top-rated Hosting Solutions for personal and small business websites in four consecutive years by the HostAdvice Community!

WordPress Hosting
- Free WordPress Installation
- 24/7 WordPress Support
- Free Domain Transfer
- Hack-free Protection
- Fast SSD Storage
- Free WordPress Transfer
- Free CloudFlare CDN
- Immediate Activation