How to Downgrade Any WordPress Core, Plugin, and Theme Version
Updated on Sep 20, 2019
The WordPress core gets updated regularly, and in most of the cases, it’s a good idea to update instantly when a new version is available. Using the latest WordPress version guarantees you that you are taking advantage of all new features and security enhancements.
Nevertheless, even with the extensive testing, it’s not possible to discover every bug, and some of them could get through. It’s not unusual for plugins not to play nicely with fresh WordPress versions. Also, it can take some plugin developers some time to catch up with everything and release enhanced versions of their plugins. One of our previous posts thoroughly explains How to Prevent and Troubleshoot Faulty Plugins in WordPress.
Those are some of the main reasons you may want to return to a previous WordPress version while some issues are sorted out. The rule also applies for when you install a new plugin or theme version, and it doesn’t work accurately.
Usually, the rollback of versions is useful temporarily until most bugs are fixed and you have the green light to update to the most current WordPress version.
We will cover:
Before You Proceed with the Downgrade
Before you downgrade the WordPress core, you need to be sure that it’s definitely the best thing to do. The bug causes are typically coming from plugins, rather than WordPress itself. If that’s the case, the problem can often be resolved by finding the faulty plugin and deactivating it until you get an updated and more compatible version of that particular plugin.
And if you are absolutely sure that the WordPress core is what causes the problem, or if the faulty plugin is crucial for your website, your best option may be a temporary downgrade of the WordPress version.
Before you downgrade, it’s of vital importance to do a full website and database backup just in case something decides to go wrong. You can do that with the assistance of specific plugins. Keep in mind though, if you are a FastComet client, you don’t need additional plugins - you get daily backups.
How to Perform a Manual WordPress Downgrade
If you decide to handle the process manually, rather than with a plugin, or in case your site is messed up enough so that you can’t get into your admin panel - follow the instructions below in order to downgrade your WordPress manually.
1. Downloading WordPress
You need to get a copy of the WordPress version your site was using before things went sideways. You can download any WordPress version from the official release archive. Usually, you would only need to go just a step back and download the WordPress release that’s before your current one. If you install an even older WordPress version, know that you could be opening up your website to security threats.
2. Deactivating Plugins
- Next step to go is deactivating each and every plugin from the Plugins page in the WordPress Dashboard:
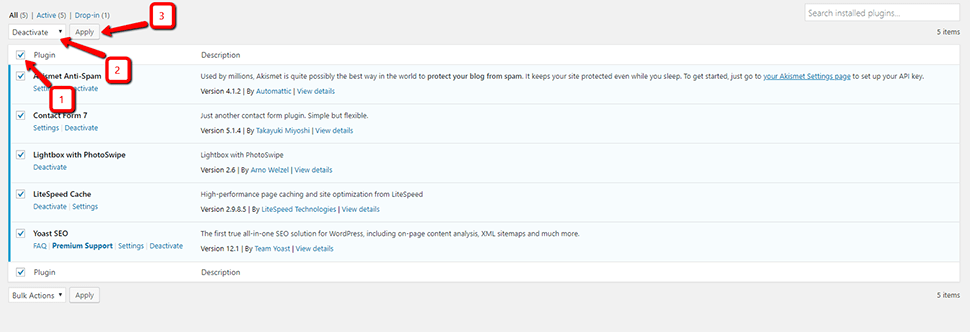
- After that, you have to logout of WordPress.
If you are unable to log in to your website, no need to worry – you will be able to complete the next steps even without the plugin deactivations, and everything should be fine. When a faulty plugin is causing issues, you may deactivate it by simply changing the name of the plugin folder via FTP or by using the cPanel File Manager:
3. Deleting Specific WordPress Core Files and Upload a Fresh WordPress Copy
As mentioned, use the cPanel File Manager or an FTP client in order to access your WordPress website on the server. Delete nothing but the `wp-admin` and `wp-includes` folders. Then you will be able to upload the WordPress version that you downloaded (excluding the wp-content folder), which will overwrite all the existing files.
Be sure not to upload the wp-content folder as it would potentially affect the content of your website.
4. Finalizing the Re-installation
After everything you have done, WordPress will be re-installed as an older release. Now you should be able to log in as usual. You will see the message saying you have a pending update of your database.
You may have to rebuild your permalinks in case you are getting 404 errors on your pages and posts after the WordPress core re-installation. You can see that option when you go to Settings → Permalinks:
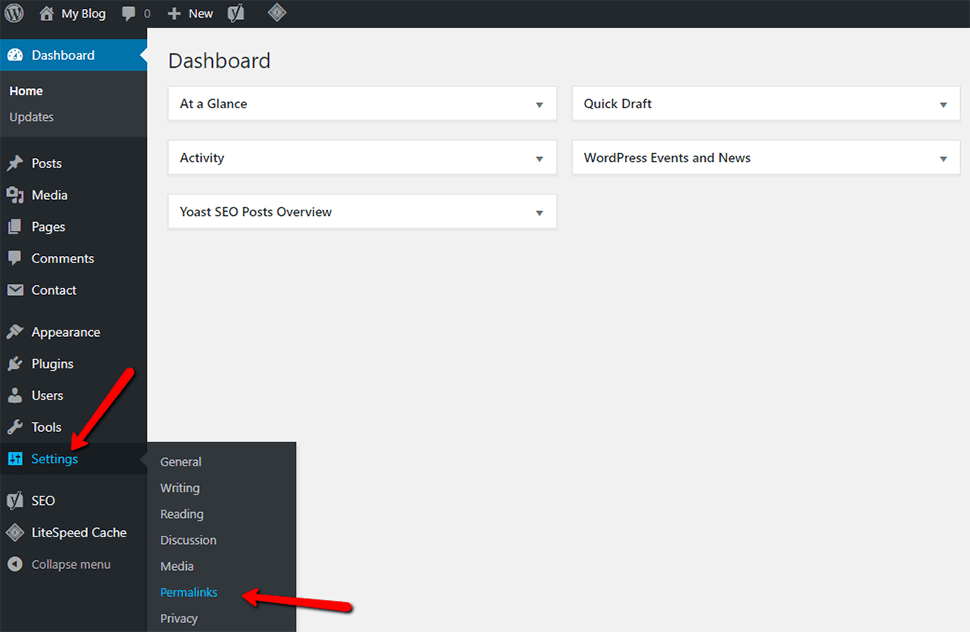
What you have to do here is to select a different option than the one you have currently, save the changes, then simply revert back to the original options and save them once again. That will sort out the issue.
5. Disabling Automatic Updates
Your final step is the disabling of the automatic WordPress updates to avoid WordPress unwanted updates. You should keep them disabled until you are completely sure that everything is compatible and would work adequately once again. Once that happens, you can update manually and just turn the automatic updates afterward.
Disabling auto-updates can also be done by editing your `wp-config.php` file. Include the following code line inside the file:
define( 'AUTOMATIC_UPDATER_DISABLED', true );Also, you can choose to implement the Advanced Automatic Updates plugin and have much easier control over the automatic updates of the WordPress core, plugins, and themes on your website.
How to Downgrade WordPress Core with WP Downgrade Plugin
If you decide on using the WP Downgrade plugin, it’s going to handle the downgrade for you. The plugin works by forcing the installation of a particularly specified WordPress release.
WP Downgrade runs just like the standard WordPress installer, which makes it very easy to use. You simply have to choose the WordPress version that you want to be installed. Your preferred version will be downloaded from WordPress.ORG and will be installed as usual. As always, you can never be too careful - remember to do a backup before using the WP Downgrade plugin.
Check the version of WordPress that you currently use. You can see this info in the dashboard:
In most cases, you will need to downgrade to the version that’s right before your current one. You can go to the WordPress Release Archive to see all WordPress versions listed.
Find the version you need and type it into the WP Downgrade settings: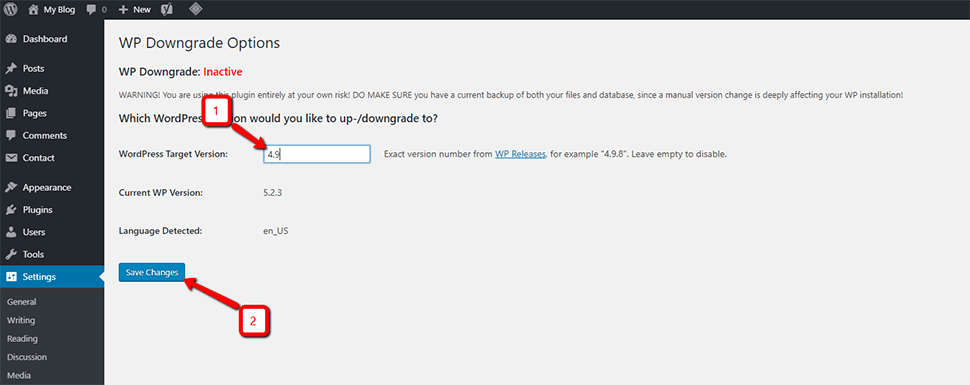
Click Save Changes to run the installation. That’s it.
How to Downgrade Plugins and Themes Manually
In general, plugins are not tested as thoroughly as the WordPress core code. That’s why it’s more likely you stumble upon a faulty plugin that causes problems when you try updating it. The most likely case is for that plugin to have a conflict with another one or more plugins. However, some plugins are incompatible with specific themes. Also, keep in mind that some themes have plugins coming along with them, and if you try installing the same plugin separately, it may cause issues.
If you want to rollback a plugin or a theme to one of their previous versions, make sure you inform the developer about the bug that you have found. That would ensure it gets fixed with the next release.
If you have downloaded your themes or plugins from somewhere other than the WordPress repository, your only option will be to perform a manual rollback.
1. Backing up Your Site
Start by making a full backup of your WordPress website, including all the content and the database.
2. Downloading Previous Versions of Plugins or Themes
You will need to download a particular version of code for the theme or plugin you want to downgrade. Usually, you will be able to get this from the developer website or from the original repository. Look for a link to “all versions” or “older versions.”
3. Renaming Your Plugin or Theme Folder
Once you’ve downloaded the .zip file:
- Access your file structure via FTP, or the cPanel File Manager;
- Navigate to the
wp-contentfolder of the WordPress instance which you want to modify; - Go into either the plugins or themes folder, depending on what you are about to rollback;
- Change the folder name of the plugin or theme that you want to downgrade. You can add something like
_testor_tempto the filename. That will make it easy to get back to the original version in case anything goes sideways.
4. Installing the Previous Plugin or Theme Version
- Go back into your WordPress admin panel;
- If you are installing a theme, go Appearance → Themes, click Add New, and then Upload Theme;
- If you are installing a plugin, go Plugins → Add New and click the Upload Plugin button;
- You can find the plugin or theme
.zipin your download and let WordPress run the install as it usually would; - Activate the plugin or theme and check whether everything works as expected;
- If you are sure that everything is okay, you can go back to the file manager, and then delete the renamed folder for the theme or the plugin.
This procedure should work in most cases, when the plugin did not make any significant changes to your database. If you get errors, you may have to restore the whole WordPress database. This is why it’s crucial to create a new backup before you proceed with any updates.
Hopefully, all problems will be sorted once you have restored your website from the backup. If you come to this particular situation, the best move is to contact the plugin or theme developer for advice on your next move.
Downgrading WordPress Themes and Plugins with WP Rollback
The easiest way for downgrading themes and plugins is via the WP rollback plugin.
Keep in mind that rolling back a Theme or a Plugin may make you lose your current settings for them.
Using the plugin is relatively simple:
- Install it;
- Use the plugin interface to search for the plugin or theme that you want to rollback;
- Choose the version that you want to rollback to;
- Re-install the plugin or theme in just a click.
Again, as with the WordPress core, make sure that you back up everything first. We also recommend that you test out on a local version of your site or a staging environment before you go ahead to the live website.
Usually, you would only want to rollback to the previous plugin/theme release as there can be security problems if you install older versions.
Keep Note: WP Rollback only works with plugins and themes that are currently in the WordPress repository. If you are using a premium plugin or theme, or one that you have downloaded from another repository like Github, you will have to download an old version of the code and then install it manually.
Again, you do that via an FTP client, or with the help of cPanel File Manager.
Before you rollback a plugin or a theme, make sure that you have deactivated WordPress automatic updates. Doing that will prevent the theme or plugin from getting updated until you know for sure that your bug is fixed. Doing this is very easy if you use the Advanced Automatic Updates plugin mentioned earlier. The alternative method for a theme is to add the following lines of code to its function.php file:
add_filter( 'auto_update_plugin', '__return_false' );
add_filter( 'auto_update_theme', '__return_false' );
How to Rollback a WordPress Plugin
After you have installed the WP Rollback plugin:
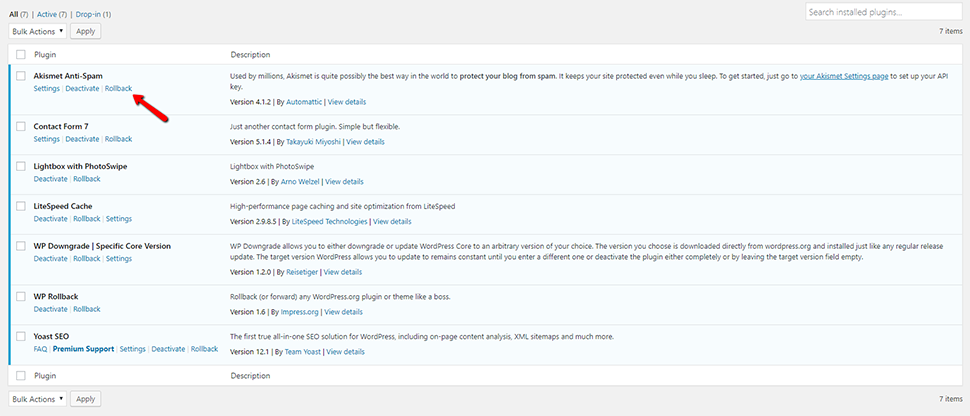
- Go to Plugins in the WordPress Admin panel to see a new link next to Deactivate and Edit – Rollback:
- If there is no rollback link, that means the plugin can’t be found in the WordPress repository, and you have to do a manual install of an earlier version of the plugin code;
- Click the Rollback link, and you will get to a screen where you can choose the version of the plugin you want to rollback to. You will see a note that tells you about your currently installed version:
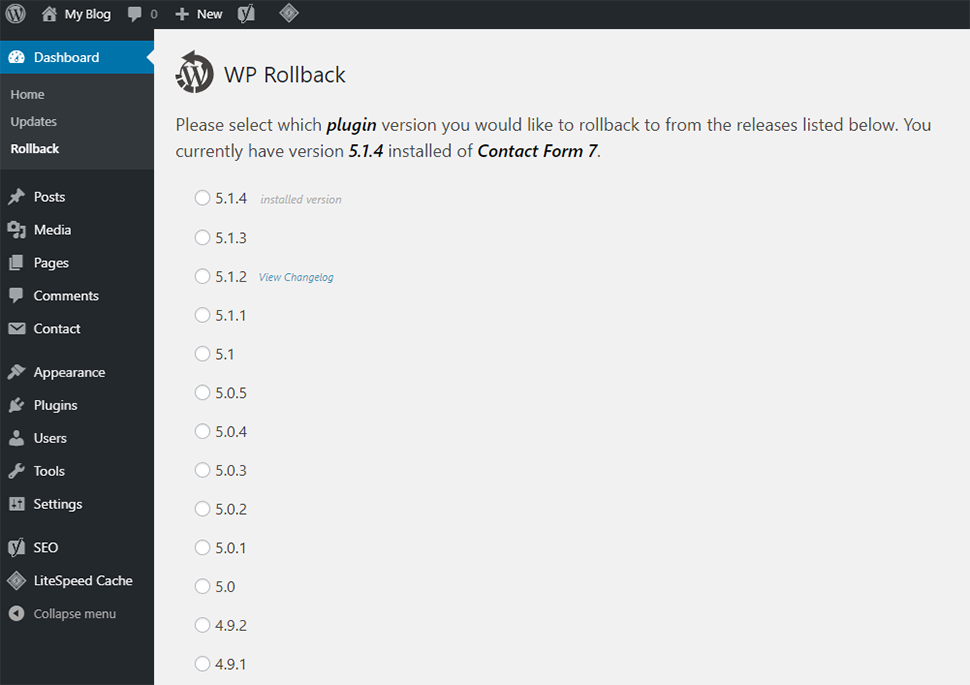
- When you select the version and click on the Rollback button, you will get the confirmation screen that reminds you to do a backup. If you have not backed up yet, go do it now!
You will then see a message that looks like the standard update screen, which should confirm that your plugin has been “updated” to the version you selected:
How to Rollback WordPress Themes
The procedure of rolling back themes is very close to the downgrading of plugins:
- Go to Appearance → Themes in your dashboard and click Theme Details of the theme you wish to rollback. You will see a pop-up with the buttons Activate, Live Preview, and Delete:
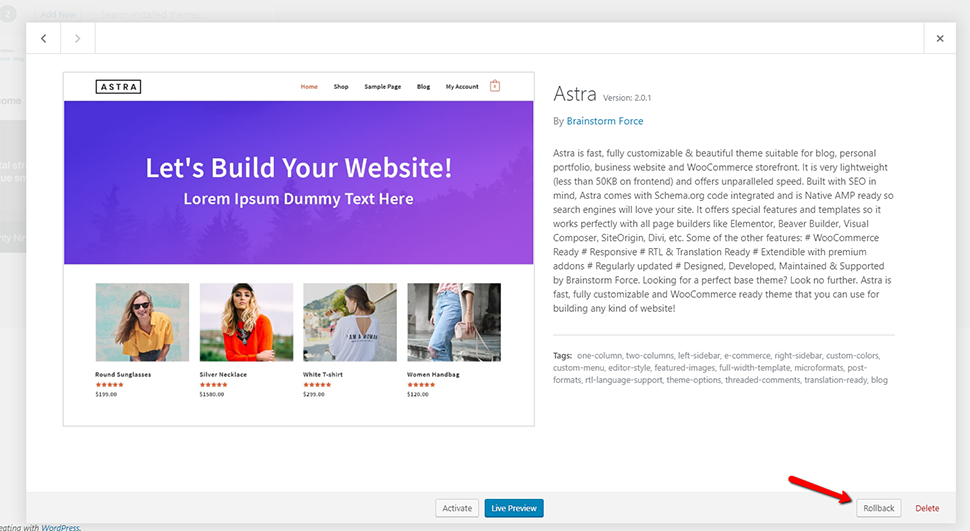
If the chosen theme is available in the WordPress repository, you will have an extra button - Rollback. - Click on the Rollback button, and you will get to a screen which allows you to find out the current version of the theme with the option to choose a different version:
- Just as before, you are going to get a confirmation theme checking if you are sure about the rollback, and then the standard WordPress theme update message.
Summing Up
Generally, the use of outdated versions of the WordPress core, plugins, and themes should be avoided. However, in some cases, there is no other option when it comes to getting your WordPress site up and running again.
In case you decide to go with a downgrade, you can follow the steps in this guide and everything should go as planned. Still, and once again, don’t forget to CREATE A BACKUP! Luckily, even if you forget, FastComet provides daily backups for your Managed WordPress Hosting.
If you have any questions or something did not go as planned, or if you simply don’t have the time to do everything on your own, you can always contact our technical support experts via a support ticket. They work 24/7 and will always make sure to provide swift assistance.
We hope you find this article useful. Discover more about FastCloud - the top-rated Hosting Solutions for personal and small business websites in four consecutive years by the HostAdvice Community!

WordPress Hosting
- Free WordPress Installation
- 24/7 WordPress Support
- Free Domain Transfer
- Hack-free Protection
- Fast SSD Storage
- Free WordPress Transfer
- Free CloudFlare CDN
- Immediate Activation