How to Submit Your WordPress Site to Google Search Console
Updated on Jun 1, 2023
Google Search Console (previously Google Webmaster Tools) provides detailed reports on the visibility of your pages on Google. By submitting your WordPress sites to Google Search Console, you can quickly determine whether Google is having difficulty accessing, crawling, or distinguishing the content on your site.
To start, visit Google Search Console. If you don't have an account you will be asked to sign in with your Gmail or Google account or to create a new one.
This post includes:
How to Verify Ownership of Your WordPress Site with Google Search Console
Once signed in, you will be taken directly to the page to add your domain.
- Enter either your domain or your website's URL, and click Continue;
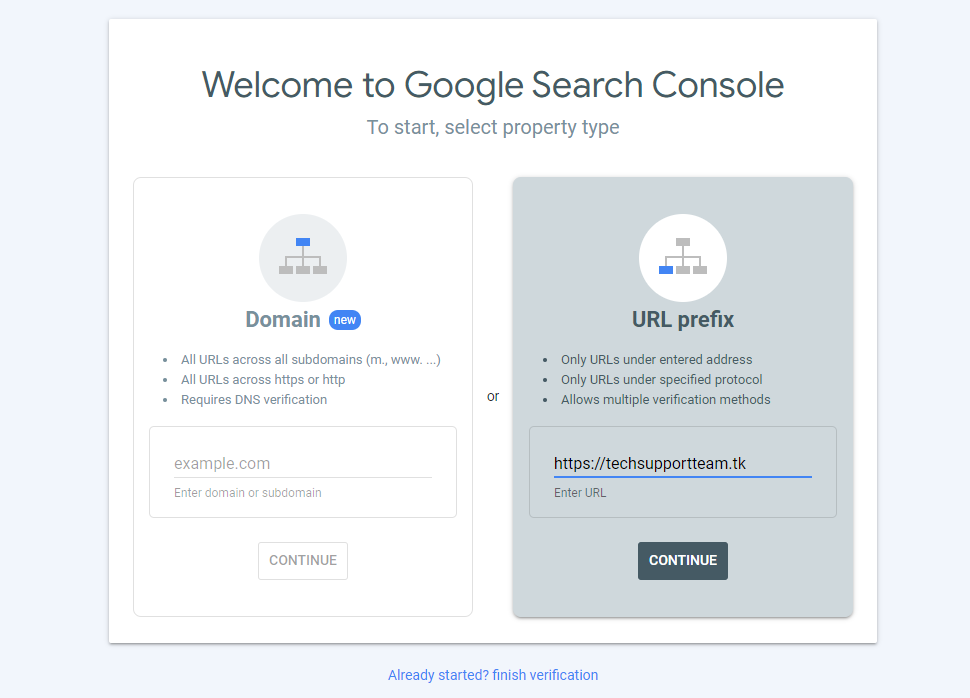
- You will be prompted to verify the domain; there are a few ways to do that. Each one of them has a small description that will tell you how it works;

-
- If you are using an SEO plugin (All in One SEO plugin, Ultimate SEO plugin, or WordPress SEO by Yoast), there will be a field in the plugin settings for you to verify your Google Search Console account. Copy and paste the HTML tag from the Google Search Console page into this field.
- If you are using the Jetpack plugin (which is the only way to verify the site if you are hosted on WordPress.com), go to Jetpack → Settings and activate the Site Verification module. Then, go to Tools → Available Tools, and you will see this page where you can paste your tag from Google.
- Return to Google Search Console and select the Verify option according to your chosen method. If the website does not verify, check the page source of one of your web pages in the browser to ensure you copied the tag content correctly. If you can't see the tag, ensure you've cleared the cache for any caching plugins you use. If you're still having trouble, use the Recommended Method to download the HTML file Google provides and upload it to your website's root directory, then click Verify.
How to Submit Your WordPress XML Sitemap To Google Search Console
When you go live with your site, you should submit an XML sitemap to Google. Google uses your sitemap to learn about your site's structure and expand your web page coverage. Otherwise, it may not find everything easily if it is simply crawling your site via links on your home page or in the navigation.
Read Google Search Essentials to learn more about how Google crawls and indexes your site. If you changed SEO or sitemap plugins, ensure Google receives the correct URL. If you use the WordPress SEO plugin by Yoast, it includes a sitemap. If your SEO plugin does not have an XML sitemap function, you can generate one for yourself, or we can do that for you as a one-time service.
In the WordPress SEO plugin by Yoast, go to SEO → XML Sitemaps. Check the box to enable XML sitemap functionality, then click the button to view your XML Sitemap. Take note of the URL: yoursitename.com/sitemap_index.xml
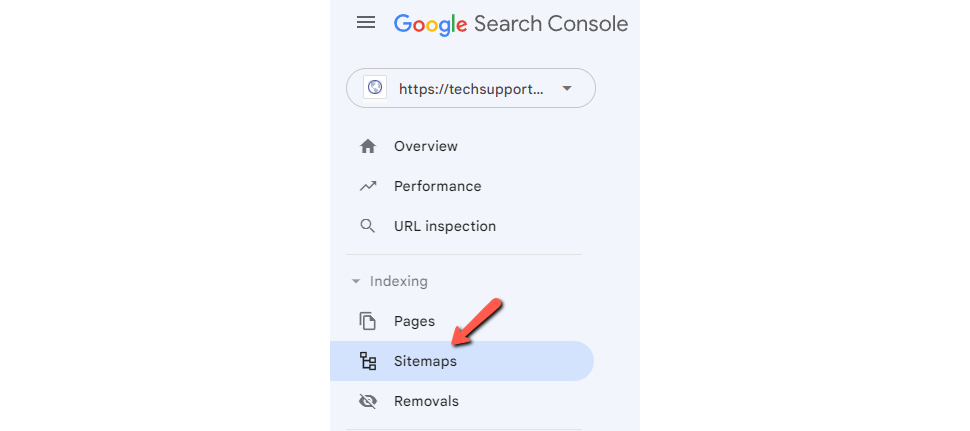
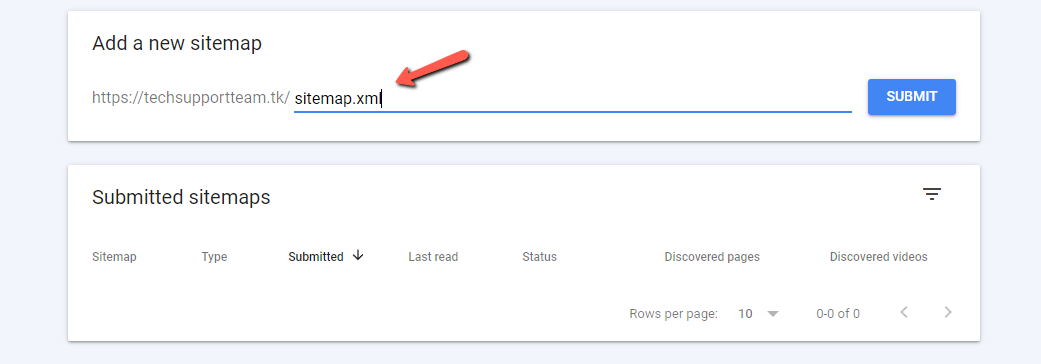
To submit your sitemap to Google, first, upload your sitemap to the root directory of your website. Then:
- In Google Search Console, click on Sitemaps;
- Enter the URL to your sitemap. It should start with your website, then the name of the sitemap itself. Then click Submit;
Receive Email Alerts from Google Search Console
In the upper-right corner of the Google Search Console page, click the User Settings icon and select Email Preferences.
Enable email notifications by checking the box. That will notify you immediately if Google detects something seriously wrong with your website.
How to Use Google Search Console to Detect Problems with your WordPress Site
- Crawl Stats – The Crawl Stats page (Settings → Crawl Stats) shows Googlebot's activity on your site over the last 90 days. It will also show you any errors that might have occurred while it was crawling your website. If your stats are low compared to the number of pages you have, it could mean that the pages take too long to load, preventing Google from crawling the site efficiently.
- Robots.txt Tester – If you have an old HTML site or files you don't want Google to crawl, create a robots.txt file in your website's root directory. Then enter the files or directories you don't want to be crawled.
- Sitemaps – As we mentioned earlier, using a sitemap will give Googlebot an easier time crawling your website. Additionally, you can see the status of each sitemap and identify any issues there might be via the Sitemaps page.
- Alerts – You will notice a bell icon in the top right corner. Keep an eye on it since it will alert you about any new developments or issues with your website that demand your attention. That is probably the best way to find out what is happening with your website regarding matters within the Search Console.
Final Thoughts
We hope this article helped you learn how to add your WordPress site to Google Search Console easily. It is an excellent tool for keeping track of your website's statistics and any issues that arise. Feel free to contact our technical support team with any hosting-related questions. You can do that quickly by submitting a support ticket.
We hope you find this article useful. Discover more about FastCloud - the top-rated Hosting Solutions for personal and small business websites in four consecutive years by the HostAdvice Community!

WordPress Hosting
- Free WordPress Installation
- 24/7 WordPress Support
- Free Domain Transfer
- Hack-free Protection
- Fast SSD Storage
- Free WordPress Transfer
- Free CloudFlare CDN
- Immediate Activation