
12 Killer Gutenberg Tips & Tricks You Should Know
While Gutenberg has been met with criticism regarding its rollout, don’t let that put you off trying it. It’s the future of WordPress. If you are still skeptical about Gutenberg, this post is for you. Below, we will share with you 12 exciting Gutenberg features that should make you switch to Gutenberg right now.
What you will find in this article:
- A Brief Introduction to the Gutenberg Block Editor
- Feature 1: Copy-Pasting Google Docs to Gutenberg
- Feature 2: Insert Blocks with the Slash Command
- Feature 3: Drag and Drop Images from your Device Directly to Gutenberg
- Feature 4: Adding Links by Pasting
- Feature 5: Top Toolbar, Spotlight Mode, and Full-Screen Mode
- Feature 5.1: Top Toolbar (Started as Unified Toolbar)
- Feature 5.2: Spotlight Mode
- Feature 5.3: Full-Screen mode
- Feature 6: Reusable Blocks
- Feature 7: Keyboard Shortcuts
- Feature 8: HTML Anchor to Create Anchor Links
- Feature 9: Content Structure and Block Navigation
- Feature 10: Button blocks
- Feature 11: Use Drag and Drop to rearrange the Blocks
- Feature 12: Copy All Blocks
- Final Thoughts
A Brief Introduction to the Gutenberg Block Editor
Gutenberg was available for testing before its official release. Since its release with WordPress 5.0, it got some mixed reviews from the community. It’s important to remember that people tend to overlook some things, especially when they don’t know much about them. Since we were all beginners at Gutenberg when it was introduced, it was a little unfair to come to any conclusions about whether it’s good or bad.
Content creators are not fans of daily routine changes, because it turns the productivity down a notch. This happens especially during the transition to the Gutenberg block editor because there are some “tricks” that not everyone knows about. Those hidden features could be beneficial when it comes to the overall workflow speed. We are listing a few of those secret features in this post, along with various workarounds to assist all Gutenberg users during its development.
With this post, we are assuming that you at least had a look at Gutenberg and WordPress version 5.0. In case you haven’t done that yet, we encourage you to go ahead. Also, you can take advantage of the fact that we have previous posts about both WordPress 5.0 and Gutenberg, which entail some useful information.
We are aware that many users choose to disable Gutenberg and continue on with their Classic WordPress editor. As we mentioned, change can be hard, and some people need more time than others. Because the Classic Editor is going to be supported through 2021, some users simply schedule their move for later.
Let’s move on to the list of Gutenberg “hidden features” that you came for.
Copy-Pasting Google Docs to Gutenberg
With Gutenberg, we can easily paste any content into WordPress, and it would need only minor tweaks to become great again. There is no unwanted and messy source code. All the headers, paragraphs, and images are neatly placed into their tailored blocks. If you write a lot, and you haven’t yet made the transition to Gutenberg, all of this could be a compelling reason.
If you often write content and use Google Docs, moving to Gutenberg is something you should consider. It’s great for copying all types of content from Google Docs. Nevertheless, we would still recommend you to upload images separately for better SEO.
Insert Blocks with the Slash Command
One of the most useful hidden tools in Gutenberg has to be the Slash Command. Using the slash command is going to trigger the Block Inserter and its search, so you won’t have to interrupt your flow of writing. All you have to do is begin a new line with “/,” and you will get a drop-down menu that helps you set up the new block in a matter of seconds:
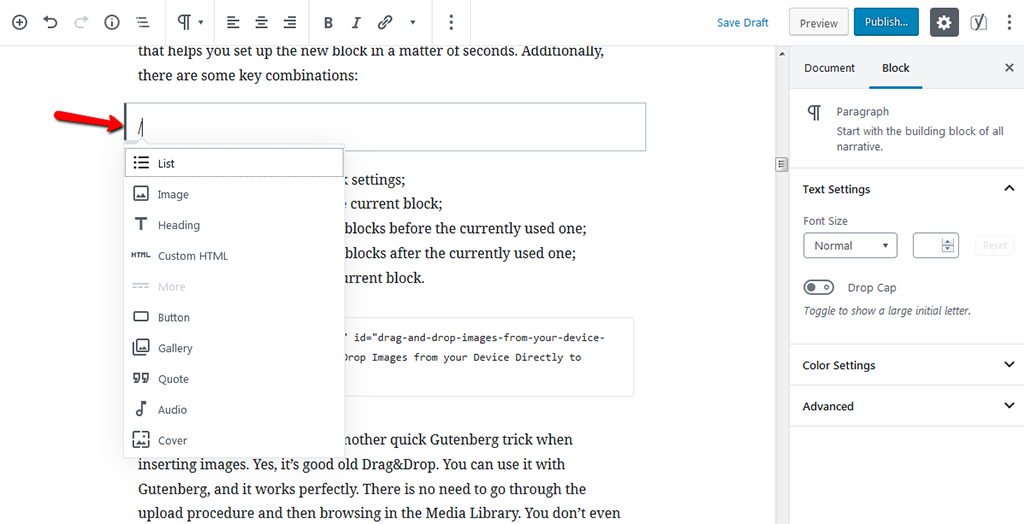
Additionally, there are some key combinations that you can find out when you hover over anything in the editor.
Drag and Drop Images from your Device Directly to Gutenberg
Since time is priceless, here is another quick Gutenberg trick when inserting images. Yes, it’s good old Drag&Drop. You can use it with Gutenberg, and it works perfectly. There is no need to go through the upload procedure and then browsing in the Media Library. You don’t even have to pre-make a block. When you drop your desired image in Gutenberg, a new block is created automatically. The image is also uploaded to the Media Library. A real-time saver, don’t you think?
Adding Links by Pasting
Pasting links is another awesome feature that you get with Gutenberg. You can just copy-paste the desired link in the editor and Gutenberg automatically make a new block from it.
The block editor will also detect your URL and convert the link into viewable content.
This would be helpful when you need to add multiple links in your content. It will save you some time and help you with getting everything done faster.
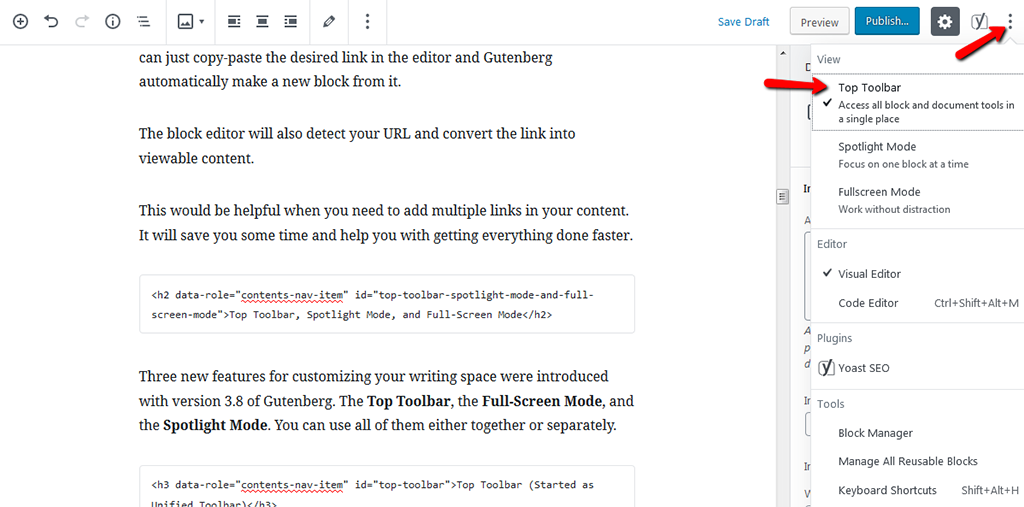
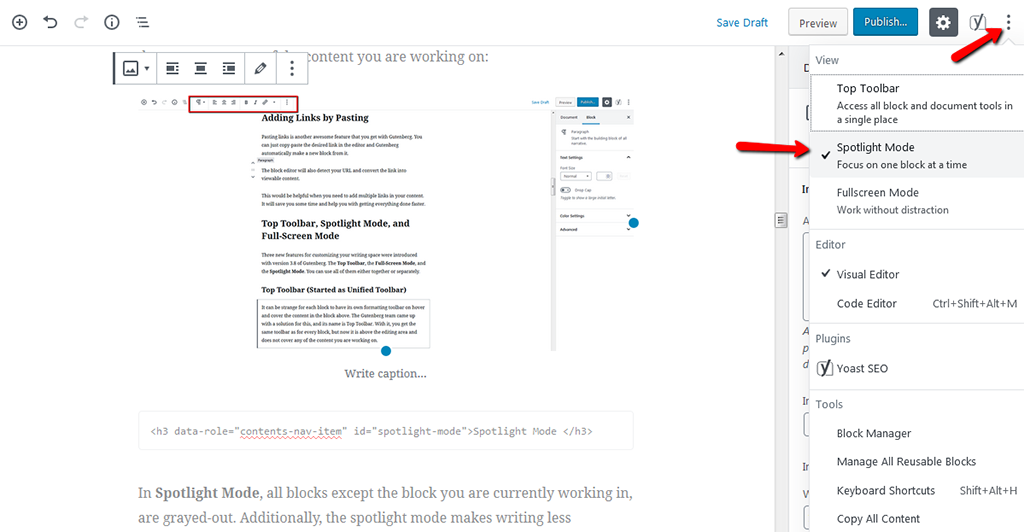
Top Toolbar, Spotlight Mode, and Full-Screen Mode
Three new features for customizing your writing space were introduced with version 3.8 of Gutenberg. The Top Toolbar, the Full-Screen Mode, and the Spotlight Mode. You can use all of them either together or separately.
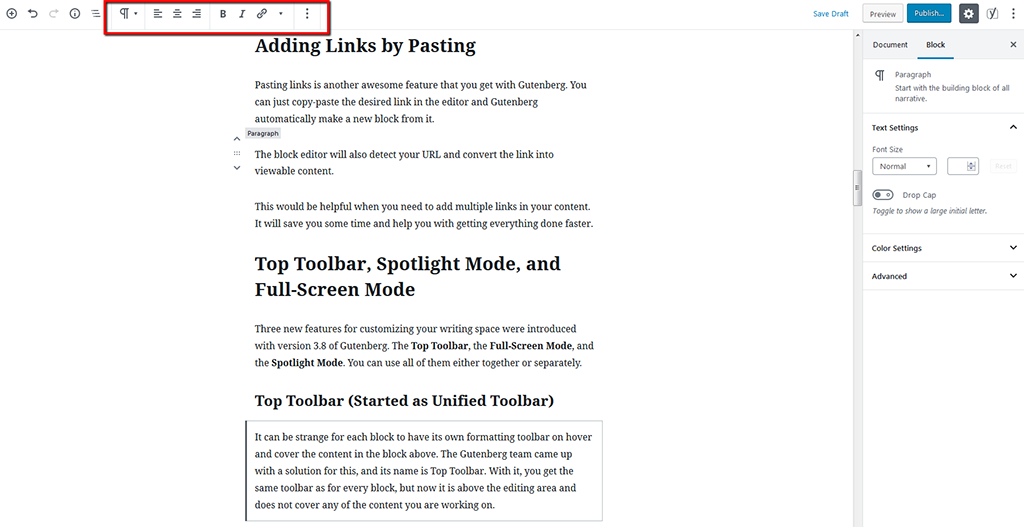
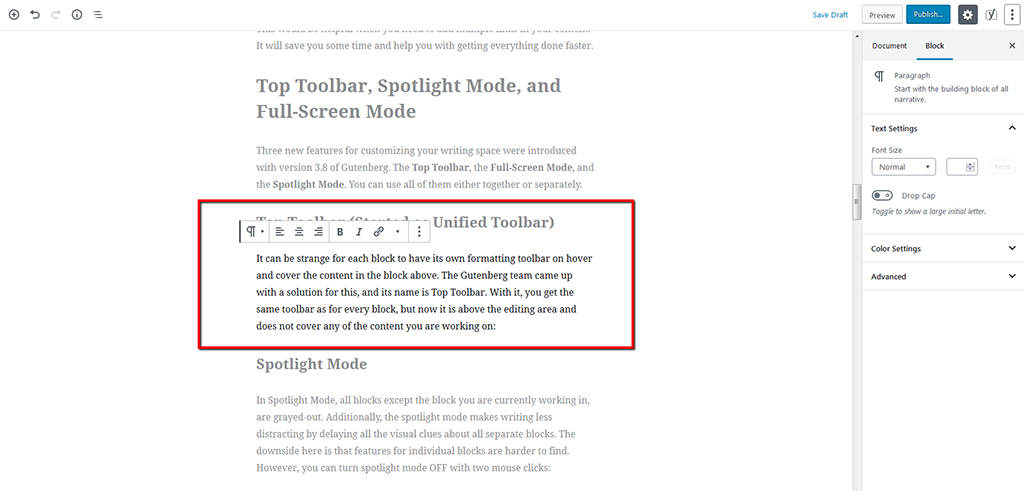
Top Toolbar (Started as Unified Toolbar)
It can be strange for each block to have its own formatting toolbar on hover and cover the content in the block above. The Gutenberg team came up with a solution for this, and its name is Top Toolbar.
With it, you get the same toolbar as for every block, but now it is above the editing area and does not cover any of the content you are working on:
Spotlight Mode
In Spotlight Mode, all blocks except the block you are currently working in, are grayed-out.
Additionally, the spotlight mode makes writing less distracting by delaying all the visual clues about all separate blocks. The downside here is that features for individual blocks are harder to find. However, you can turn spotlight mode OFF with two mouse clicks:
Full-Screen mode
With version 3.8, Gutenberg now has a full-screen mode as well. You can switch it ON and remove the admin toolbar at the top, alongside the left admin menu. Once you’ve removed the sidebar, all that you see on the screen will be the Top Toolbar (if you have enabled it) and your content.
Reusable Blocks
Gutenberg has a new feature under the name Reusable Block. It allows users to define a specific block or a block combination and save them for reuse anywhere on their site.
You might ask: “When am I going to use that?” There are various cases where you could implement reusable blocks. Maybe you would like to highlight a product of yours on more than one page. Perhaps you have some particular posts that need a disclaimer at the beginning or at their end. Instead of writing the same paragraph every time, you simply write it once and then save it as a reusable block, ready for use whenever you need it.
Save blocks to your reusable blocks by clicking More Options, and then Add to reusable block:
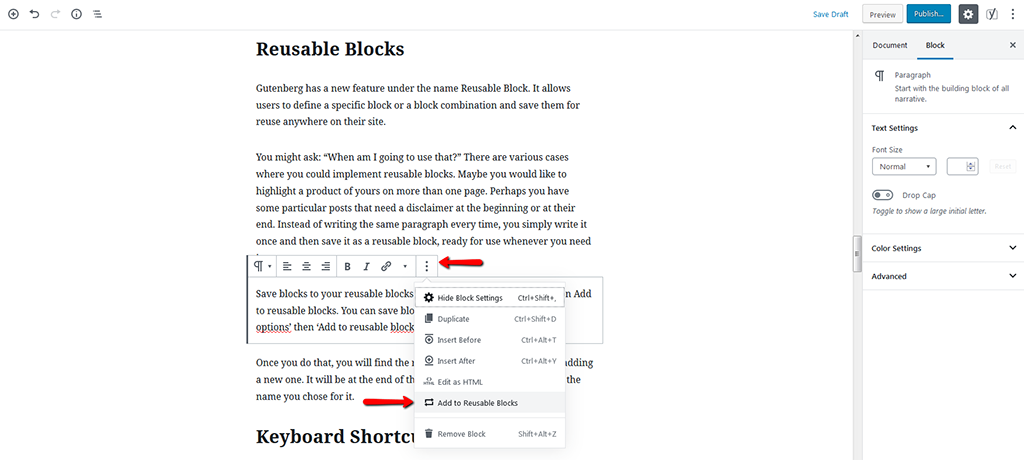
Once you do that, you will find the reusable block whenever you are adding a new one. It will be at the end of the list under the tab Reusable with the name you chose for it.
Keyboard Shortcuts
Gutenberg developers came up with a new concept: a new line as a command line.
By pressing enter in a paragraph, you can write another line to execute a few shortcut commands:
- `/` – slash command to insert a block;
- `>` – to start a quote;
- `##` – to start a heading;
- `1.` – to start a list with order (you can also use‘1)’);
- `-` – to start a list.
- Backticks (`) at the beginning or at the end of a string add code formatting to your string (the same key as the ‘~’ key).
There are a few more useful key combinations:
- Ctrl+Shift+Alt+M Switch between Visual Editor and Code Editor;
- Ctrl+K – Convert the selected text into a link;
- Ctrl+Shift+K – Remove a link.
HTML Anchor to Create Anchor Links
Anchor links (also known as tables of content or jump menu links) are links that take users to a particular position in the post/article. Anchor destinations are generally specified using the A element (A is for Attribute), or by another element (naming with the ID attribute). Both methods are fully compliant with W3C standards (source).
Most sites use anchor links only for tables of contents at the start of their longer articles. If you know a little CSS, you would be able to make those tables of contents a bit more appealing to your visitors. Additionally, there are those websites where you will not see the anchor link. Instead, the links are being used on headers to share links directly to specific sections.
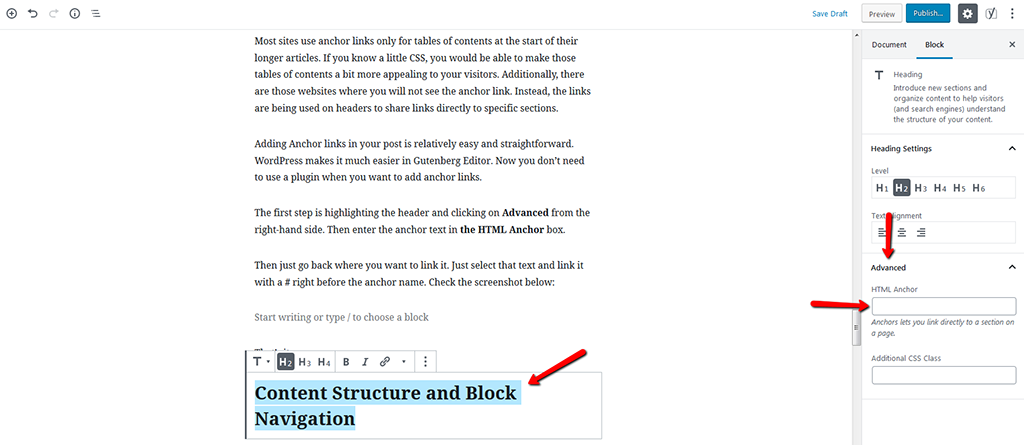
Adding Anchor links in your post is relatively easy and straightforward. WordPress makes it much easier in Gutenberg Editor. Now you don’t need to use a plugin when you want to add anchor links.
The first step is highlighting the header and clicking on Advanced from the right-hand side. Then enter the anchor text in the HTML Anchor box.
Then just go back where you want to link it. Just select that text and link it with a ‘#‘ right before the anchor name. Check the screenshot below:
That’s it.
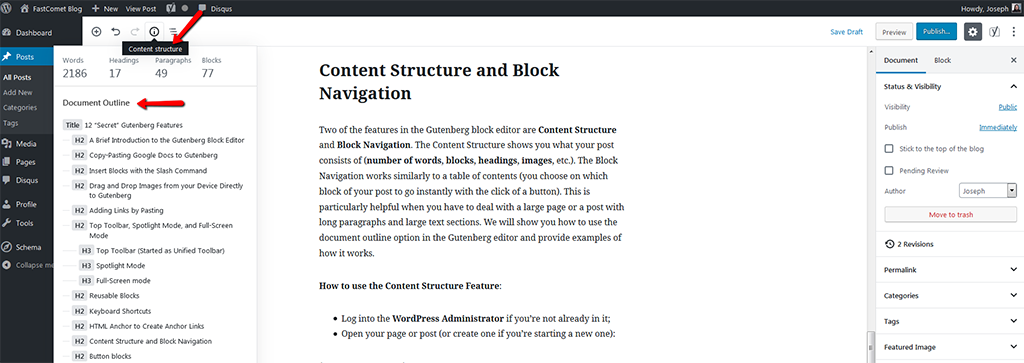
Content Structure and Block Navigation
Two of the features in the Gutenberg block editor are Content Structure and Block Navigation (Shift+Alt+O). The Content Structure shows you what your post consists of (number of words, blocks, headings, images, etc.). The Block Navigation works similarly to a table of contents (you choose on which block of your post to go instantly with the click of a button). This is particularly helpful when you have to deal with a large page or a post with long paragraphs and large text sections. We will show you how to use the document outline option in the Gutenberg editor and provide examples of how it works.
How to use the Content Structure Feature:
- Log into the WordPress Administrator if you’re not already in it;
- Open your page or post (or create one if you’re starting a new one):
- In the top left corner of the screen, you will see a circled “i.” Click on this icon. If you hover over it, you will see that it is labeled Content Structure;
- When you click on the Content Structure option, you will see a small pop-up window appearing. It will give you information about your page or post (if there is any content on it). The first line will summarize your page or post, giving you the number of words, headings, paragraphs, and blocks:
Button blocks
The Button Block is exactly what you would think – create a button within your post and link to a URL. Here is how you create a button block in Gutenberg:
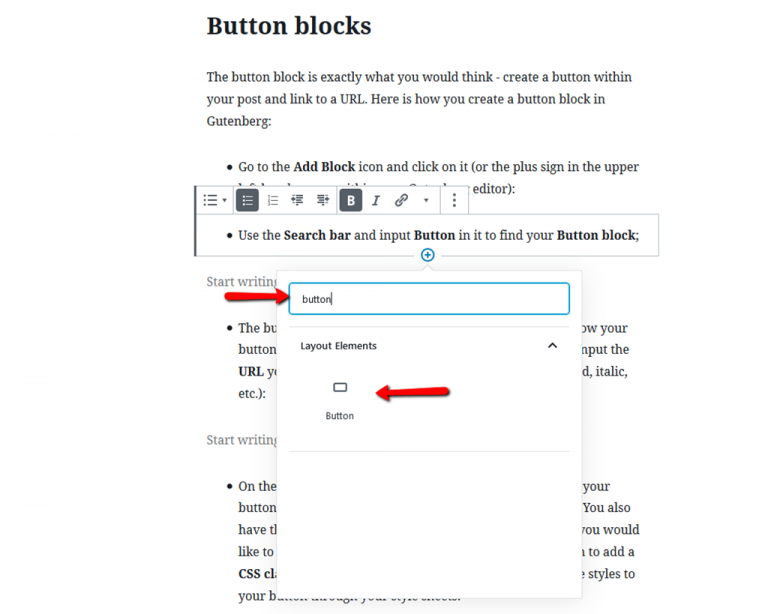
- Go to the Add Block icon and click on it (or the plus sign in the upper left-hand corner within your Gutenberg editor):
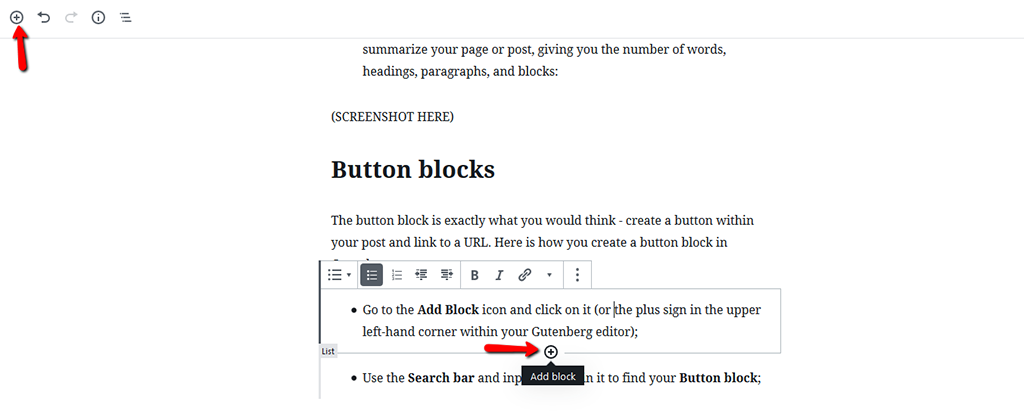
- Use the Search bar and input Button in it to find your Button block:
- The button edit window will appear. Here, you can select how your button will align with your content, enter the display text, input the URL you want the button to direct to, and style the text (bold, italic, etc.):
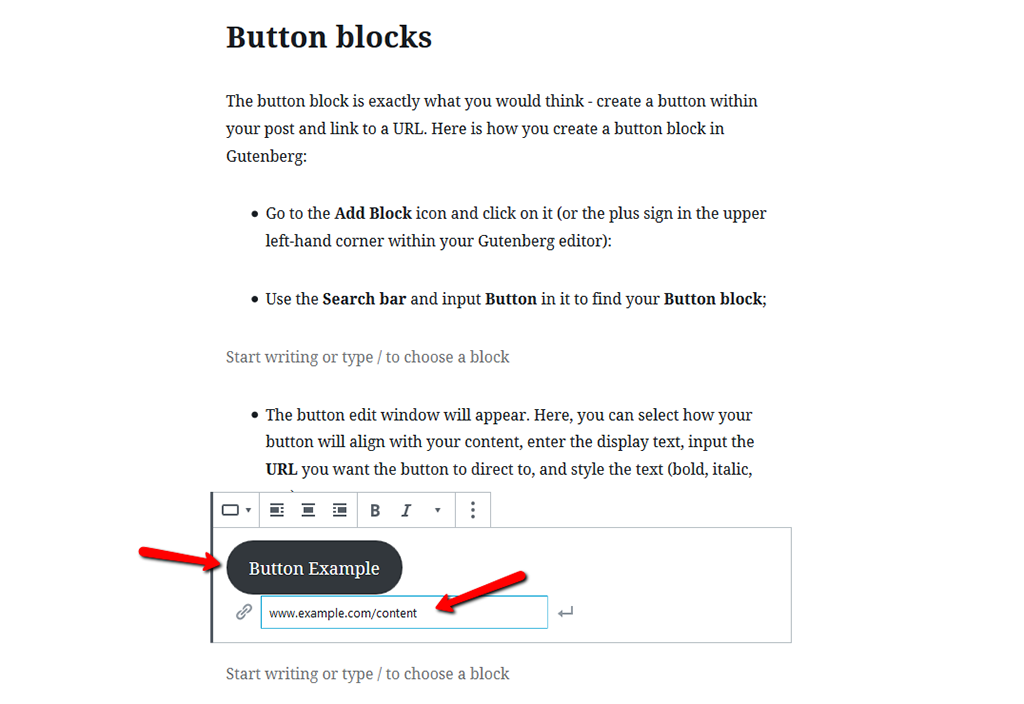
- On the right-hand side, there are customization options for your buttons. The Color options and text color options are there. You also have the option to enter the RGB or HEX code of the color you would like to use
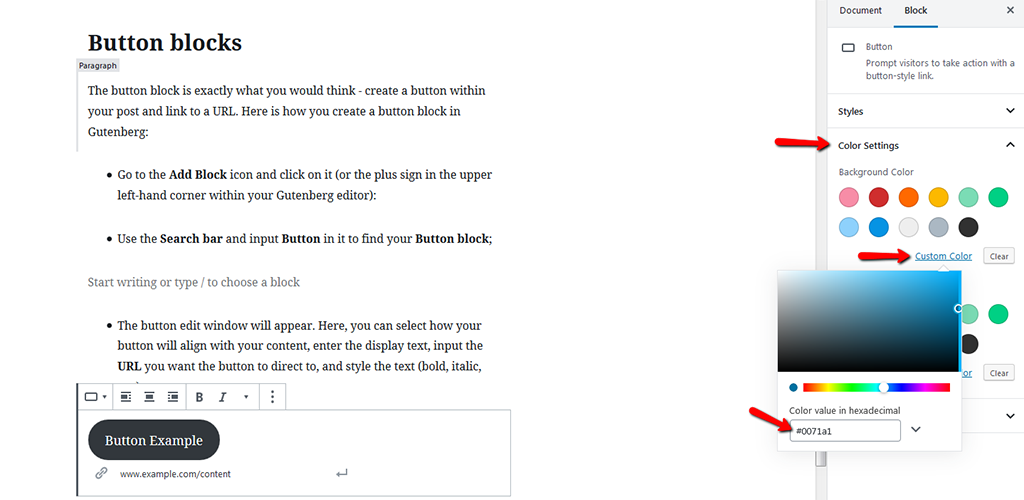
- Additionally, you have the Advanced option to add a CSS class to the button. From there, you can add even more styles to your button through your style sheets:
Use Drag and Drop to rearrange the Blocks
If you need to move a block of content from one point to another, this is where the drag and drop feature come in handy. It’s one of the easiest ways to move content around and can save you a lot of time while writing your inspired article. Just a reminder, in the old editor you could only copy (or cut) and paste when you needed to make some rearrangements.
To get the Drag and Drop option activated, you need to go over the six little dots on the left side of your block toolbar.
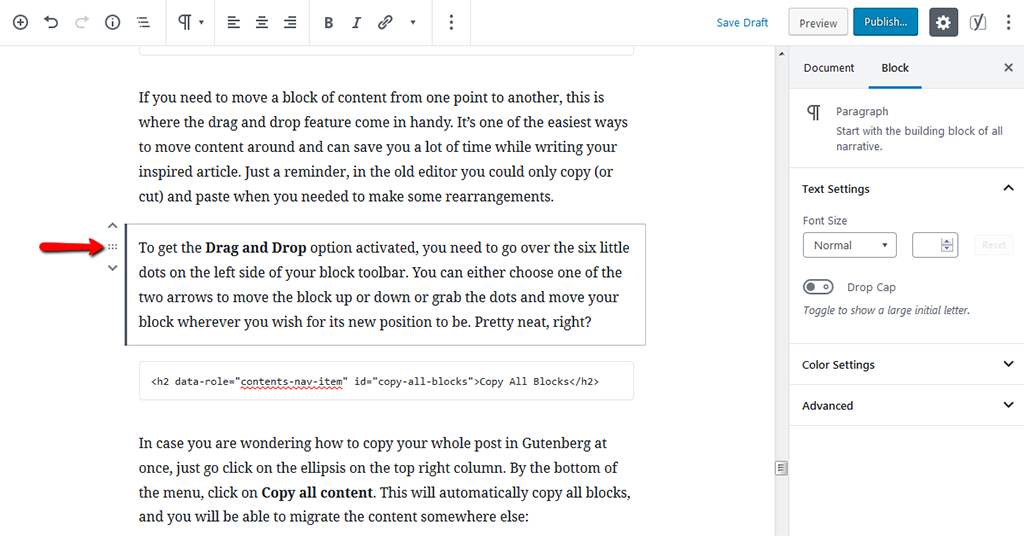
You can either choose one of the two arrows to move the block up or down or grab the dots and move your block wherever you wish for its new position to be. Pretty neat, right?
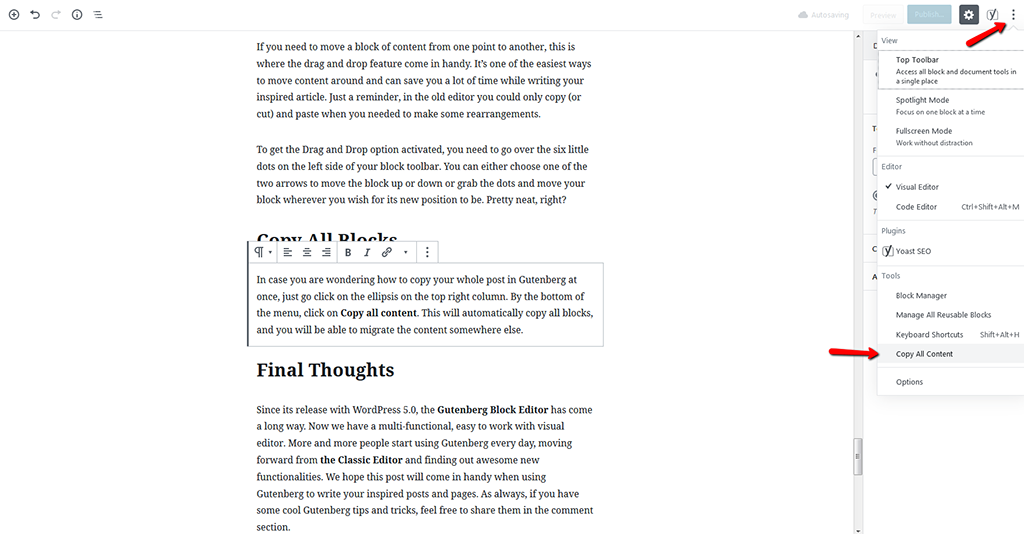
Copy All Blocks
In case you are wondering how to copy your whole post in Gutenberg at once, just go click on the ellipsis on the top right column. By the bottom of the menu, click on Copy all content. This will automatically copy all blocks, and you will be able to migrate the content somewhere else:
Final Thoughts
Since its release with WordPress 5.0, the Gutenberg Block Editor has come a long way. Now we have a multi-functional, easy to work with visual editor. More and more people start using Gutenberg every day, moving forward from the Classic Editor and finding out awesome new functionalities. We hope this post will come in handy when using Gutenberg to write your inspired posts and pages. As always, if you have some cool Gutenberg tips and tricks, feel free to share them in the comment section.

The latest tips and news from the industry straight to your inbox!
Join 30,000+ subscribers for exclusive access to our monthly newsletter with insider cloud, hosting and WordPress tips!
Joseph is part of the FastComet Marketing team. With years of content writing experience behind him, it's one of his favorite activities. Joseph takes part in the SEO of the FastComet website and blog. His goal is to write comprehensive posts and guides, always aiming to help our clients with essential information. Joseph also has a thirst for knowledge and improvement, which makes the hosting environment a perfect place for him.
No Comments