Cloudflare Security Settings
Updated on Sep 18, 2024
Cloudflare provides large variety of security settings you can configure. From DDoS protection to a fully integrated WAF(Web Application Firewall) Cloudflare offers not only CDN services but protection for your website as well. In this section of our tutorial we will go over the entire Security tab in your Cloudflare dashboard and explain what the options there do.
To get to the Security tab all you need to do is log into your Cloudflare account and then, on the Home page click on the website you want to manage. That will take you to the website's dashboard where you will find Security on the left. It has several subcategories and each of them has its own documentation you can find near the top of the page. The first one is Events which is what opens by default when you click on Security.
This post includes:
Events
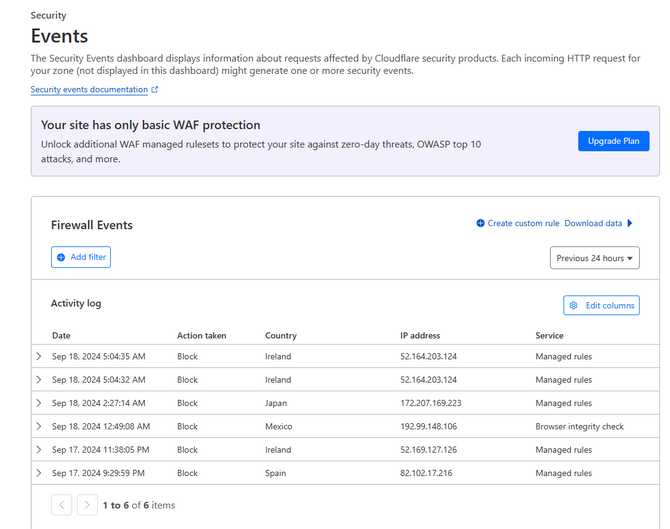
In Events you will find every instance where Cloudflare's security suite had to intervene by blocking or challenging the request. Challenging the request displays a JavaScript challenge. We have all seen that message that informs us our connection or browser is being checked, or the tickbox you must click to verify you are a human. Blocking or challenging a request like that ensures only good traffic proceeds to your website.
The main section of this page is the Activity Log where all such events are logged. Clicking on them will show you additional details about the origin and nature of the event but only subscribed users will have in-depth information about them. Additionally you can export each of these instances as a JSON file and also filter the results by time frame, action taken, source, HTTP method, etc.
Finally, as this is mostly an informational page, you will find a link to create your own custom rules within Cloudflare's firewall which will take you to the next section of the Security tab: WAF.
WAF
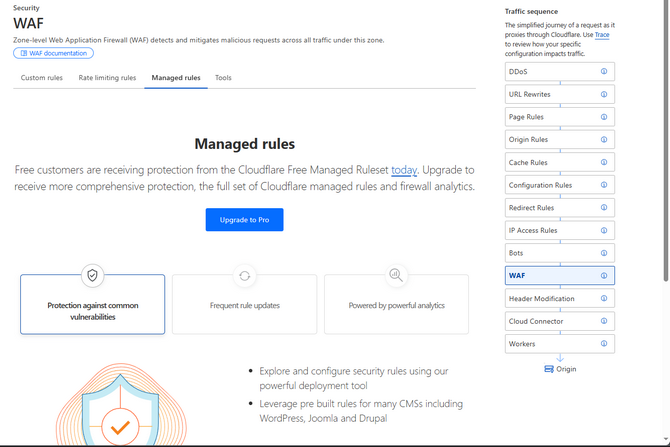
The abbreviation WAF stands for Web Application Firewall. Such a firewall sits between your web application (website, for example) and the rest of the Internet. Its purpose is to protect your web application by monitoring the traffic coming towards it and filtering out bad requests. In plain words: it protects your website from getting hacked! As you can see, it is an extremely useful thing to have! Fortunately, Cloudflare offers such a service as well and we will break down what it can do for you.
When you click on WAF you will be taken to the Managed Rules tab that you can see in the image above. Cloudflare offers all of its users a set of rules that Cloudflare itself manages. These rules have been meticulously curated and are receiving regular updates ensuring your website are protected from countless new and old vunlerabilities. The ruleset is also compatible with almost any web application, minimizing or entirely eliminating any impact it can have on it. Depending on your Cloudflare plan the rules available to you will vary but even the free ones will help immensely to secure your website. You can read more about what rules come with each plan in Cloudflare's documentation.
However, since we suspect most Cloudflare users are the free ones we will focus on what you can do in the WAF tab with that plan. Firstly, the Managed Rules tab contains only a link to Cloudflare's blog post about their firewall alongside some additional information what upgrading can do for you. So let us go back two tabs.
Custom Rules
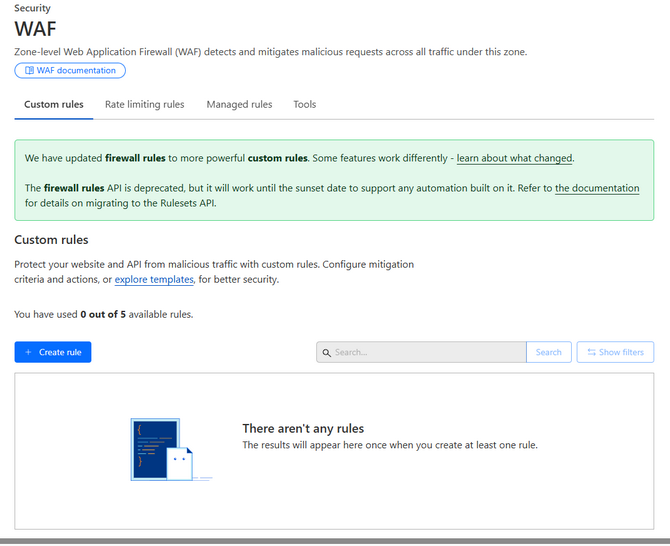
The first tab of the WAF section allows free users to create up to five custom firewall rules. You will see links to Cloudflare's documentation about this section at the top, some rule templates at the bottom and a button to create new rules. Free users can create up to five custom firewall rules. Clicking on the +Create Rule button will take you to the main feature of this page.
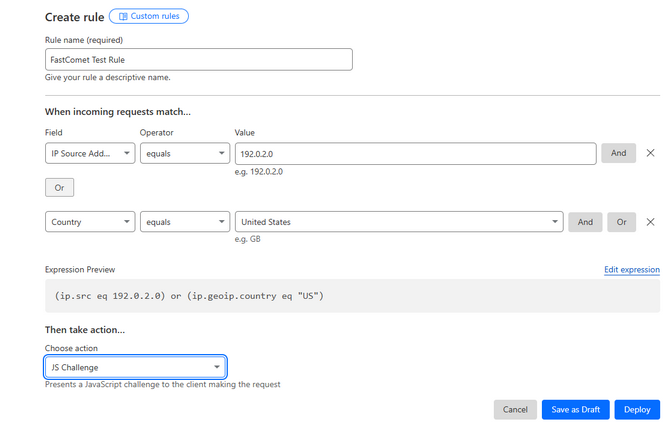
Here you can choose the parameters of your custom rule. The procedure is very straightforward. As you can see in the example above we have chosen an IP or a country and have selected that if a request comes that matches any of those two requirements, Cloudflare will issue a JS Challenge. You can have either an And or an Or variation, and the requirements and action lists are sufficient for almost any need. You can either save your rule as a draft and deploy it later or deploy it right away. When the rule is deployed it will appear in the Custom Rules table on the previous page.
Rate Limiting Rules
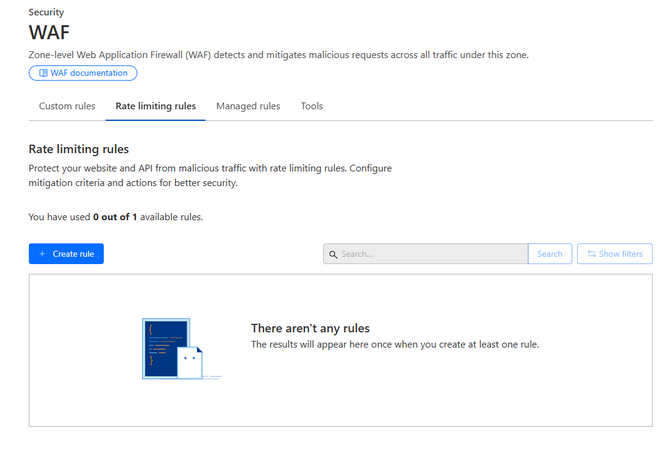
As the name suggests, this page allows you create rules that limit the rate requests can be made to a URI on your web application or by bots. The way it works is similar to the Custom Rules. There are as set of requirements that must be met before the Cloudflare firewall triggers. In this instance it is number over a period of time. Here, we will show you.
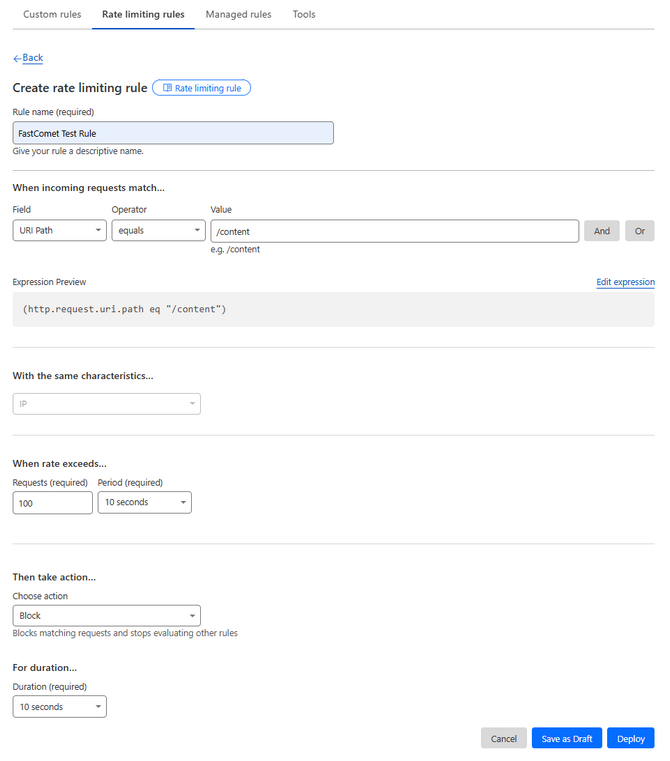
In the example above if any one IP sends requests to our /content directory at a rate of more than a 100 per ten seconds those requests will be blocked for ten seconds. As free users ten seconds is the only time frame we can choose but you can input any number of requests you desire. You can also rate limit bots in this same way if they are crawling your website too much. When you save your rule it will appear in the previous page. Free users can create only one rate limiting rule, though.
Tools
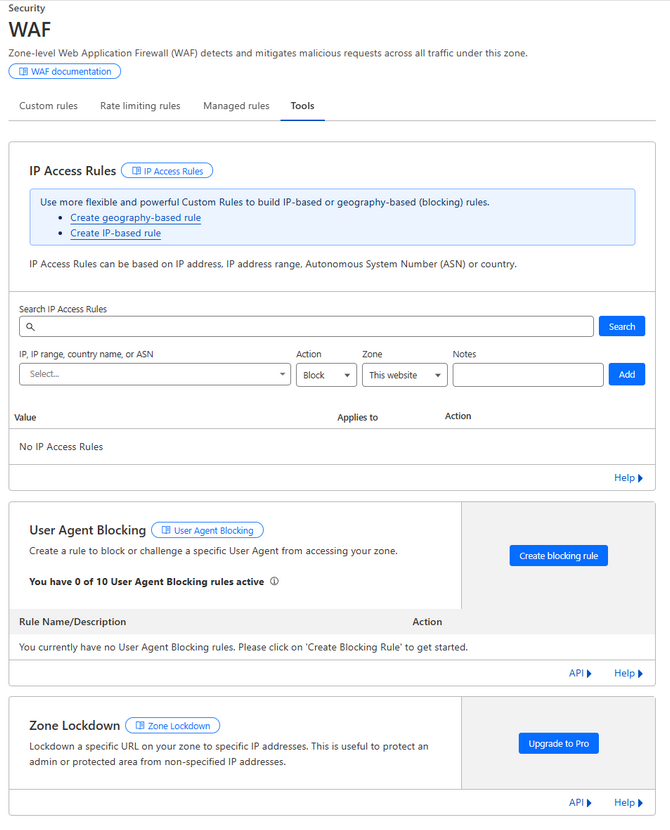
The final tab of the WAF section is Tools. Here you will be able to apply three other rules to further secure your web application from unwanted visitors: IP Acces Rules and User Agent Blocking. As a free user you cannot create Zone Lockdown rules, though. Here is what each of them does.
- IP Access Rules - You can block, allow, or issue challenges to specific IPs, IP ranges, countries or ASNs. Simply type in the number of name of the country, select the action that you want Cloudflare to take and select if this should apply to only the current website or to your entire Cloudflare account;
- User Agent Blocking - In case you want to block or challenge specific User Agents from accessing your website you can do so from here. Like with all other rules, provide the necessary parameters and Cloudflare will handle all the rest;
- Zone Lockdown - Through here you can prevent specific IP addresses from accessing a URL on your web application. This is useful if you want to ensure that only allowed IPs have access to sensitive parts of your website.
As you can see even the free plans in Cloudflare get access to some powerful firewall tools that can help to secure your website that much more against the ever-lurking threat of cyberattacks.
Page Shield
The next secton of the Security tab of your Cloudflare dashboard is Page Shield. While it is not aviailable to free users it is still a really good investment if your website requires extra security.
What Page Shield does is it monitors resources loaded by visitors to your website. Anything from their connections, to their cookies and even scripts that are being executed, Page Shield checks everything a user is loading and triggers alert notifications when it deems something is unsafe. Then, Page Shield will act according to the policies you have set up. Only specific resources are allowed through Page Shield and everything else is either logged for further review or outright blocked.
This tool is very useful for businesses who work with customer information, for example, preventing it from getting stolen. As it is not a feature for free users we recommend you read the documentation Cloudflare have if you would like further information.
Bots
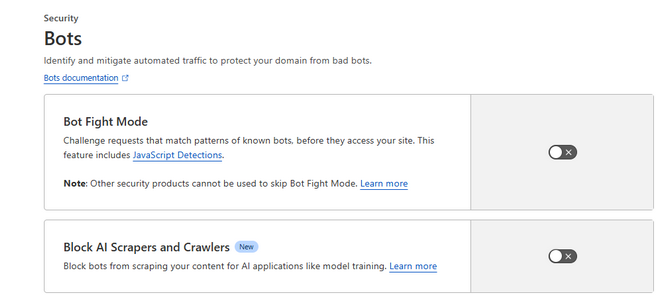
You may have guessed what this part of the Security section does by the name alone! Yes, it allows you to handle those pesky crawlers that eat up so much bandwidth and cause so many executions on your website. Additionally you can also block prevent your content from being obtained by AI-related bots if you do not want it to be used for AI training.
The two toggles are very self-explanatory.
- Bot Fight Mode - This mode is useful if you want to combat malicious bots while ensuring legitimate traffic (including "good" bots) is not blocked. Cloudflare is capable of identifying malicious bots via their behaviour, headers, or other techniques and when such a bot is identified it is issued a challenge. Malicious bots more often than not are incapable of solving it so they are filtered;
- Block AI Scrapers and Crawlers - As the name suggests, you can toggle this to prevent the content on your website from being collected to teach AI models. Useful if you have a lot of copyrighted content.
Even though there are only two options in the Bots section you can see just how useful they are.
DDoS
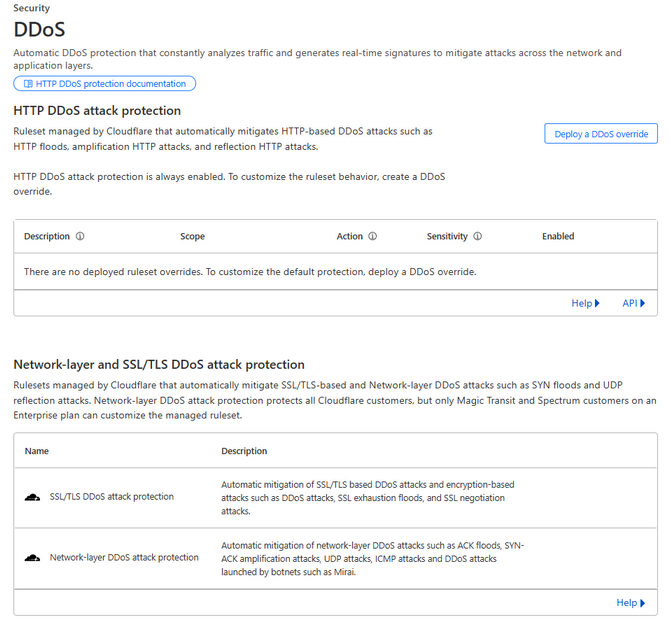
As you may already know that Cloudflare offers DDoS protection as part of its free services. That protection is enabled automatically and is constantly monitors the traffic to your website. However, what if you needed to customize that protection? That is where the DDoS tab in the Security section can help you.
Through it you can create DDoS Overrides which will change how the protection works. We recommend reading the Cloudflare documentaton on how to adjust the rules that are already set in place to ensure that you do not block legitimate traffic to your website. This is immensely useful if you are expecting a large spike in requests to your website that can look like a DDoS attack but are instead legitimate traffic.
Settings
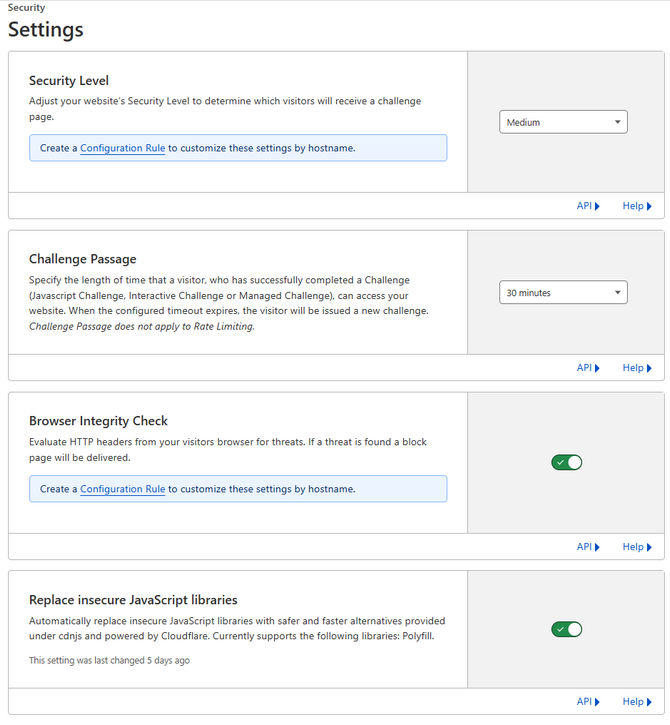
The final tab of the Security tab is Settings. Here you will find four other miscalleneous optioins you can toggle to round out the protection and accessibility of your website. Here they are.
- Security Level - Through here you can select which visitors are issued a JS Challenge. Each individual level represents a range of IP reputation. In short, IP reputation is the level of trustworthiness each IP on the Internet has. It is determined by the behaviour of an IP address over a period of time. If the IP has been doing suspicious or malicious things then its reputation goes down. So, Cloudflare has set the level to Medium which means that both threatening and moderately threatening IPs will be challenged. If you want to be even more secure set it to High. For a more lax approach set it to Low. The two extremes in the scale, though (Essentially Off and I'm Under Attack) will basically mean that either very few, if any, IPs are challenged or that all IPs are;
- Challenge Passage - Set the time frame a visitor who has completed a Challenge will remain authenticated to access your website. After this time has passed they have to do the challenge again;
- Browser Integrity Check - If you enable this, Cloudflare will evaulate visitors' browser headers for threats, blocking any bad connections;
- Replace Insecure JavaScript Libraries - Finally, if this is toggled, Cloudflare will automatically replace or update insecure JavaScript libraries with newer and safer ones.
With these settings our section about Cloudflare's Security tab is concluded. As you can see even free users get a lot of useful tools to fight off malicious traffic and keep their web applications secure.

CDN Hosting
- Free Domain Transfer
- 24/7 Technical Support
- Fast SSD Storage
- Hack-free Protection
- Free Script Installation
- Free Website Transfer
- Free Cloudflare CDN
- Immediate Activation