How to Upgrade/Downgrade your FastComet Hosting Plan
Updated on Oct 25, 2022
Being a website owner can be a complex and daunting task. You may have your ups and downs when it comes to website traffic and the resources your website(s) require from the server. Perhaps you have a store that is going stronger with each day and you need a shared hosting plan that gives you more power. Or maybe you've decided to refurbish your website into a one-page site that needs minimum resources to run.
The good news is that in cases where you need to upgrade or downgrade your shared hosting plan with FastComet—you can absolutely do that. In this guide, we will go through all the steps you need to take for both going to the next level of shared hosting, or stepping one (or even two) level(s) down.
This post includes:
How to Upgrade/Downgrade Your Shared Hosting Plan
Let's go into the details of how to upgrade or downgrade your shared hosting plan with FastComet.
How to Upgrade Your Shared Hosting Plan
In case the available resources with your account are not sufficient for your projects and you need to utilize more resources, you can easily upgrade your shared hosting plan by paying only the price difference between the two packages until the end of your current billing cycle.
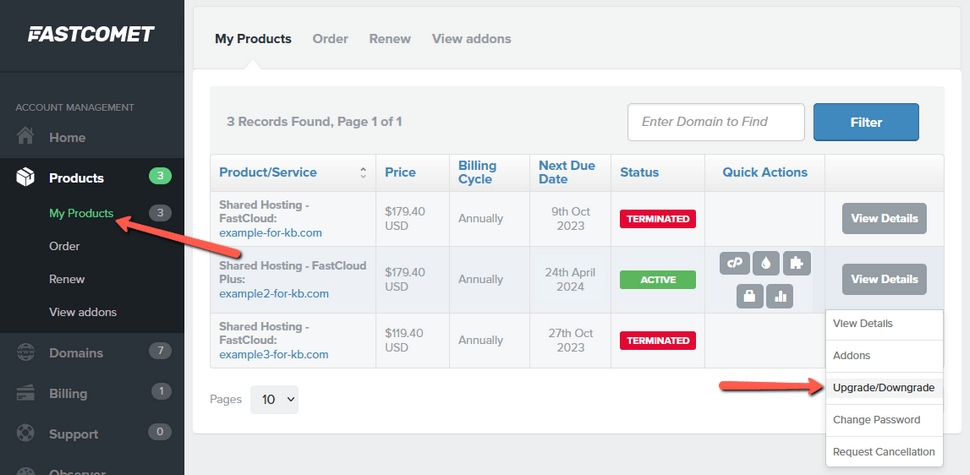
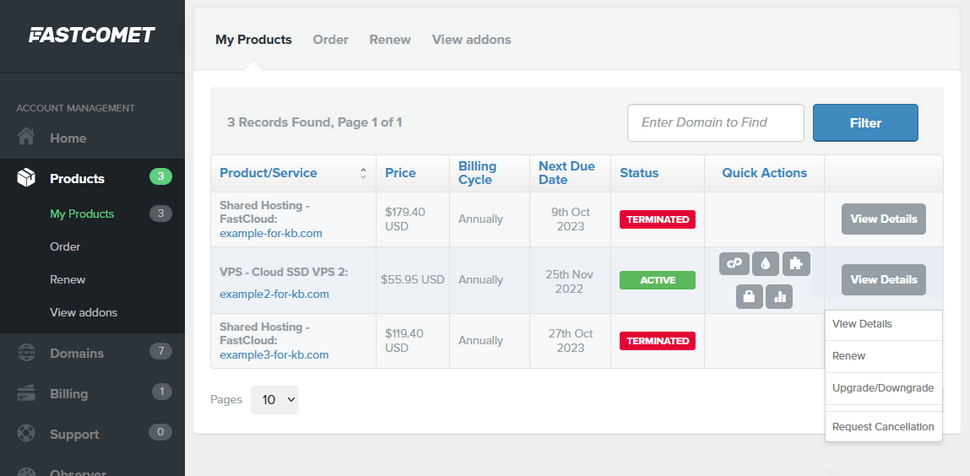
You can easily place an upgrade order for the upgrade of the plan via your FastComet account → Products tab → My Products → View Details. When you click on the View Details drop-down you will have the option to select Upgrade/Downgrade.
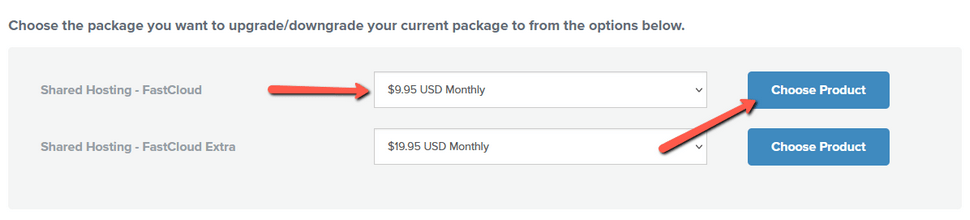
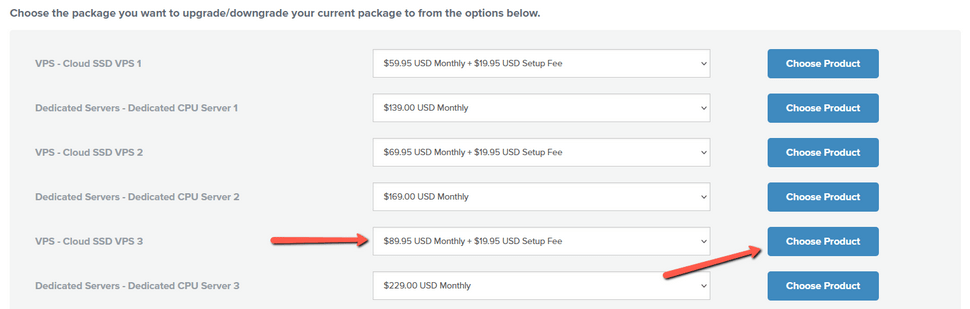
Once you click there, you will be able to select the preferred hosting package that you would like to use and its future billing cycle. You just need to click on Choose Product to proceed.

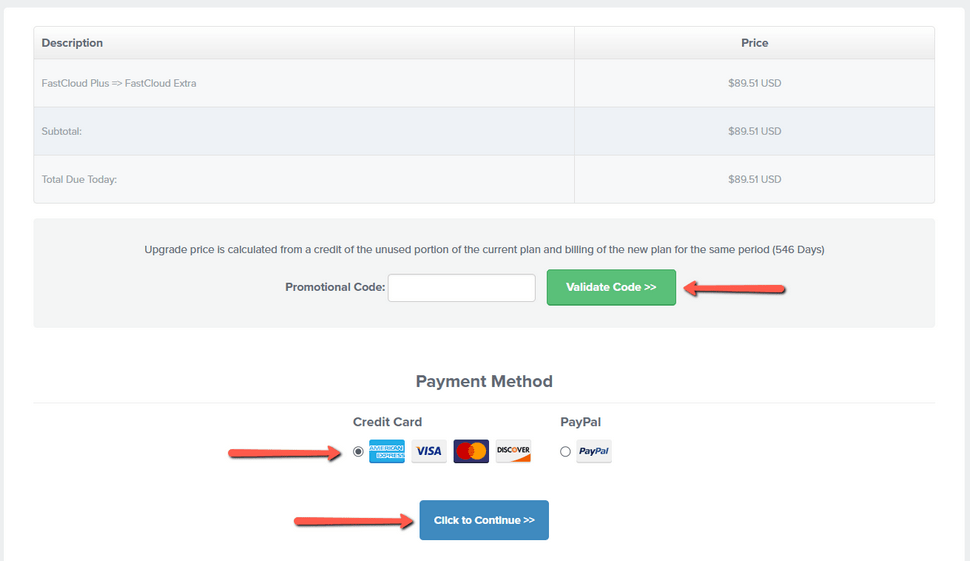
When you select the product that you will be using in the future, you will be redirected to a page, where you will be able to see a description of your order and the total amount due for the upgrade. You will also be able to apply a promotional code, select the payment method and proceed with placing the order when you click on the Click to Continue button at the bottom of the page.
Note that the upgrade process to the FastCloud Extra plan requires a server migration, as those packages are located within a different server environment. A ticket will be opened regarding the transfer to the new server as soon as the invoice for the upgrade fee is paid, and our Tech Team will handle the entire process. There is no downtime involved. However, the customer will need to update the DNS settings of their domains. The correct settings are provided by the Tech Team via the ticket.
How to Downgrade Your Shared Hosting Plan
In case you are not fully utilizing the resources of your account and would like to use a smaller plan, you can request a downgrade of your package. You can easily place an order for the downgrade of the plan via your FastComet account → Products tab → My Products → View Details. When you click on the View Details drop-down, you will have the option to select Upgrade/Downgrade.
Once you click there, you will be able to select the preferred hosting package that you would like to use and its future billing cycle. You just need to click on Choose Product to proceed.
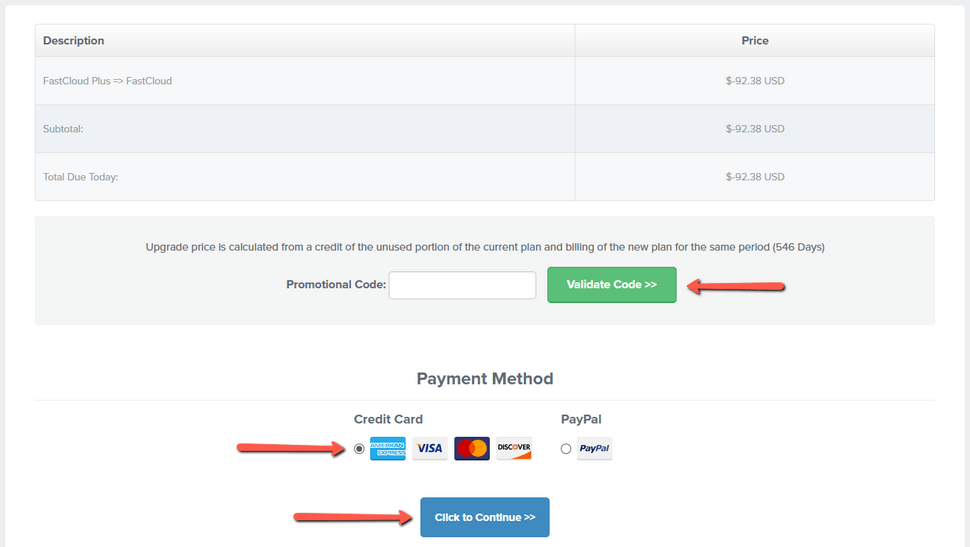
On the next page, you will see a brief description of your order, and you just need to click on the Click to Continue button at the bottom of the page to proceed. When you downgrade your hosting plan, the system calculates the price difference between the two packages until the end of your billing cycle and adds the additionally paid amount to the Credit Balance of your account. This way, the funds can be used for any future invoices. You will see the amount that will be added to the balance of the account on this page as well.
Note that the downgrade process from the FastCloud Extra plan to any of the two smaller shared hosting packages requires a server migration, as those plans are located within a different server environment. A ticket will be opened regarding the transfer to the new server, as soon as the downgrade order is placed, and our Tech Team will handle the entire process. There is no downtime involved. However, the customer will need to update the DNS settings of their domains. The correct settings are provided by the Tech Team via the ticket.
How to Upgrade from a Shared Hosting Plan to a Cloud VPS/DS server
In case you need to upgrade your shared hosting plan to one of the Cloud VPS or Dedicated CPU servers, which come with a dedicated amount of resources, you need to purchase a new plan first. This is the case as the Cloud VPS and Dedicated CPU servers are different types of hosting packages.
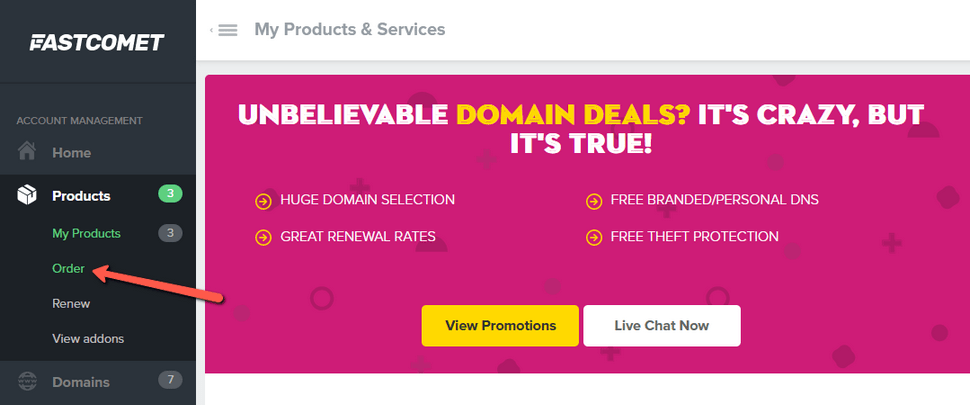
To place the order for the new server, you need to go through your FastComet account → Products → Order.
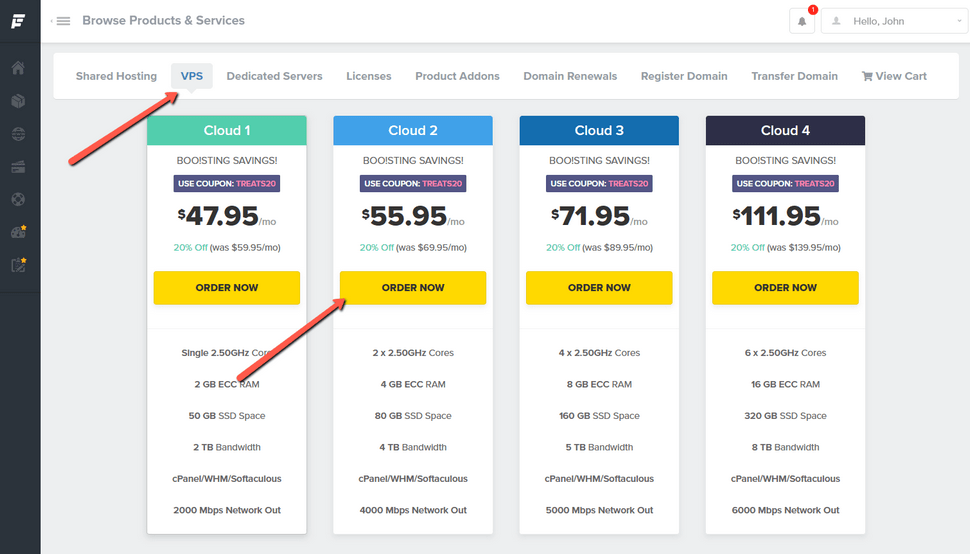
On the next page, you need to click on VPS or Dedicated Servers depending on the hosting plan that you would like to upgrade to. Then hit the Order Now button below the selected package, and you can proceed with placing your order for the new service.
Once you submit the payment for the new service, a ticket will be opened with the Tech Team for the setup of the new server. To proceed with the upgrade, you need to request the transfer of the files from your shared hosting plan to the new server within this ticket.
There is no downtime during the process, as both hosting plans will remain active during the migration. You will need to update the DNS settings of all of the domains though and the correct settings will be provided within the ticket with the Tech Team.
When everything is successfully transferred and working through the new Cloud VPS/ Dedicated CPU Server, you can reach the Billing Team by submitting a ticket, so they can assist you with the closure of the shared hosting plan. Any prepaid unused time on the shared hosting plan will be calculated and added to the Credit Balance of the account, so the funds can be used for future invoices.
How to Upgrade/Downgrade a Cloud VPS or Dedicated CPU Server
Whenever you need to use more or fewer resources with your hosting plan, you have the option to Upgrade or Downgrade the server, depending on your needs.
Upgrading a Cloud VPS or Dedicated CPU Server to a higher one
In case the available resources with your account are not sufficient for your projects and you need to utilize more resources, you can easily upgrade your Cloud VPS or Dedicated CPU Server by paying only the price difference between the two packages until the end of your current billing cycle.
You can easily place an order for the upgrade of the plan via your FastComet account → Products tab → My Products → View Details. When you click on the View Details drop-down, you will have the option to select Upgrade/Downgrade.
Once you click there, you will be able to select the preferred hosting package that you would like to use and its future billing cycle. You just need to click on Choose Product to proceed.
When you select the product that you will be using in the future, you will be redirected to a page where you will be able to see a description of your order and the total amount due for the upgrade. You will also be able to apply a promotional code, select the payment method and proceed with placing the order when you click on the Click to Continue button at the bottom of the page.
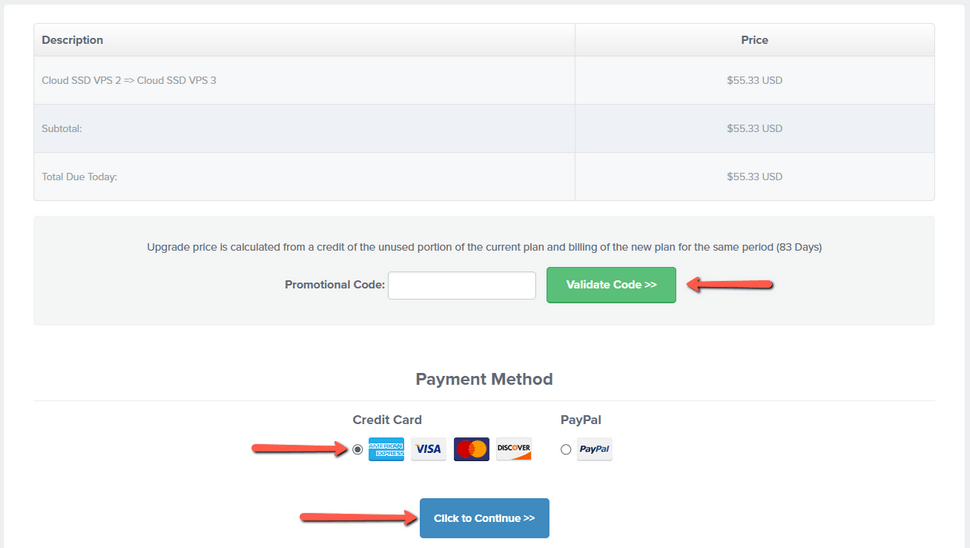
The upgrade process from a Cloud VPS or Dedicated CPU server to a higher one involves a downtime of up to 2 hours, as the server needs to be rebooted once the additional resources are assigned. A ticket will be opened regarding the upgrade as soon as the invoice is paid, and you will be able to initiate the upgrade by submitting a reply to the ticket 15 minutes before you would like the process to start.
Downgrading a Cloud VPS or Dedicated CPU Server to a smaller one
In case you are not fully utilizing the resources of your account and would like to use a smaller plan, you can request a downgrade of your package. You can easily place an order for the downgrade of the plan via your FastComet account → Products tab → My Products → View Details. When you click on the View Details dropdown, you will have the option to select.
Once you click there, you will be able to select the preferred hosting package that you would like to use and its future billing cycle. You just need to click on Choose Product to proceed.

On the next page, you will see a brief description of your order, and you just need to click on the Click to Continue button at the bottom of the page to proceed. When you downgrade your hosting plan, the system calculates the price difference between the two packages until the end of your billing cycle and adds the additionally paid amount to the Credit Balance of your account. This way, the funds can be used for any future invoices. You will see the amount that will be added to the balance of the account on this page as well.
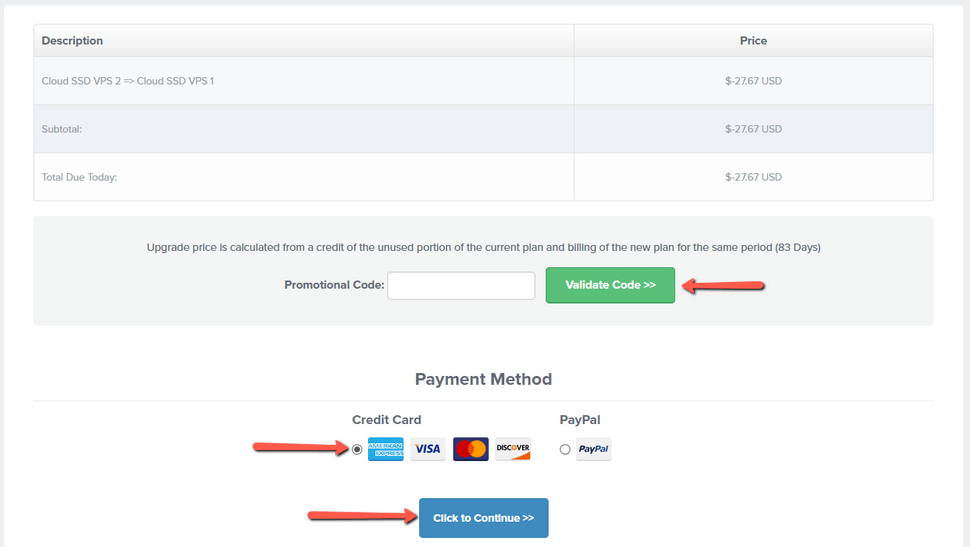
During the downgrade, there will be a downtime of up to 2 hours, as the server needs to be rebooted once the resources are amended. A ticket will be opened regarding the downgrade, as soon as the order is placed, and you will be able to initiate the downgrade by submitting a reply to the ticket 15 minutes before you would like the process to start.
Downgrading from a Cloud VPS or Dedicated CPU Server to a Shared Hosting Plan
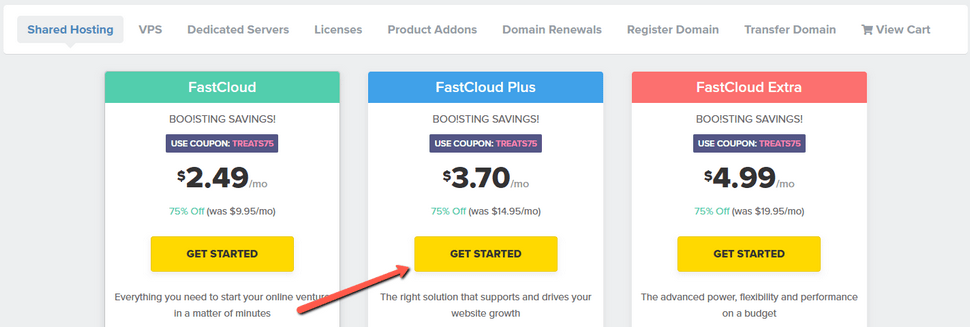
In case you decide that a shared hosting plan is more suitable for your project while you are currently using a Cloud VPS or Dedicated CPU server, you have the option to downgrade your plan in this case too. Since the Cloud VPS/Dedicated CPU Servers are different types of packages, you will need to place an order for a new shared hosting plan via your FastComet account → Products → Order.
On the next page, you just need to select the preferred shared hosting plan and click on the Get Started button.
Once you submit the payment for the new account and the service is activated, you just need to open a ticket through the Website Transfer category and request the migration of the files from the Cloud VPS/Dedicated CPU server to the new shared hosting package.
The Tech Team over the ticket will handle the entire transfer process and will provide you with the correct DNS settings for your new plan. There is no downtime during the migration to the shared hosting package, as both plans will remain active during the transfer.
When the files have been migrated to the shared hosting plan, and everything is working as expected, you can open a ticket through the Billing/Sales category of the account and request for the Cloud VPS/Dedicated CPU server to be discontinued. Any prepaid unused time on the service will be added to the Credit Balance of your account, so the funds can be used for future invoices.
We hope you find this article useful. Discover more about FastCloud - the top-rated Hosting Solutions for personal and small business websites in four consecutive years by the HostAdvice Community!

SSD Cloud Hosting
- Free Domain Transfer
- 24/7 Technical Support
- Fast SSD Storage
- Hack-free Protection
- Free Script Installation
- Free Website Transfer
- Free Cloudflare CDN
- Immediate Activation