How to Create an Image Gallery in WordPress
Updated on Sep 19, 2019
Do you want to create your own gallery for your WordPress site? An image gallery will let you add pictures and photos in rows and columns, which allows you to include more pictures in less space. At the same time, you are making it much easier for users to browse those images.
This post is to show you how easy it is to create an appealing WordPress image gallery. We will walk you through the necessary steps. So, let’s start, shall we?
We will show you both manual methods to make an appealing WordPress gallery. The post will cover:
Why Create an Image Gallery in WordPress?
When it comes to adding images to your blog posts and pages, WordPress makes it easy as pie. All you have to do is add the image block in Gutenberg and upload your image.
With that said, if you are adding several images, all of them would appear one after another, which does not look great. In such a case, your visitors will need to scroll a lot to view each image.
When creating a gallery, you may display images in a grid layout with rows and columns. You can put on thumbnails for your images, which are there for your visitors - they can click on the thumbnails and see the particular image in full resolution. All of this helps you show more images in less space, in addition to making you look more professional.
With WordPress 5.0 came the Gutenberg block editor, and with it - the Gallery Block. This block lets you make your gallery via simple clicks. Additionally, you can use some helpful gallery plugins to create even better looking, feature-rich galleries.
Create an Image Gallery without a Plugin
As we already mentioned, WordPress 5.0 comes with a built-in feature for creating galleries. The functionality is basic and does not offer a lot of options, but it will help you get the job done.
Here is how you create an image gallery in WordPress without any plugins:
- Edit the post or page on which you want the image gallery;
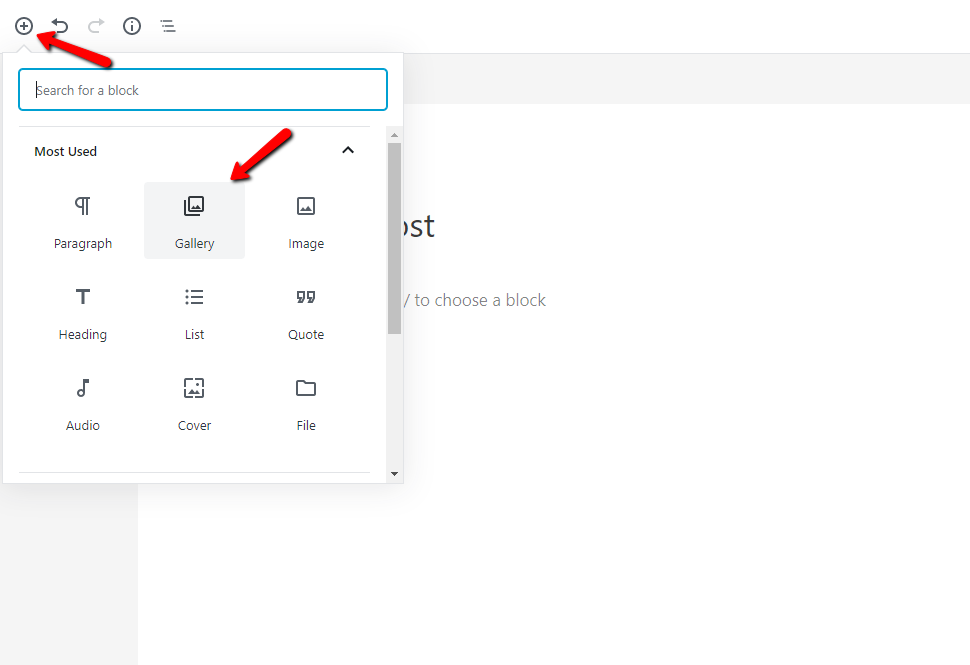
- On the edit screen of the post, click Add New Block and select Image Gallery:
- This adds the gallery block where you can choose Upload to add images from your device to your Media Library. Of course, you can also select from your previously uploaded images.
- If you click on the Upload button, then you can generally upload one photo at a time. However, you can select and open multiple images with CTRL key pressed on your keyboard.
- After you have uploaded all the images, you can add captions to them. Simply click on the photos, and you will see Write caption… option where you need to enter the caption:
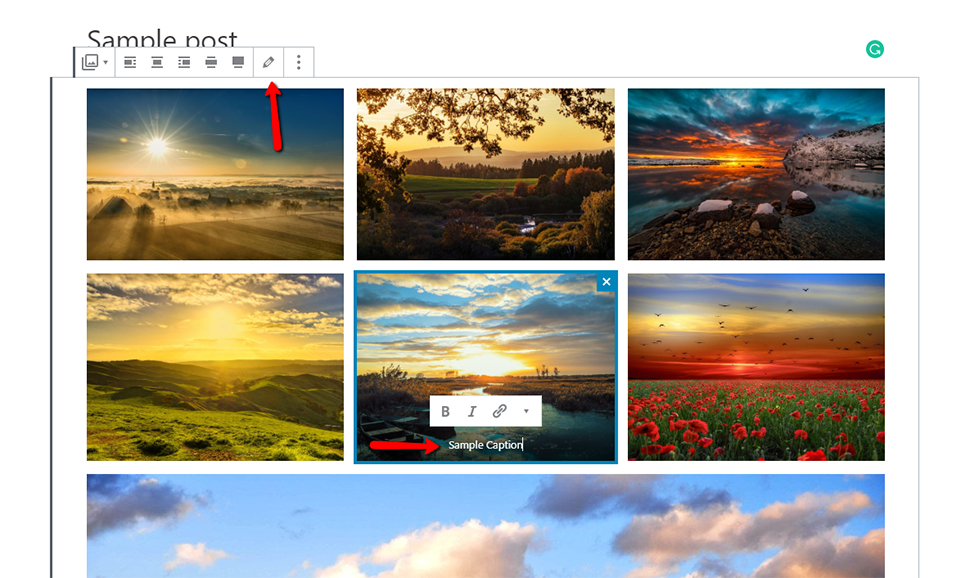
- You will see the Edit Gallery page, which is for adding/reviewing image captions. (the pencil on your block menu) There you can select images, enter the image alt text, title, and caption from the attachment details panel on the right side;
- Once you are done with your editing, click on Update Gallery, which is at the bottom-right corner:

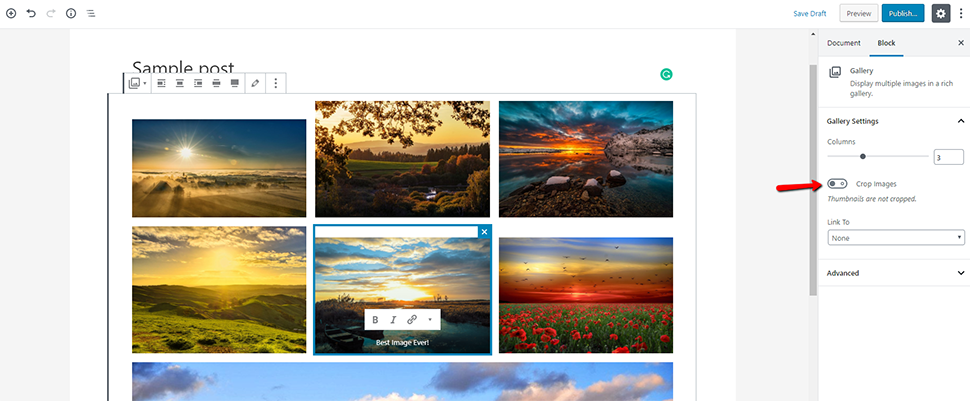
- Your post edit screen will then open with the gallery block settings panel on its right side. Now you are able to choose the number of columns on each row, enable and disable the Crop Images option, as well as decide where to link your images:
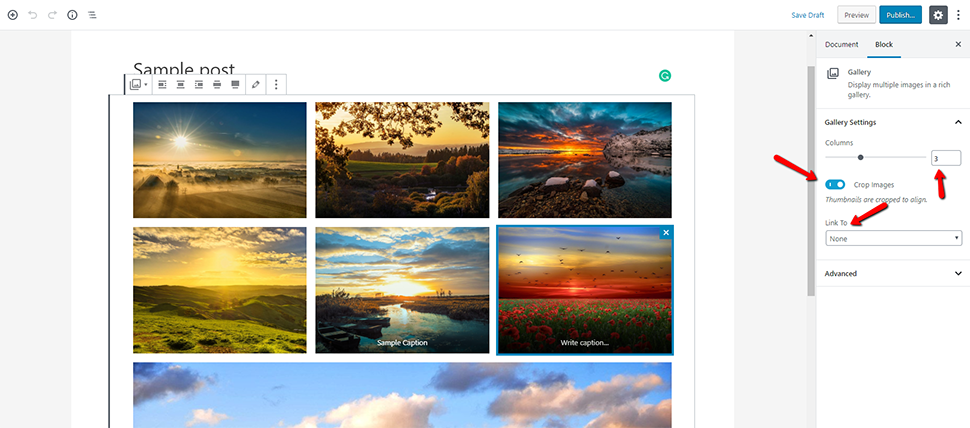
- From the Link To options, you have to choose None in case you want your users only to view the photo. That option disables the clicking feature for all gallery images.
- If you choose to select the Media File option, your images will be clickable. When someone clicks on an image, the image file will open. In the same manner, the Attachment Page would open if you choose the Attachment option.
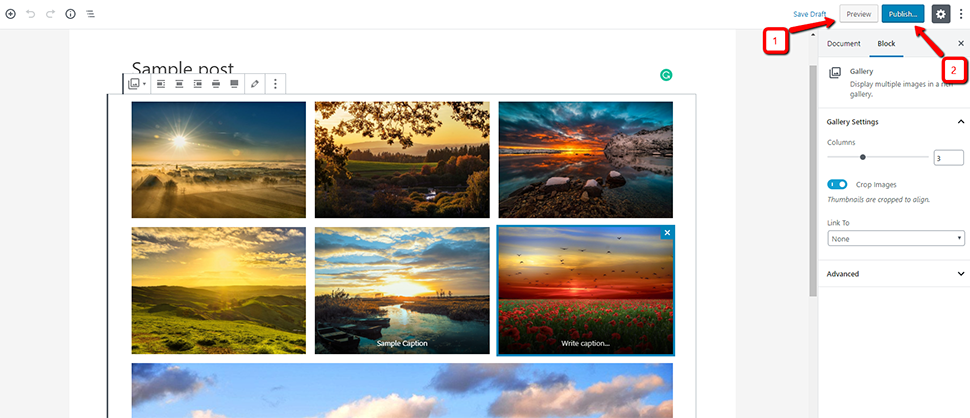
- When you decide that you are satisfied with the results, you can go ahead and publish your post. Of course, we recommend previewing it first:
Gallery Styles via Gutenberg
The two gallery styles you can implement in Gutenberg are the Grid-style and the Masonry-style. Choosing one of those is a manner of personal taste. Of course, we will shed some light on how to do both styles.
Grid-Style Image Gallery
If you want a simple grid-style gallery that has 2 - 4 images per row, you need to select all images that you wish to include and do that in a single go.
Your images should be arranged in 3 columns, as well as being appropriately cropped to fit your grid.
If you choose 7 images, for example, one of them could be alone on its row. That is rarely a problem since the design is responsive, and everything should be neatly arranged. That’s also why we mentioned it’s good to add all images together at once.
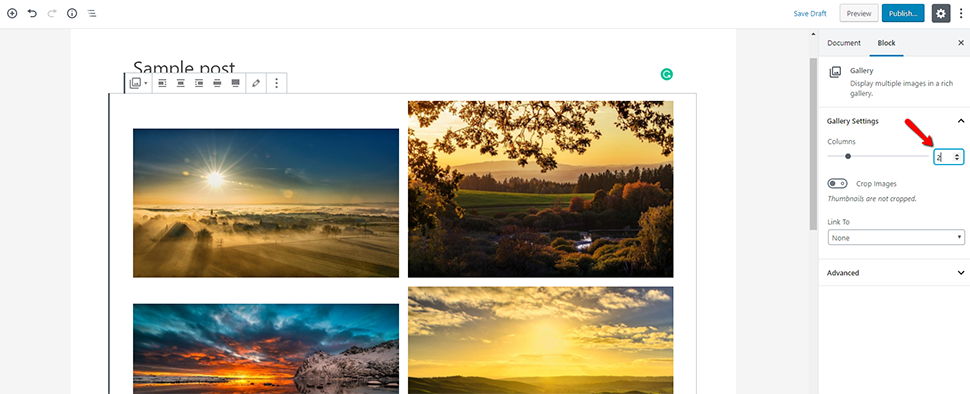
Feel free to make some changes to your default gallery layout. Let’s try a 2-column layout, rearrange the order of the images, as well as disable the cropping.
For all that, follow the steps below:
- Click on any image to be sure that you have the gallery block selected;
- Toggle OFF the Crop Images option;
- Change the column count by using the Columns slider, or just type in the number 2 instead of 3 as it is now;
- To change your gallery image order, click on Edit Gallery;
- Then you will be able to just drag-and-drop images to rearrange them in the order you want. That’s all for the grid-style image gallery.
Masonry-style Gutenberg Image Gallery
Do you have images that are different sizes and can’t be appropriately arranged in a grid-style? If that’s the case, you can try the Masonry-style image gallery, which can be much more pleasing for you and more appealing for your visitors.
The method we will share is not perfect, but it works. Since currently there aren’t a lot of functionalities when it comes to image galleries in Gutenberg, we need to include some do-it-yourself work.
Before starting with the masonry-style image gallery, you have to decide what you want your exact layout to be.
For this example, we will use 2 images in the first row, 1 in the second, and then 2 rows with 2 images on each of them.
Here is how you do that:
- Create a new gallery block (/gallery);
- Upload the first 3 images, using 2 for the first row and 1 in the second row. Set your Column count to 2. The first 2 images will be put side by side, and the 3rd will get dropped down on the second row.
- Next, we will add 4 more images, but do it in a new image gallery block. We do that because if we continue adding them to the gallery block we already have, we will create a grid-style gallery, and thus lose the single image on the second row.
- Add the new gallery block under the one you have just created;
- Select the rest of the images and set the layout to 2 columns.
Keep Note:
Depending on your theme, there might be larger than expected gaps between the two galleries. That’s why this is not a perfect method.
However, you can get a bit creative and add some text between the two galleries, making gaps look natural.
Image Gallery Pro Tips
Since WordPress 5.0 and Gutenberg, there are some things we can do with galleries, which were not possible before.
Here are some creative things that you can do and make the most of your image galleries.
Wide Width Image Gallery
Keep in mind that the wide width image gallery will work only on some of the WordPress themes that don’t support the Wide Width feature. The good thing here is that if your theme doesn’t support the feature at all, it will not be selectable. So, you don’t have to test your theme manually.
Selecting your gallery block and clicking on the wide width icon will make the image gallery wider than the main content area.
Full Width Gallery
In the same way, you can use wide width, you can choose the full width layout, making your gallery go all the way to your page edges. Again, your theme needs to support that option for it to be available.
This layout style works best when you have 3- or 4-column image galleries. That’s because otherwise, the images can get a little bigger than you want them.
When using the full width layout, it’s best to use only high-quality images. Otherwise, there is the risk of them get pixelated on larger desktop monitors.
Set your gallery to full width by just selecting your gallery block and then clicking on the Full Width button located next to the Wide Width button.
Lightbox Gallery Feature via a Plugin
Make your images not only appealing but functional too. When visitors are browsing your beautiful new image gallery, chances are they will want to click on images to see them a bit closer.
There are several plugins out there that give your gallery a lightbox (the pop-up effect) functionality. We have tested some of them, and right now our favorites are PhotoSwipe and lightGallery.
For this guide, let’s install PhotoSwipe. It’s free and looks neat and professional. PhotoSwipe can be navigated via mouse clicks, keyboard arrows, and for mobile devices - swiping. So, it will serve you well.
Here’s what you do to add a lightbox to your Gutenberg Image Gallery:
- Go to Plugins → Add New and Search for PhotoSwipe.
- Install the plugin and Activate it.
- Go back to your post where you have image galleries;
- Click on any gallery block and set the Link To option to Media File:
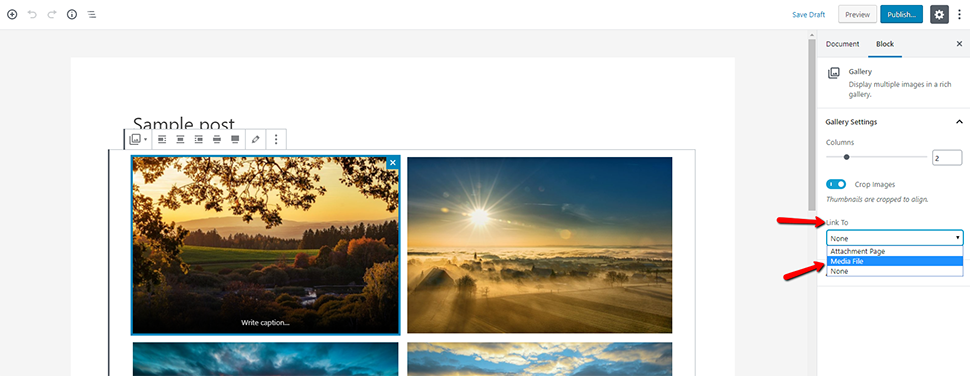
All done! Now you have galleries with clickable images to enter full-screen mode.
Cons of Creating an Image Gallery in WordPress without Plugins
If you often have to create image galleries, you will notice that the manual method lacks some essential features:
- Your images might be unclickable, or they could get opened in a new page/window. That’s not user-friendly, and could potentially frustrate your visitors, making them decide to leave your website for good;
- Your gallery depends heavily on your theme, which in most cases makes an image gallery look generic;
- You are unable to organize galleries into topics, tags, albums, etc.
- You have a gallery that is not stored anywhere. Therefore if you want to add a duplicate somewhere, you have to recreate it manually again.
If you wish to add better and more professional looking image galleries on your WordPress site, you need to use an image gallery plugin.
Choosing the Right WordPress Image Gallery Plugin
The built-in gallery feature, as we mentioned, lacks the functionality that most users desire. When you go on the hunt for the right Image Gallery Plugin, and if you want the best experience, there are some essential factors to consider.
While most image gallery plugins have free (lite) versions, the best of them are premium plugins. With that said, they would rarely break the bank. So, if you want good looking, fully-functional image galleries, an image gallery plugin is the way to go.
Features
Of course, you have to choose an image gallery plugin that comes with all the features you need. Some plugins come with plenty of features out-of-the-box, while others allow you to expand the core functionalities and work on necessary addons.
In general, before investing in a gallery plugin, you should definitely take a moment to examine the features that it provides. Ask yourself if it can meet your needs, and if not, continue browsing the plugin store.
Ease of Use
Having a feature-rich plugin is great and all, but you want to find the WordPress gallery plugin that will adapt to your workflow. A feature-overloaded plugin can make your user interface messy, while an easy-to-use plugin saves a lot of precious time when managing galleries.
Speed
Images are responsible for the majority of the downloaded bytes of any site. Whether you are a photographer, an artist, or a publisher that wants to display a photo gallery, you cannot afford to compromise on the speed of your site pages.
Speed is even more crucial for SEO, as Google keeps emphasizing it on its search algorithm in each of their updates. When you are choosing a plugin, make sure that it doesn’t make your site sluggish.
Updates
Is your chosen gallery plugin being updated regularly?
Your gallery plugin may have compatibility issues with new releases of WordPress if it is not updated regularly. When choosing a WordPress gallery plugin, you need to make sure it’s maintained and supported by a team you can rely upon.
If you have employees that are also going to work with the gallery plugin, you should gather them and make the choice as a team.
Now, let’s take a look at some of the high-rated plugins on the market.
5 Highly Rated WordPress Image Gallery Plugins
Envira Gallery
Envira Gallery is both easy to use and robust. The plugin comes with its set of pre-built templates that will let you customize the look and feel of your gallery with ease.
Unlike other popular WordPress gallery plugins, Envira is lightweight and non-bloated. The plugin comes with the full package of essential features out-of-the-box. You can also easily enhance the core functionalities by installing one of many addons.
Some key Envira Gallery features are:
- Drag-and-drop builder - create attractive galleries in seconds with only a few clicks;
- Responsive and mobile friendly - all galleries that you build with the help of Envira are 100% responsive. That means they will look great on every device;
- Standalone galleries - create your independent galleries and save them. They are not tied to your site’s posts and pages.
- Plenty of addons - you will be able to find an extensive addon collection, such as Videos, WooCommerce, Social Sharing, Watermarking, etc.
Modula
When it comes to resizing images in your gallery, Modula makes the job a piece of cake. By resizing your images, you can choose which of them to stand out. This plugin lets you instantly preview changes that you have made to your gallery. So, you don’t have to switch back and forth between Preview and WordPress dashboard.
The free Modula version is available from the official WordPress.org directory, but it naturally comes with limited features. The price for the pro version of the plugin starts at $29 for 1 website, being $99 for unlimited sites.
NextGEN Gallery
NextGEN Gallery is actually the most popular WordPress gallery plugin with more than a million active installs. It comes in a bundle with all the needed features out of the box. However, if you want a lightweight plugin with minimal features, you might find NextGEN Gallery a bit bloated.
The plugin’s free version offers two main gallery display styles, as well as two album styles. The premium version gives you the premium gallery displays, pro lightbox display with image commenting, in addition to social sharing.
NextGEN Gallery also provides some different ways for image organizing, such as:
- Batch uploading of images;
- Importing metadata from your photos;
- Grouping your galleries into albums;
- After uploading images to your WordPress site, you can group them to make a slideshow or a thumbnail gallery.
NextGen gallery also has eCommerce features, as well as many other powerful features that professional photographers desire.
FooGallery
Similarly to Envira and Modula, FooGallery also has a lite version that can be downloaded from the official WordPress plugin repository.
With FooGallery, you have the opportunity to arrange your images exactly the way you want by using its drag-and-drop reordering function. It also offers gallery templates for you to choose from, so you don’t need to create a gallery from scratch every time.
Is your gallery plugin currently NextGEN? If that’s the case, you should know that you can import and convert all your NextGEN galleries into FooGallery in a few clicks.
FooGallery is a developer-friendly plugin that comes with various hooks and filters to help you quickly customize the plugin per yours or your clients’ needs.
WP Photo Album Plus
WP Photo Album Plus is a robust photo album plugin. It lets your site visitors rate and comment on images (photos).
The plugin setup is not as straightforward, especially when compared to other WordPress image gallery plugins. Nevertheless, it comes with some extra customization options than most free WordPress gallery plugins.
WP Photo Album Plus gives you full control over the metadata like Exchangeable Image File Format (EXIF) and the display sizes. It also offers you to upload images from the frontend of your WordPress site and has loads and loads of built-in features such as lightbox overlay system, search functions, and Google Maps.
The uniqueness of WP Photo Album Plus is that it is bundled with 20 different widgets to add to your website, including Featured photos, Photo of the day, Photo rating, etc.
Conclusion
Having a gallery is specific to each site owner. An image gallery displays your style and your vision. No matter what kind of images you are presenting (art, photography, pictures, etc.), your gallery should be set exactly the way you want. This is why it’s not something you just do like a daily chore. This is why you spend some more time until it’s perfect in your eyes. We hope we helped you understand the different ways you can create an image gallery in WordPress. If your site is focused around your galleries, we recommend using a plugin (even if it’s the lite version) for better appeal on your website visitors.
In case you are not currently using WordPress, and you want to try it out, you should know that FastComet offers Fully Managed WordPress Hosting. If you wish, you can check our pricing.
If you already have your WordPress gallery, you probably want to go over it one more time, after reading our article. And if you don’t have one, now you know how easy and fun it is to create it. Create your beautiful, vibrant galleries and share them with everyone.
We hope you find this article useful. Discover more about FastCloud - the top-rated Hosting Solutions for personal and small business websites in four consecutive years by the HostAdvice Community!

WordPress Hosting
- Free WordPress Installation
- 24/7 WordPress Support
- Free Domain Transfer
- Hack-free Protection
- Fast SSD Storage
- Free WordPress Transfer
- Free CloudFlare CDN
- Immediate Activation