
Boost Your SEO Efforts Instantly with XML Sitemap
Crawlers of various search engines constantly study and collect information from a huge number of websites around the world. These programs are autonomous and trained in such a way in order to effectively scan website pages. The collected information about web pages is passed to the index, and they can be ranked by specific search queries. “But where does the sitemap come in?” – you ask. They are needed so the procedure for scanning web pages and site content can be as accurate as possible.
Today, the creation and regular updating of sitemap XML is the default standard for most websites and is also among the mandatory stages of technical optimization.
Table of Contents:
What Is an XML Sitemap?
An XML sitemap is an XML file that contains a list of all available site URLs, each of which has specific metadata. The most important are:
- Address and type of web page;
- Date and time of the last web page update;
- Refresh frequency;
- The priority of the web page in the overall structure of the site;
- Availability of language versions.
Here’s what Google states on their help center page:
A sitemap tells the crawler which files you think are important in your site, and also provides valuable information about these files: for example, for pages, when the page was last updated, how often the page is changed, and any alternate language versions of a page.
Keep in mind that the use of the sitemap protocol does not guarantee that web pages will be indexed by search engines. This is simply an additional hint for crawlers who can perform a more thorough site scan. However, in most cases, using a sitemap helps optimize the crawl process and prevents possible errors.
Google began using XML sitemaps back in 2005. Search engines like MSN and Yahoo joined shortly after. Nowadays, search engines use sitemaps for even more than just URL discovery.
The Purpose of Sitemap XML
Using sitemap XML enables search engine crawlers to be more efficient in the following ways:
- Prioritize web pages according to specified parameters.
- Fix the refresh frequency of the site pages.
- Determine which of the site’s pages are new and require mandatory indexing.
- Determine if there were any changes to pages that have been indexed before.
- Scan media content on a website (images and videos).
- Scan the news feed of the site.
- Index all necessary pages of a website.
Now, we can conclude that the main purpose of sitemap XML is to help search engine robots scan the various content on the site pages as correctly as possible.
Sitemap XML Formats
According to the Search Console reference information, Google supports the following sitemap formats:
- XML;
- RSS, mRSS and Atom 1.0;
- text file;
- Google platform site.
In this post, we will only cover the XML format. For the XML format, there are three mandatory requirements that must be followed when creating an XML sitemap:
- A single file cannot contain more than 50,000 URLs;
- The file size should not exceed 50 MB;
- Only UTF-8 encoding is allowed.
As you can see, the main restrictions are related to size, which is why it’s possible to create multiple files. In this case, you can create a site map, the so-called sitemap index file, and list all used files in it. In case your sitemap XML is larger than 50 MB, it can be compressed using a GZIP archiver.
Sitemap XML Classification
According to the Search Console reference information, Google supports the extended syntax in the XML file for the following data types:
- images;
- video;
- news;
An XML sitemap for images is a file with information regarding only the images of your website. With this, you can specify a list of images available on the website and, most importantly, specify information for each image, which may be the name of the image, its caption, location, etc.
XML sitemap for video is a file with information regarding the video content of your site. In it, you can list the video content available on the website along with its description. The description can contain title, video duration, publication date, number of views, etc.
A sitemap XML for news is used to optimize your site for Google News.
The simplest and most commonly used sitemap is an XML sitemap for website pages, which actually describes the site structure.
HTML vs. XML Sitemaps
You may have heard that there are actually two types of sitemaps: HTML and XML. Here are the differences between the two.
Different Format
It’s obvious that HTML is a different format from XML. However, there’s more: while HTML sitemaps are visible to website users, XML sitemaps are feeds only for search engines.
Same Purpose in Different Ways
Both help search engines discover new URLs—pages, videos, or images.
XML sitemaps are custom feeds that help search engines easily understand the priority of URLs they should crawl, how often those URLs change, and which new ones were added to the website. That is especially helpful for search engine schedulers as they can better estimate when and how often to recrawl a specific URL.
HTML sitemaps also help search engines discover new URLs. However, that is through the discovery of links they follow, meaning that HTML sitemaps can only be an effective URL discovery tool if they are being crawled and if the links are followed.
Different Side-benefits
XML sitemaps have meta-attributes such as <changefreq> or <lastmod> to indicate how the state of URL changes. They can also carry extensions for videos, images, and news.
HTML sitemaps distribute PageRank throughout a website, and that is what they are mainly used for, aside from the navigational value for users. HTML sitemaps are often linked in the footer of a site. Because of that, they are usually linked from every web page and may distribute that incoming PageRank to other pages with weaker internal linking.
Number of XML Sitemaps You Need
Before creating a sitemap, you need to understand how many sitemaps you need. Normally, one is enough. Still, there’s a number of cases when you’d have to create several sitemaps.
Splitting Large Sitemaps
Search engines will only crawl a sitemap with a maximum file size of 50MB when uncompressed and containing no more than 50,000 URLs. Google has imposed such limitations for a reason—they ensure that your web server does not get overloaded when serving very large files.
It is also recommended to compress sitemap files using a tool such as gzip to save bandwidth. When a sitemap is compressed, the .gz extension is added to the filename—e.g. Sitemap.xml.gz.
So, if you have a huge website and, thus, a huge sitemap file, you’ll have to break it into several smaller ones. Otherwise, you’ll get a Sitemap file size error when submitting a sitemap to your Google Search Console.
Multiple Sitemaps for Different Website Sections
It is also a good practice for e-commerce websites to distribute website pages belonging to different categories across several sitemaps. For example, you can split product pages, category pages, blog posts, etc. It allows webmasters to notice if some types of pages have indexing issues. Also, as product pages are updated more often than others, with multiple sitemaps you’ll only have to update one product sitemap instead of revamping the sitemap for the whole website.
Using smaller sitemap files for different website sections is also good technical-wise. Your sitemaps file size may not exceed 50 MB and the number of listed URLs can be under 50,000, but the more pages you list—the more unnecessary strain they put on your web server. This can lead to truncated responses or timeouts, and thus crawling errors may occur. By using smaller sitemaps, you can prevent such issues.
Video, Image, and News Sitemaps
In addition to sitemaps listing website URLs, Google allows creating custom sitemaps for your image and video content as well as news sitemaps.
The latter will come in handy for news websites—since such websites handle time-sensitive content, it’s crucial for Google to discover news articles as fast as possible. To make sure users get up-to-date information, Google allows only including fresh articles into a news sitemap—they should be published within the last two days. Besides, you can include no more than 1000 articles into a single news sitemap, but since you’re supposed to remove older content from it, that is not a big deal. The last—and probably the most important—condition is that your website should be registered with Google News.
Speaking of Image and Video sitemaps, they will be of great use for websites that heavily rely on media content, e.g. stock photos, libraries, or streaming platforms. Image sitemaps increase website chances for getting featured in image search and a Video sitemap helps Google rank your video content.
Here you can provide Google with additional information on your media—for example, you can indicate the image title and caption. For a video, you can specify its length, rating, family-friendliness, and more.
Image sitemaps increase your site’s chance to be found in Google image search. You don’t need to have a dedicated image sitemap; you can also use image extensions in your regular sitemap.
Here is what image extensions look like (XML specifications):
<?xml version="1.0" encoding="UTF-8"?>
<urlset xmlns="http://www.sitemaps.org/schemas/sitemap/0.9"
xmlns:image="http://www.google.com/schemas/sitemap-image/1.1">
<url>
<loc>http://example.com/sample.html</loc>
<image:image>
<image:loc>http://example.com/image.jpg</image:loc>
</image:image>
<image:image>
<image:loc>http://example.com/photo.jpg</image:loc>
</image:image>
</url>
</urlset>
Video sitemaps function after the same principle: either create a dedicated sitemap or add extensions to your regular one:
<url>
<loc>https://example.com/mypage</loc>
<video> ... information about video 1 ... </video>
</url>
Still, most websites don’t really need separate image and video sitemaps—to ensure Google sports your critical image and video content, you can simply add their URLs to your regular sitemaps.
Pages to Include in a Sitemap
This part of our site-mapping crash course is extremely important, so read carefully!
One common misconception is that to help Google crawl and index your site, you need to include all your website pages into a sitemap. In fact, it’s the other way around. Google doesn’t need to see all the garbage pages you may have on your site—you only need to tell it about high-quality juicy pages that you believe deserve ranking high. By including some pages into your sitemap, you ask Google to focus on them. It may or may not follow your advice, but that’s a different story.
As a rule of thumb, all the pages you add to a sitemap have to be 200 OK pages filled with high-quality content that serves the users. That means you should exclude all pages that do not meet these criteria while bearing in mind some exceptions.
4XX Pages in XML Sitemap
4XX response codes mean that the requested page does not exist or has restricted access, so in most cases, you don’t want to include such pages into your sitemap.
4XX Pages not to Include
404 are deleted pages, so if such pages were removed on purpose, keep them away from your sitemap. The same goes for soft 404 pages that were removed but still return a 200-level success status code. Normally those are pages with little or no content, redirects to the homepage, or 404 pages blocked by robots.txt. Soft 404s are generally not good for your SEO, so spend some time fixing this issue.
Remember to create a custom 404 page to ensure a smooth user experience.
Another popular 4xx status code is 401—it means that Google is “not authorized” to access the page. Normally, such pages are intended for logged-in users, and you don’t want Google to index them. Therefore, you don’t need these pages in your sitemap.
4XX Pages You May Need
In some cases, you may actually want Google to crawl and index a 401 page. For instance, it happens that you had password-protected a page under development and then forgot to lift the restrictions when the page went live. Also, sometimes webmasters restrict access to certain pages to protect them from bad bots or spammers. In such cases, you need to enable a DNS lookup to verify that a web crawler accessing your page is the Googlebot.
3XX Pages in an XML Sitemap
3xx are redirect pages, and you may or may not want them on your sitemap depending on the redirect type.
3XX Pages not to Include
A 301 response code means that a page has been permanently redirected to a new address and the original page no longer exists. Therefore, such pages shouldn’t be in your XML sitemap. The only thing to remember in this case is to include the destination URL in the sitemap.
3XX Pages You May Need
302 pages are temporarily redirected pages. For example, such a redirect is often used for A/B testing—this is when part of the users are sent to the test a URL. In this case, you want to keep the original page indexed, so obviously, it should stay in your sitemap. The test page, on the other hand, shouldn’t get indexed because it will be a near-duplicate of the original page. So, you need to mark the original URL as canonical and keep the test URL away from your sitemap, just like all non-canonical pages.
5XX Pages in XML Sitemap
5XX status codes mean that there’s a problem at your web server’s end. The most common out of 5xx codes is a 503 Service Unavailable error that says the server is temporarily down. It may occur because the webserver was under maintenance or got overloaded.
If the error was spotted just once, there’s nothing for you to worry about as it was probably due to scheduled web server maintenance. If, on the other hand, the problem persists, you’ll have to figure out what’s causing it and fix the issue asap—otherwise, Google may conclude that your website is poorly maintained.
With 5xx pages it’s not really about adding them to your sitemap or not, but about fixing an issue to make sure pages’ have a response code of 200 OK.
Non-indexable Pages
Every website has a number of utility pages that are important for users, but not for search engines—login pages, pages available upon logging in, sorting and filtering pages, etc. A common practice is to block such pages with the robots.txt file so that Google can’t access them. Or one may let Google crawl the page, but restrict its indexing with special directives (noindex or all).
Naturally, all these pages shouldn’t be on your sitemap. If a page cannot be indexed but is featured on your sitemap, it not only confuses Google but also wastes your crawl budget. The same goes for pages blocked by robots.txt—Google won’t be able to crawl them.
If you want Google to deindex a page and apply a noindex tag on it, make sure not to add this page to robots.txt file. You can also keep it on your sitemap before the page falls out of the index.
It is also a good idea to audit your site to make sure the noindex directive and robots.txt file are used properly, and you have not accidentally blocked the wrong pages.
You can easily find all such pages using SE Ranking’s Website Audit tool. After launching an audit, you’ll have to go to the Crawling section of the Issues Report.
By clicking on the number of respective pages, you’ll see a full list of URLs marked as noindex or blocked by robots.txt along with other important parameters such as the number of internal links pointing to the page, all the robots meta tags and x-robots tags, and page title. You’ll also immediately see whether the page is currently included in your sitemap.
Non-canonical Pages
A canonical tag is used to mark which of two or more similar pages is the main one. Google is supposed to index and rank the preferred page and ignore duplicate or near-duplicate ones. Similar pages marked with canonical tags can have totally different URLs or similar URLs (e.g. URLs generated in the process of sorting and filtering, URLs with UTM tags and tracking parameters).
Sometimes, canonical tags are also used to make a page accessible through both HTTP and HTTPS as well as both with and without the www prefix. In this case, the main version of the page (for instance the HTTPS non-www variation) is marked with rel=canonical. However, most websites prefer server-side redirects in this case, as they are more straightforward and guarantee that only the preferred website variation will get indexed.
Canonical tags work differently than redirecting, they are more like recommendations than directives, and Google can follow or ignore them. This is why having non-canonical URLs in a sitemap is really confusing from the search engines’ viewpoint. If the page is not marked as canonical, it tells Google you don’t want to have it indexed. At the same time, you add the page to your sitemap encouraging Google to index the page. As a result, Google can index all the page versions, and you’ll have to deal with keyword cannibalization. Or the search engine may choose to index the non-canonical URL, which is something you don’t want as well.
Pages to Keep Away from Your Sitemap
Now, let’s quickly summarize, which pages you shouldn’t include in your sitemap:
- deleted 404 and soft 404 pages, password-protected 401 pages;
- permanently redirected 301 pages;
- non-indexable and non-canonical pages—this category includes login pages and pagination pages, filtering and sorting pages, site search result pages and Parameter or session ID-based URLs, etc.
By only including high-quality pages in your sitemap, you increase your overall site quality in the eyes of Google, which should positively impact your rankings.
Sitemap XML Tags and Their Settings
I’ve already mentioned that along with website URLs, a sitemap features various tags that specify page parameters. Here’s an excerpt from our blog’s XML sitemap for you to see how the tags are organized.
Now, let’s go through every one of them for you to understand which purpose the tags serve and how to use them properly.
<urlset>is a mandatory element that encapsulates a sitemap and indicates which version of the XML Sitemap protocol standard is used (via thexmlnsattribute). Protocol standard is also called namespace<url>is another mandatory element that marks a block with all information pertaining to a single URL<loc>is the last mandatory element that indicates the page URL itself. All listed URLs should be fully-qualified—contain site protocol (HTTP or HTTPS) as well as the www prefix if it is included in your domain name<changefreq>defines how often a page can change. You can set this parameter as always, hourly, daily, weekly, monthly, yearly, or never<priority>sets the crawling priority of a page (valid values range from 0.0 to 1.0)<lastmod>indicates the last time the page content was updated
Make sure that you use the same syntax when specifying a URL. Also, sitemap files should be UTF-8 encoded.
Now, in the past, Google consulted <changefreq> and <priority> tags to define which pages should be prioritized during website crawling. Therefore, webmasters had to carefully set these parameters for each page. This hasn’t been the case for years now. John Mueller and Gary Illyes have confirmed that Google now ignores <priority> tags with Gary Illyes calling the tag “a bag of noise”.
The same goes for the <changefreq> tag.
The only optional tag that still counts is <lastmod>—Google may consult it if the tag is precise enough. By precise Gary Illyes probably means that the tag should be only updated when some significant changes were made to the content. Updating the tag to fool Google into thinking that your content is fresh won’t cut it.
When used properly, <lastmod> helps Google understand when the content was last updated and whether it needs to be recrawled. Besides, the tag helps the search engine figure out who was the original publisher.
Static vs Dynamic Sitemaps
By now you may be wondering how much time you’ll have to spend updating your sitemap every time you publish a new page or revamp an existing one. Keeping your sitemap up-to-date can really be a daunting task if you choose to create a static sitemap. The good news is that you can easily avoid all the hassle by creating a dynamic sitemap instead.
This kind of sitemap updates automatically the moment you make any changes to your website. For example, whenever you delete a page, and it becomes 404, the page would be removed from the sitemap. If you mark a page as noindex or add it to the robots.txt file, it would also be deleted from the sitemap. On the other hand, whenever you create a new page and mark it as canonical—it will immediately be added to your sitemap. It really is that easy—all you need is to properly set up the tool that will be generating your dynamic sitemaps.
How to Create an XML Sitemap
The easiest way would be to have a sitemap generated by your CMS. Since a CMS contains information about all the website pages and all the adjustments you make, it can feed all the data into a dynamic sitemap.
Some CMS, such as Magento, have sitemap-generating capabilities from the get-go. With other popular CMS such as WordPress, Joomla, Drupal, or OpenCart, you’ll have to use special plugins. Furthermore, creating a sitemap using Yoast takes ten minutes or less.
When picking the plugin for your site, pay attention to its array of features: SEO-friendly solutions would allow you to exclude 404, redirected, noindex, canonicalized, and other inappropriate pages from your sitemap. Besides, mind customization capabilities—you want to be able to easily amend the list of pages included in the sitemap.
If your website is not CMS-based, you can use one of the dedicated sitemap generator tools. There are plenty of both free and paid options available in the market, so again, make sure to carefully study the tool’s capabilities. The thing is that while you should be able to generate a customizable dynamic sitemap with one of the paid generators, most free solutions are too basic and lack some crucial features. So, you may end up with a static sitemap that features all pages of your site including canonicalized, noindex, and redirect URLs.
Therefore, if using one of the paid solutions and CMS features is not an option, I advise you to generate a sitemap using SE Ranking’s Website Audit tool. In just a few minutes the tool will create a static sitemap for you based on the latest website crawl. By default, the tool only includes 200 pages in a sitemap while omitting 4xx, 3xx, noindex, and other pages that you normally want to leave out.
While generating a sitemap with Website Audit mind your crawl limits—the number of pages on your website should exceed your set crawl limits. Otherwise, some important pages may not be included in your sitemap.
Finally, if none of the ready-made solutions work for your website, you can create a custom sitemap. This requires some coding skills, so you will need a developer to craft a proper dynamic sitemap for you.
How to Submit your Sitemap to Google
Depending on the tool you used to generate your sitemap, you may need to manually add it to your site, or it may already be there—this would be the case for dynamic sitemaps generated by a CMS. Normally, whenever a sitemap is automatically added to a website, it is located at yoursite.com/sitemap.xml.
If you’ve used one of the tools that generated an XML sitemap file, you’ll have to manually upload it to your website’s root folder. You can do this using your cPanel or via an FTP client such as FileZilla. A good idea would be to check the sitemap’s validity before uploading, especially if the file was created manually—use one of the free tools like XML Sitemap Validator to make sure your sitemap is operating as intended.
It is also a good practice to add the reference to your sitemap to your robots.txt file—you can find it in the root directory of your web server.
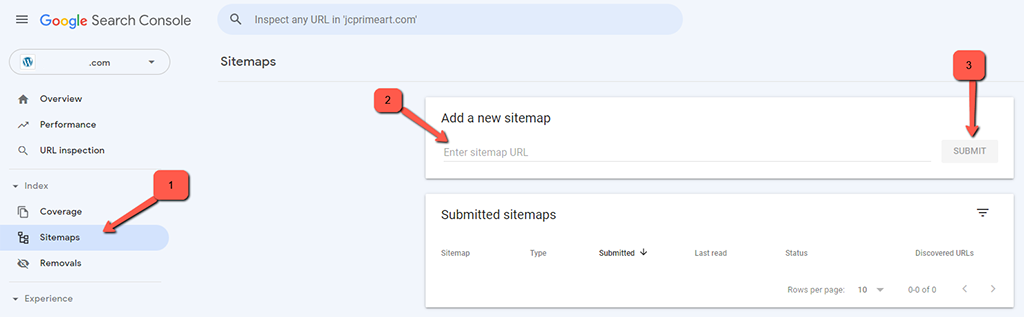
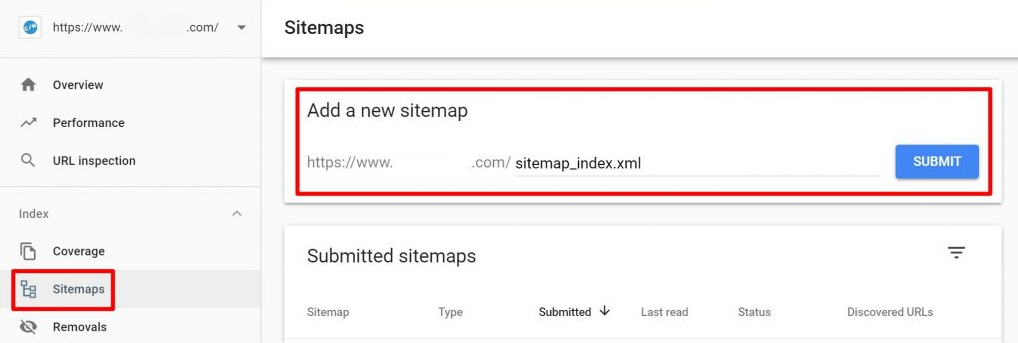
Once a valid sitemap is on your website, you can submit it to Google Search Console (GSC). To do so, go to Sitemaps, click Add a new sitemap, enter your sitemap URL, and hit the Submit button.
You will see if Google was able to properly process your sitemap in the Status column—if everything went well, the status will be Success. If a sitemap was parsed, but Google detected some errors, the status would be Has errors. Finally, if Google fails to crawl your sitemap, you’ll end up with the Couldn’t fetch status.
Make sure to fix all the sitemap errors so that your sitemap status is Success.
In the same table of your Sitemap report, you will see the number of discovered URLs—ideally, it should equal the total number of URLs added to your sitemap.
Finally, by clicking the icon next to the number of discovered URLs you’ll get to the Index Coverage report that will help you better understand how Google crawls and indexes your site. Studying the report will help you remove some low-quality pages from your sitemap and add pages you might have missed.
Alternatively, you can ping your sitemap directly to Google, Baidu, Bing, and Yandex.
Here are the links you need for that:
- Ping Google – https://www.google.com/webmasters/sitemaps/ping?sitemap=https://www.example.com/sitemap-file.xml
- Ping Bing – https://www.bing.com/webmaster/ping.aspx?siteMap=https://www.example.com/sitemap-file.xml
- Ping Yahoo – https://search.yahooapis.com/SiteExplorerService/V1/updateNotification?appid=YahooDemo&url=https://www.example.com/sitemap-file.xml
Submitting Several Sitemaps to Google
If you decide that you need several sitemap files, you can still submit them all to Google at once. For this purpose, you’ll have to list all your sitemaps in a single file.
The file is called sitemap index, and it helps Google easily find all your sitemaps. You can include up to 50,000 URLs into a single file and the other requirement is the file size. As mentioned before, it should not exceed 50 MB.
Once you have your file, submit it to Google in the same way as you would have submitted a regular sitemap file.
Final Words
Site mapping can be crucial when you are aiming for the top spot on search engines. We hope you got all the information needed and understand how easy it is to generate and submit an XML Sitemap for your website. In case you have questions on the matter, don’t hesitate to ask them in the comment section.

The latest tips and news from the industry straight to your inbox!
Join 30,000+ subscribers for exclusive access to our monthly newsletter with insider cloud, hosting and WordPress tips!
Joseph is part of the FastComet Marketing team. With years of content writing experience behind him, it's one of his favorite activities. Joseph takes part in the SEO of the FastComet website and blog. His goal is to write comprehensive posts and guides, always aiming to help our clients with essential information. Joseph also has a thirst for knowledge and improvement, which makes the hosting environment a perfect place for him.
No Comments