The Ultimate Guide to Image Optimization for Better Performance of Your WordPress
You probably know that optimizing images is of some importance when it comes to your WordPress site. However, are you aware of the actual impact perfectly optimized images can have on your site? Whether it is a blog, e-commerce, or a small business website, the loading speed of your WordPress website is one of the most important factors. If you want visitors to enjoy their stay and Google to love your website, you need to provide the best experience for them. Being fast and responsive is something that every customer appreciates.
Whenever a beginner starts a new blog or website, they often don’t know enough and end up uploading images without even slightly optimizing them for the web. Large image files (and large files in general) will make your WordPress site sluggish, leading to a higher bounce rate.
A slow website should be one of your main concerns. Not only that it chases visitors away, but it also affects your SEO. Trying to keep your WordPress site in its best condition is one of the things that has to be on the top of your priority list. This will ensure you better scores in GTmetrix/Pingdom, improved UX, potentially rank you higher in search results, and make your content load much faster.
In this post, we will shed some light on image optimization and the best practices for improved web performance. We will go over:
Table of Contents:
What is Image Optimization?
Image optimization is the process where the high-quality image is being saved and delivered in the right format, dimension, size, and resolution while keeping the smallest possible size, retaining its overall quality. Nowadays, you can use one of many tools and plugins for image optimization without visible losses in their quality.
It’s also about image SEO. That is, getting your product images and featured images to rank on Google and other search engine image results.
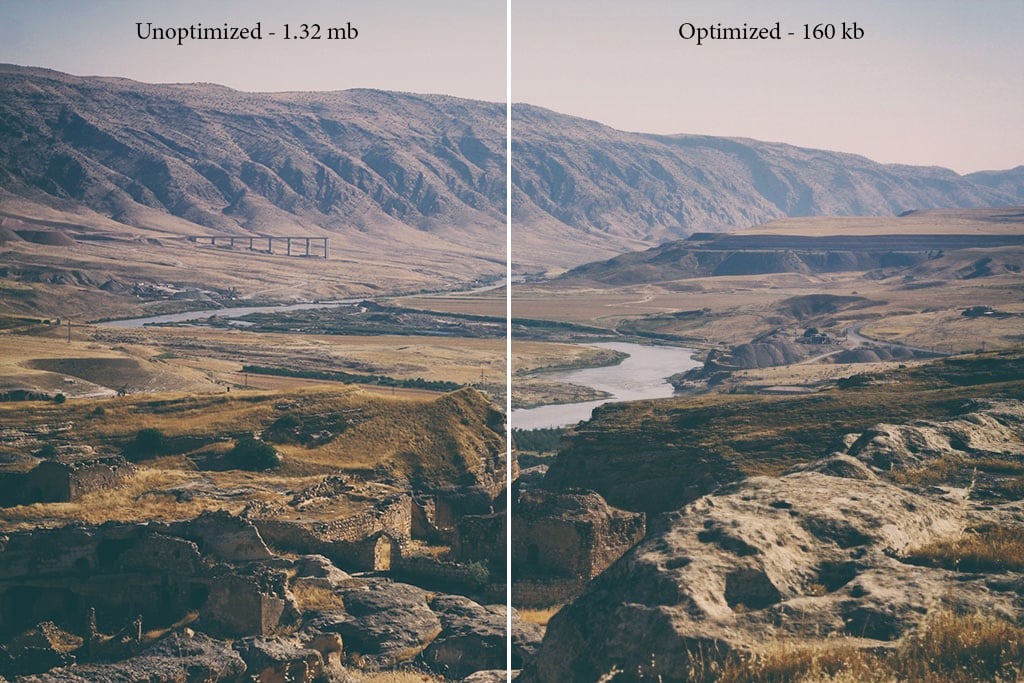
Image optimization can be performed in different ways, be it by resizing the images, caching, by compressing the size, saving in the correct format (e.g. PNG/JPEG), and writing a descriptive file name. There are actually more than 20 different ways to optimize images (if you include both SEO and page speed optimization). We will share more about those two a bit later in the post.
Why is Image Optimization Important?
Websites nowadays use more visuals than ever. Multimedia grew exponentially in popularity, and people’s attention span went downhill accordingly. All this has its complexity since now users require more images and videos when they are browsing the Internet. So, if you want to accomplish your goals when it comes to traffic, your WordPress site needs to both have images, and load quickly. This is exactly why you should aim to optimize your media as much as possible.
The Internet is now full of high-resolution images, graphics, and videos. It’s only natural, considering that we have 4k and 8k resolutions available. High-quality is the key to a more successful presentation, which leads to better marketing and higher profit.
It’s easy to forget that images are also content. In fact, images are an essential part of any content marketing effort. What is more, people often forget (or are just unaware) about the fact that uploading images on a regular basis gradually affects the loading speed of their WordPress site, which ultimately leads to a degraded UX.
Thus, if your site is image-heavy and your content relies mostly on images, their optimization should be your main focus. They shouldn’t be ignored or forgotten when it comes to updating and improving your website.
The Benefits of Formatting Your Images
There are a few benefits when it comes to optimizing your images for the better performance of your WordPress site. Consider the fact that according to HTTP Archive, as of March 2020, the total webpage weight is 39% made up of images. So, when talking about optimization, you should focus on image optimization, which should be right beside optimizing any video files on your site.
Image optimization doesn’t have to be an intimidating process, but it can be a hard sell when it comes to what takes priority on your site. Тhere are a lot of people that overlook this factor, mainly because they don’t know how essential it can be for the overall performance of a WordPress site. Even if image optimization isn’t the highest priority item on your list, it still matters and should be done.
Here are some of the main pros of image optimization:
- Enhances page loading speed. Page loading speed is the amount of time taken by a web page to load completely. There are many tools that can help you in analyzing your page load speed, such as Google’s PageSpeed Insights, GTmetrix аnd Pingdom, which will give you full report about your web page. When a page takes too long to load, visitors may not even wait for the process to finish and just go on with their search, quickly forgetting about the slow page. You don’t want your site to have such pages, and thus you need to focus on your optimization; Images are heavy pieces of content. Without proper optimization, they can seriously slow down your website and can even cause loading issues;
- Improves SEO Ranking. Image optimization is even better when you combine it with a good SEO WordPress plugin (e.g., Yoast SEO). The result will be your site ranking higher because of the fact that search engines like quick loading websites. Also, when crawling your website, Google will be able to do the job faster for their image search. If you want to find out the percentage of the traffic that comes from Google image search—use a Google Analytics segment and check the Google image search traffic;
- Boosts Higher Overall Sales/Conversions. Improving your search rankings ultimately means you can capture more users on your website and possibly get more conversions. Since a visual could communicate a message in the clearest way, oftentimes better than words, it is always a good idea to consider how images can improve your conversion rate;
- Enhances User Experience. Properly formatted and descriptive alt text on your images isn’t visible on the page itself, but it makes a world of difference from an accessibility point of view to website visitors who have visual impairments and are using screen readers.
- Faster backups. Smaller image sizes also mean faster backups;
- Lower bandwidth usage. When you have smaller image files, you will be using less bandwidth. Optimizing your images can save you hundreds of KB per image, which means significantly less bandwidth used. Web hosting servers and browsers appreciate this;
- Less storage space needed;
- Improves Image Searches. Optimizing images for search engines helps you to rank higher in Google Image Search results.
Have you ever received a recommendation to optimize images by a speed test tool or by your WordPress hosting support? If so, then you should definitely reduce the file size of your images, optimizing them for the web.
How to Optimize Images for Web and Performance
When optimizing (formatting) your image files, you need to find a good balance between smaller file size and decent quality. There are more ways than one when it comes to optimizing your images. This can be done either manually or with plugins. Perhaps the most popular method is optimizing them before you upload them to WordPress, which could save you a lot of work. A helpful tool for that is Adobe Photoshop, GIMP (free), or online via ImageCompressor.com. We will also share some plugins that can work well for image optimization.
The two main things you need to consider are the file format you will be using and the compression type you are going to implement. If you choose the right combination, you will be able to reduce the image size by up to 5 times without visually losing the quality of the image. Feel free to experiment until you find out the best combo.
Optimize Images Prior to Uploading
Prior to uploading an image to WordPress, you need to make sure that your visual is the best it can be when you make it. You need to compose it properly, size it perfectly, use the appropriate image format, and give it a descriptive file name.
Using programs or tools to optimize your images before uploading them saves a lot of time. You can resize, crop, compress, strip EXIF data, write a descriptive file name, and then save in the correct format, such as JPEG or PNG.
Pre-optimizing images is especially in your favor if you are working with raw images from a DSLR camera, where usually the dimensions are much larger than needed.
Choose the Right File Format
Make sure to choose the best file type before you begin with the modifying of your images. Before you start modifying your images, make sure you’ve chosen the best file type. Here are the types of files that are most commonly used:
- JPEG (Joint Photographic Experts Group). JPEGs use lossy and lossless optimization. JPEG images can be compressed considerably, which results in a good balance between quality and size;
- PNG (Portable Graphics Format). PNGs produce high-quality images but are usually larger in size than the JPEG format. They don’t degrade over time with re-saves, as JPEGs do. The PNG was created as a lossless image format, but it can be lossy as well;
- GIF (Graphics Interchange Format). GIFs use only 256 colors. This format is best if you have animated images. It uses only lossless compression;
- SVG (Scalable Vector Graphics) – SVGs are vector graphics based on XML and used to display a variety of graphics. SVGs are used for the Web and other environments. Unlike raster formats seen in JPG, GIF, and PNG, an SVG image remains crisp and clear at any resolution or size.
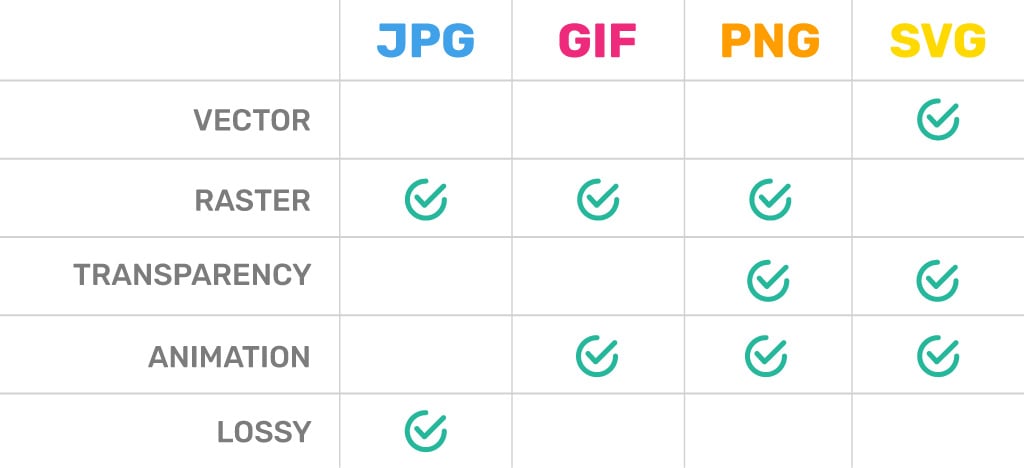
Vector vs. Raster Images:
- Vector images are ideal for images that consist of geometric shapes;
- Vector images are zoom and resolution-independent;
- Raster images should be used for complex scenes with lots of irregular shapes and details.
There are a few others (WebP, JPEG XR), but they are not supported by all browsers or by WordPress itself. We recommend that you use JPG and JPEG for colorful images and PNG for simple images.
Find Out The Maximum Display Size of Your Images
Most likely, your website is responsive, and all the images you upload will be served at different resolutions based on the user viewport (the device they’re browsing your site from). The maximum display size is the largest resolution the image can take counting all the potential viewports and screens that can access it. GTmetrix and Google PageSpeed Insights recommend scaling your images to fit the container they will inhabit to improve performance.
The dimensions of your images should be according to the WordPress theme you are using. Let’s say you are using a theme that supports 1024 pixels wide images, but your images are larger. Images that are oversized for their container need to be manually shrunk by the browser. That wastes time and data when loading your web pages without providing any benefit in performance and quality. In this case, you can either resize your image width to fit the optimal 1024 pixels or, if possible, crop the image and focus only on what’s essential.
Removing extra pixels lowers the file size of your images, which helps your site load faster. Additionally, by using tools to compress images for the web, you can get them into their recommended file size, which is 40Kb-80Kb. When it comes to “full page” web images, the optimal size is up to 160Kb.
In case you are not completely sure about the proper image dimensions for your WordPress site, there are a few ways in which you can check that.
Resize your browser and take note of “breakpoints” where your image resizes suddenly. Many responsive themes have multiple breakpoints, so keep doing this until you see the largest size in which the image is displayed. Generally, this is the maximum display size of your image. To find out exactly what pixel dimensions it is:
Usе the Developer Tools in Your Browser
With Chrome, Firefox, and Safari, you can use the built-in web developer tools in order to find the image sizes that are set for your site. All you have to do is click with the right mouse button over an image, and then select “Inspect Element”:
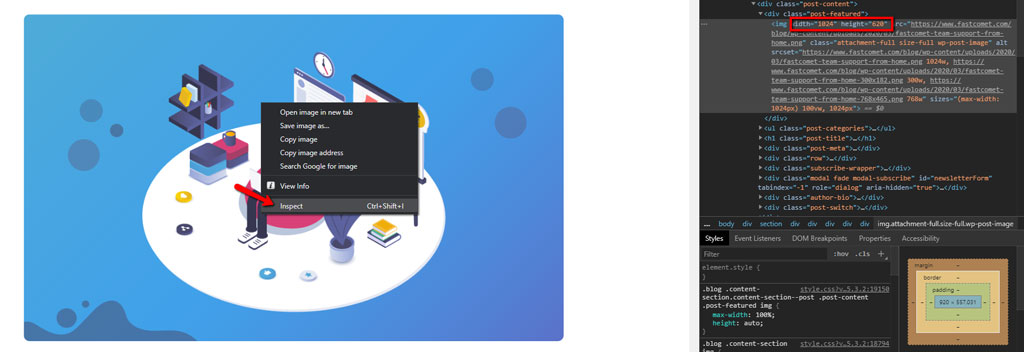
This way, you can see the resolution of an image you are checking, as well as the maximum display size on your site or blog.
You can now go and resize and crop your image so it can correspond to the given dimensions. This way, you’ll make sure you will optimize it efficiently so it can still look good on the screen and, at the same time, not weigh much on your website.
Before uploading images, remember that if you want them to look crisp on retina devices, you should double their size. So if you have an image space of 600x320px, for retina it should be 1200x640px when uploading to WordPress
Usе the Image Size Info Extension
Another method to find image size is via the Image Size Info extension for Chrome. If you are not using this browser, we recommend doing that, at least while you are working on your website. Once the extension is installed, it will help you find out the image size of any image element on your website.

However, keep in mind that this tool cannot inspect background images for sizing.
How to Change WordPress Default Image Sizes
Changing your default image sizes in WordPress is very easy. In case the default settings are not fitting your needs, all you have to do is:
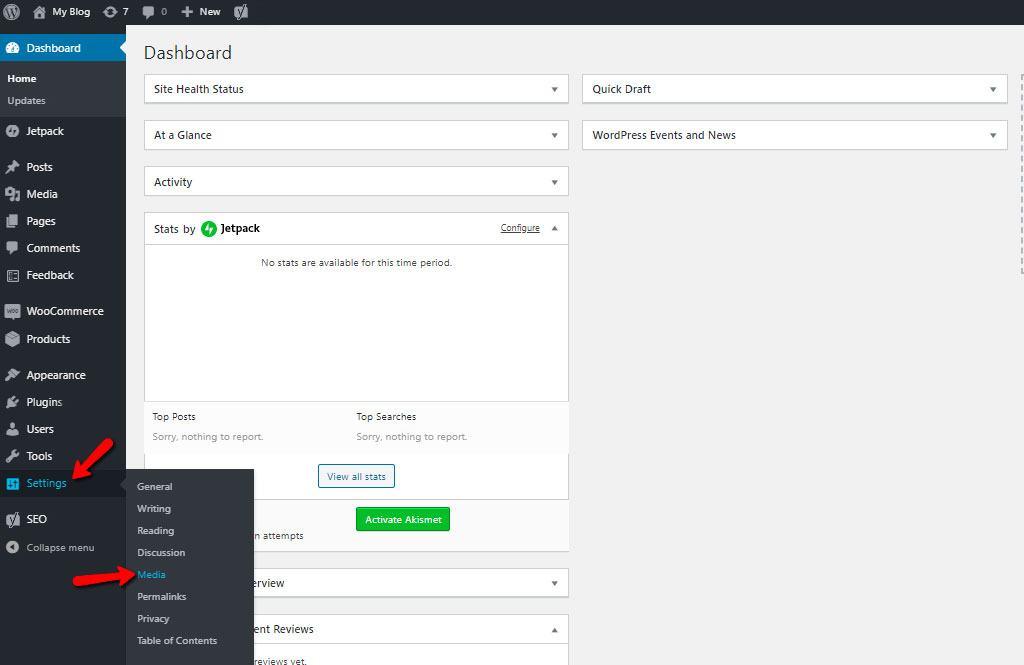
- Go to your WordPress Admin Dashboard;
- Navigate to Settings → Media;
- In your Media Settings, edit your width and height dimensions as you wish;
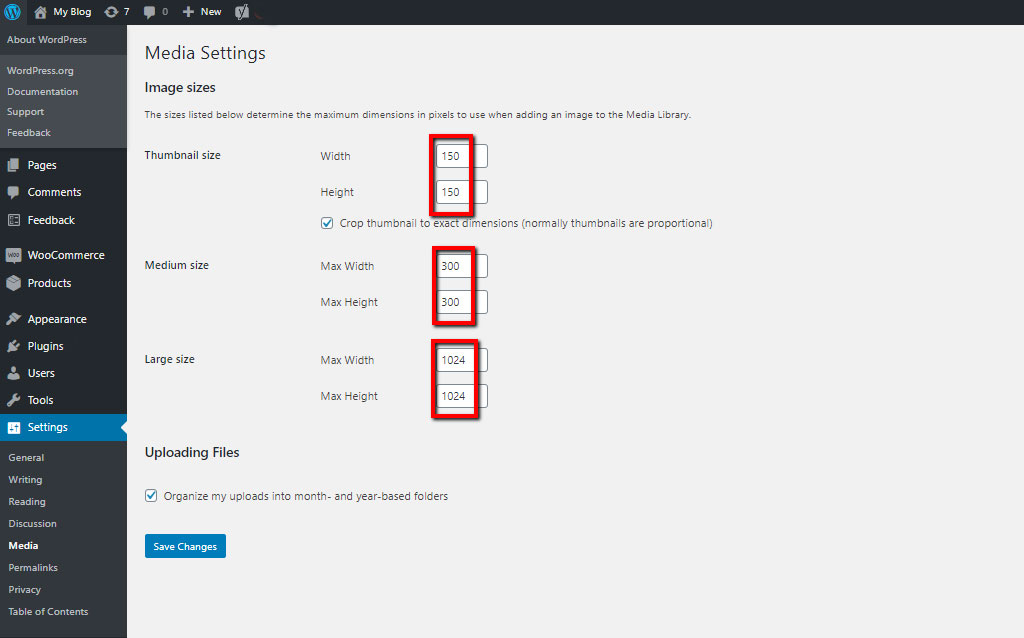
- Click Save Changes.
Recommended Image Sizes for WordPress Content
Here are some recommended sizes for content to look at its best on any device:
- Blog post images – 1200 x 630px (Facebook resolution);
- Full screen images – 2880 x 1500px;
- Portrait images – 1200 x 900px;
- Landscape images – 900 x 1200px;
- Gallery images – 1500px x auto width;
- Fullscreen slideshow images – 2800 x 1500px.
Check for Embedded Images From External Websites
Make sure that you check your site for embedded images and ultimately avoid them. Always upload images to your website, instead of copy-pasting them. If you do that, you will end up with extra requests because copy-pasted images are not hosted on your server, and thus it has to pull those images from somewhere else. Those extra requests make your site load slower than optimal. Furthermore, you have no control over the availability of the files, so if they are deleted users will get 404s when trying to fetch them.
Optimize Image After Uploading Them
Find Unoptimized Images
There are many tools available if you want to check whether your images are optimized or not. Such tools usually come with additional performance metrics for your site or page. Some of the most popular tools are:
- Google Pagespeed Insights;
- GTMetrix;
- Pingdom;
- Modern.ie;
- WebPageTest.
From the statistics you will get, you will find out whether your site is doing well or it needs to be improved (or both).
Try running your web page through GTmetrix to find out information about unoptimized images in the Page Speed/YSlow tabs.
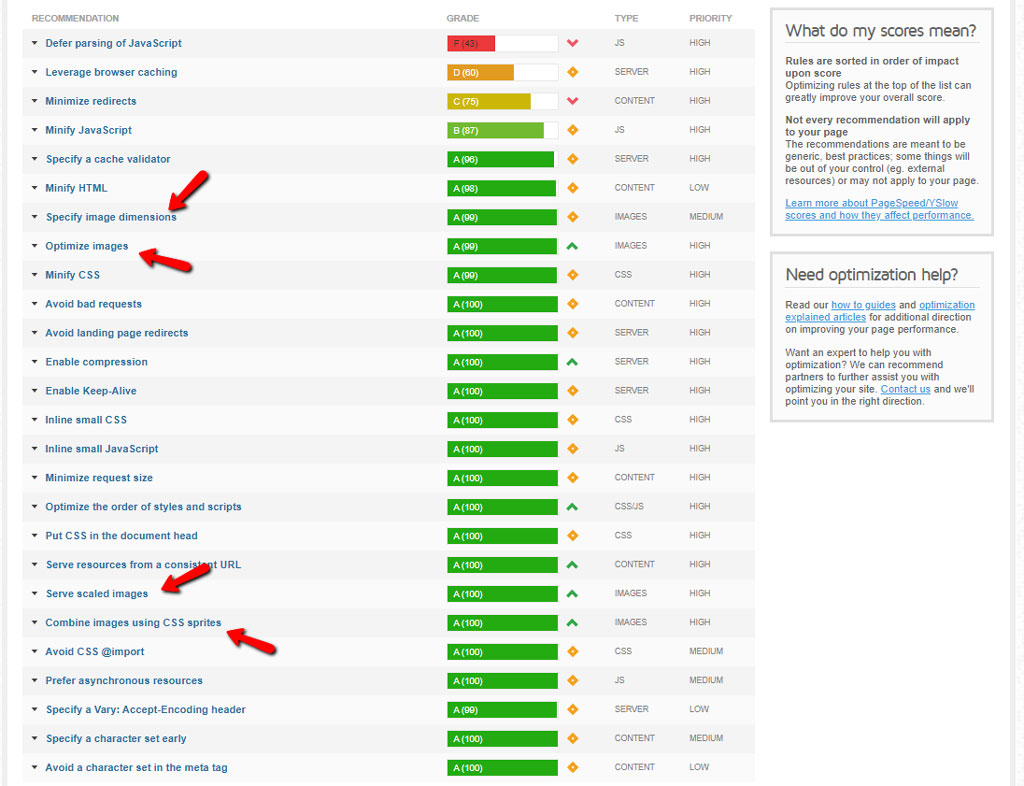
It is not unusual for GTmetrix to display worse results for a WordPress website than Pingdom. There are no discrepancies, it’s just that GTmetrix measures the fully loaded time, unlike Pingdom which only counts the onload time.
Resize and Crop Images
In case you see serve scaled images errors in GTmetrix, know that there are oversized images that need resizing. GTmetrix helps you here, by providing the correct dimensions for those images. If you have already uploaded oversized images, you can either resize the photo dimensions down to the maximum display size manually with a photo editor (Photoshop, GIMP, etc.) or use a plugin for that.
When cropping your images, try to create tighter crops and cut the excess detail and space from the image that makes the content redundant. 4:3 and 16:9 ratios are better for image SEO, so if your goal is to get the image ranked in image search, aim for an image that is not panoramic or tall and skinny.
- Bulk Resize Images via a Plugin. The problem here is that your images have different functions (widgets, sliders, fill width images). Bulk resizing saves time in some situations, but it’s still best if you optimize your images before uploading them;
- Resize Images Manually. Once you have the correct image dimensions from GTmetrix, you can resize/crop and re-upload your images manually. It can take some of your time, but you will most likely need to do this only once because all your images will be optimized before uploading from now on. Don’t forget that GTmetrix only displays unoptimized images for the specific single page you are testing.
Losslessly Compress Images
After performing the minor task of cropping and resizing, you can actually go deeper by compressing the images. You can find these as items in the “optimize images” GTmetrix tab. There are lots of programs (e.g., Photoshop and GIMP) that offer options to compress images when exported for the web. Actually, all photo editors have this option where they ask you at what quality you want to save your edited image. You can also use some great plugins, such as Imagify, Kraken, or Smush. You would usually go with a quality of 100% (for cristal clear reasons), but you can lower it a bit too, say, 70-80%. You won’t find a big difference if the image already has a huge resolution. Its file size will be smaller in this case.
Lossy vs Lossless
It’s important to know the difference between the two types of compression – lossy and lossless.
- Lossy is a filter that eliminates parts of the overall data, which leads to degrading the image. That is why you need to be careful of how much you reduce the image. The size can be reduced by a large amount. You can use tools such as Adobe Photoshop, Affinity Photo, or other image editors to adjust the quality settings of an image. The example we used above is using lossy compression.
- Lossless is a filter used to compress the image data. Compressing does not reduce the quality of the specific image, but requires said image to be uncompressed before the process of compressing.
We recommend that you try out your compression techniques and see if everything works as expected for each and every single one of your images. If you are using tools that have an option to save images for the web—use it. This option is included in many image editors. It provides quality adjustments for you to perform optimal compression. Don’t forget that you will be losing some of the image quality. Experiment and find the best balance you can.
Cache Images
Caching is the action of temporarily storing assets (such as images) in a cache for faster retrieval so that, if a user accesses your site frequently, the data will be automatically delivered without going through the initial loading process again. This takes place when the site files are loaded for the first time. This dramatically improves performance for returning visitors when done properly.
The majority of cache plugins have a browser caching, which caches images. For a free cache plugin, consider the fact that Swift Performance and Cache Enabler are considered among the best choices. If you are willing to spend some cash, you should use WP Rocket.
Serve Images From a CDN
Content Delivery Network (CDN) is a system that will serve your site content – including images, from the nearest server location to your readers’ accessing point. CDNs have locations all over the globe, so the data transfer required to load your website content happens much more quickly, which translates into faster loading time.
One thing to keep in mind if you’re using a CDN to deliver your images is you’ll want to avoid switching CDNs or activating a CDN and deactivating it later on. This will change the image URLs and can negatively impact your image SEO.
- Old Image URL (No CDN): https://yoursite.com/blog/uploads/2020/03/name-of-your-image.png
- New Image URL (With CDN): https://cdnserver.cdnname.yoursite.com/blog/uploads/2020/03/name-of-your-image.png
FastComet is an Official Cloudflare Partner, so we offer the integration of their CDN service with a 1-click application in cPanel. You can also consider using the WordPress Cloudflare plugin, which is known as the most popular free CDN for the CMS, with more than 200,000 active installations.
Note that Cloudflare Premium plans include a feature named Polish. It can automatically optimize your website’s images, using lossless or lossy compression. Whereas Cloudflare and other general CDNs serve up HTML files as well, there are CDN services that are only focused on your images.
Lazy Load Image
Lazy Load is an optimization method used to delay image loading by displaying images gradually until the user has scrolled down enough to see the images. With every scroll, a new batch of images is rendered onto the visible area of the user’s screen making the server respond better to all of the requests. Use this technique when your posts and pages include a lot of embedded videos and high-resolution images.
Combine Images Into CSS Sprite
Without CSS sprites, each image on your WordPress site is presented as a separate file. Combining images using CSS sprites is a popular performance enhancement technique you can use to combine several images into a single file, and then use CSS properties to choose the right image to show. This method doesn’t reduce the amount of data browsers download, but it can definitely cut down тhe amount of HTTP requests on the page. To do this, you typically need CSS knowledge. However, there is a helpful tool called CSS sprite generator, which can come in handy.
Use CSS sprites only for decorative images. Important images should be separate from each other, with their file names and alt tags. They are important when you want to best describe your content.
Make Favicon Small And Cacheable
Creating the favicon small and scalable improves performance for retrieving the favicon. The recommended size of the favicon graphic is typically 16×16 pixels square. Making favicon.ico cacheable avoids frequent requests for it.
SEO Image Optimization
Image optimization creates many advantages, such as better user experience, improved website accessibility, and additional ranking opportunities. SEO image optimization is just as important as the general SEO of your website. Without proper image optimization techniques, you’re wasting a valuable SEO asset. Here are the most important tips you should follow to help your images rank higher on search engine results pages (SERPs).
Name Your Images Descriptively
Let’s start with what Google says about images:
“Like many of the other parts of the page targeted for optimization, filenames are best when they’re short, but descriptive.”
The search engine recommends avoiding long filenames, such as entire sentences.
When naming an image, ask yourself what this image actually shows. The filename of your images should be relevant to the information they give. A common misconception is that you should stuff as many keywords in your image file names as possible. Images are used to make the content richer and to ensure better UX.
Optimize Your Alt Attributes
The “alt” attribute’s main purpose is to specify an alternative text for your image in case it cannot be displayed, or if a visitor is visually impaired.
Remember to fill out your alt text for every image on your WordPress site or blog. Keep in mind that alt texts are actually required under the American Disabilities Act for individuals who are unable to view images. That should be enough for you to understand the importance of alt texts.
As with image file names, make sure that your alt texts are descriptive, and add your keyword only if it fits properly.
Add Images to Your Sitemap
Google encourages all website owners to submit an image sitemap to them. Doing that enables the search engine can do a better job when crawling your site, which could potentially result in better SEO ranking for you.
You can choose to include images in your site’s XML sitemap, or to create a separate image sitemap and submit it.
Images in Featured Snippets
Paragraph featured snippets that include images are incredibly eye-catching. However, you should know that when you optimize for featured snippets, Google sometimes even picks up text from one page and an image from another. With that said, the only way to influence your chances to get an image from your site in a featured snippet is to make sure your images are eye-catching, relevant, and helpful (put together graphs, tables, charts, etc.).
Keep in mind that WordPress adds dates to image URLs. So, even if you update articles with information that is up to date, if you don’t reupload the images, they will be considered old, making them unlikely to get into a featured snippet.
WordPress Image Optimization on Autopilot
There are a lot of image optimization tools, programs, and WordPress plugins that will optimize your images for you.
Image Optimization Tools and Programs
As mentioned, most software for image editing comes with compression settings and image optimization. In addition to the well-known image editing software, there are several powerful optimization tools, which are also free to use. We recommend these tools when optimizing images before uploading them to WordPress, especially if your goal is perfection. With this method, you will be able to save disk space on your WordPress hosting account, also guaranteeing you the fastest loading time.
Free Tools:
- GIMP – a free and open-source alternative to the popular Adobe Photoshop;
- TinyPNG – a free web app using a smart lossy compression method for reducing the size of your PNG files;
- TinyJPG (the sister site to TinyPNG) – same as the above, but for JPG files;
- ImageOptim – a free and open-source Mac utility that allows you to compress images without losing any quality. ImageOptim finds the best compression parameters and removes color profiles that are not needed;
- Trimage – a cross-platform tool for lossless optimization of PNG and JPG files for the web.
Premium Tools:
- Adobe Photoshop – comes with a feature to save images optimized for the web. All you have to do is open your image and click on File → Save for Web;
- JPEG Mini – uses lossless compression technology to significantly reduce the image size with no effect over perceptual quality;
WordPress Plugins for Image Optimization
When running a multi-author site, or in case you need an automated solution for your image optimization, you should consider using a WordPress image compression plugin. Some of the highly-rated plugins for image optimization are:
- Optimole – a popular plugin by the team ThemeIsle team;
- Compress JPEG & PNG Images – a plugin by TinyPNG;
- EWWW Image Optimizer;
- Imagifty – a WP Rocket plugin;
- ShortPixel Image Optimizer.
Conclusion
Аfter reading this post, you probably understand that optimizing images is much more important than you imagined. Boosting your SEO ranking is a journey, and there are lots of factors you need to consider along the way. The proper optimization of your images will make a great difference when it comes to your site speed, which will lead to happier visitors or customers. Once you finish with the optimization, your WordPress site will be much faster.
Have you already formatted your images for better performance? Do you format them manually, use a plugin, or both? With modern web technology, techniques and work methods are always evolving. So share your techniques and best practices in the comments below!

The latest tips and news from the industry straight to your inbox!
Join 30,000+ subscribers for exclusive access to our monthly newsletter with insider cloud, hosting and WordPress tips!
Joseph is part of the FastComet Marketing team. With years of content writing experience behind him, it's one of his favorite activities. Joseph takes part in the SEO of the FastComet website and blog. His goal is to write comprehensive posts and guides, always aiming to help our clients with essential information. Joseph also has a thirst for knowledge and improvement, which makes the hosting environment a perfect place for him.
Comments (1)
To optimize images in WordPress website:
Use a plugin such as Smush, EWWW Image Optimizer or ShortPixel.
Compress images before uploading using tools like TinyPNG or Kraken.io.
Implement lazy loading and use responsive images.
Use a Content Delivery Network (CDN) to store cached images and deliver them faster to users based on their location.