Node.js Selector
Updated on Oct 6, 2023
If you are just starting out with Node.js and you have access to a CloudLinux server, which is a derivative of AlmaLinux, then you should check out the Node.js Selector tool. It is a graphical interface that helps immensely with the deployment of Node.js applications. No command line is involved, and everything is done via the tool’s interface. It is simple, easy, and convenient for beginners. We wanted to mention it because the tool is available on our services, and we found it prudent to bring it up. The Selector will show you precisely what you need to do to get your application running and will also show you any errors that may occur during the deployment process.
When you open the Selector, you will see a list of all Node.js applications currently deployed through the Selector. You can edit, stop, start, restart, and delete the applications from this screen or create a new one. When creating a new application, several fields must be filled, and that is what we meant: that the tool itself will tell you what you need to do. Firstly, select the Node version you wish to use and if you want to run the application in production or development. Next are these fields:
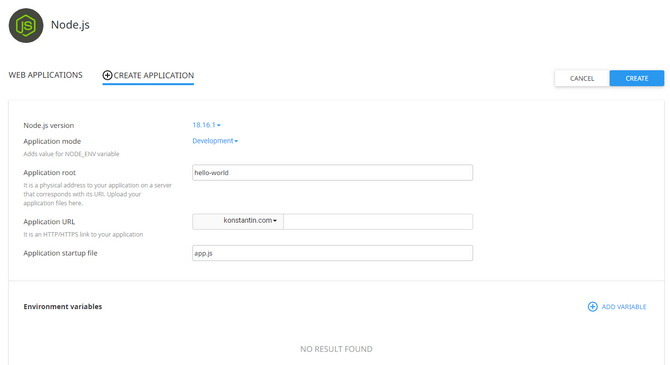
- Application root - The physical path to your application files on the server. Please remember that the path should not include “/home/user”. In other words, simply type in the main directory of the application and any subdirectories it might be in;
- Application URL - The URL through which the application will be available. Remember that the domain or subdomain you choose must be hosted on the server the Selector is on. Additionally, if the application is in a subdirectory of the domain or subdomain, specify that here as well;
- Application startup file - The actual file the application will use when it is started. In our “Hello World” example above, we used app.js as the startup file, which is what you would put in this field;
- Environmental variables - Usually, variables for projects are global and are added to an .env file in your project’s directory. However, with the Node.js Selector, you can set up environmental variables from within the configuration page of each application. That way, you can have the same variable for different applications representing different values.
- For example, you can add a PORT variable with the port’s number as a value for one of your applications and then use the same PORT variable with a different value for another application;
- Having connections to different databases, each with its own value for the SECRET_KEY variable works on the same principle. That is the true strength of environmental variables and the reason why they are preferred from a utility viewpoint.
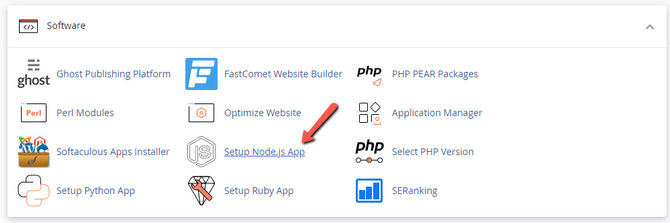
As you can see, this is a convenient way of deploying your applications without using the command line. You can’t code and package an application through the interface, but at least the deployment can be automated for you. Now, let us show you an example of the setup process with the “Hello World” application. To begin, log into cPanel or DirectAdmin and locate the Node.js Selector. Its name may vary, but it is called Setup Node.js App on our services and is located in the Software section.
- Click Create Application;
- Select Node version and deployment environment;
- Specify the application root. Remember that the directory cannot be public_html or the equivalent of your control panel. The best thing to do here is to place your application in a directory with a relevant name;
- Since we are using cPanel, the Selector is convenient enough to provide us with a drop-down menu of all domains currently added to it. Select the one you want the application to appear on and type in a subdirectory if necessary. For our example, it is not, but if it was, all we would do is add the subdirectory’s name after the domain;
- Insert the application startup file. We have no environmental variables, but you can add any that you need from the blue + symbol;
- When ready, click Create. The application will be deployed and started, and when you visit the URL you specified, you should be able to open it and see the results.
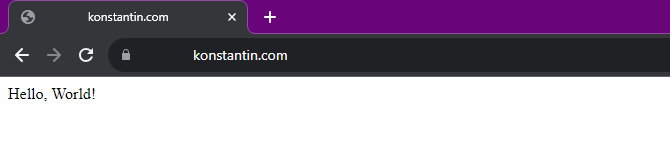
Since we used the “Hello World” application, there were no errors; it is simple. It has no real potential for encountering errors. If you encounter any errors, they will appear in the top right corner during deployment.
Finally, if you have recently added any new modules or packages to your application’s package.json file, you can install them from the Node.js Selector’s interface as well. Simply click on the pencil icon next to your application to edit it, and then Run NPM Install. That will go through the package.json file and install any missing modules. If any errors occur, they will also appear in the top right, informing you of what has gone wrong and why the installation can’t proceed.
With this, our beginner section of working with Node.js concludes. We hope we gave you a foundational understanding of how a basic application works and how to deploy it. Next up, we will write a slightly more complex application to provide you with a more in-depth example of working with Node.js.

Node.js Hosting
- Multiple Node Versions
- 24/7 Node.js Support
- Free Domain Transfer
- Hack-free Protection
- Fast SSD Storage
- Free Node.js Transfer
- Free Cloudflare CDN
- Immediate Activation