How to Transfer Wix to WordPress (3 Easy Methods)
Updated on Jun 17, 2020
Currently, Wix is one of the most used site builders that let people create their own simple website and do it with ease. We should mention that many users quickly realize Wix is quite limited, and some of its extra features can be a little expensive.
If you are a person that needs more features and flexibility minus the high costs of Wix, switching to the self-hosted variation of WordPress would be the right move. Currently, WordPress powers roughly 34% of the Internet, which is a good indication of the actual power of the CMS.
This post is to cover the three methods for moving a Wix site into the world of WordPress. You will find:
Differences Between a Wix Site and Self-Hosted WordPress
Nowadays, “Wix vs. WordPress” is a popular topic when it comes to website building options. Wix is a relatively easy to use drag-and-drop website builder that has a flexible design, can be the perfect choice for a portfolio-type website. It’s not recommended to build large sites with Wix, because the navigation there is limited. On the other hand, WordPress allows users to create virtually any type of site, but it comes with a bit more technical knowledge requirements than Wix.
Wix and WordPress use two completely different approaches when it comes to technical management. While all Wix packages come with hosting and technical support, WordPress (the WordPress.org version) requires you to take care of such things on your own. You have to find a web host on your own and to install WordPress on your webspace. Luckily, with FastComet, you get fully managed WordPress hosting, and the technical support is of the highest quality.
What You Need to Consider Before Moving Away from Wix
Perhaps you already have considered the limitations of Wix. However, there are some things that you need to know you will be giving up with your move to WordPress. Your site conversion will provide alternatives to your previous settings with Wix, with emphasis on “alternatives.”
Wix is a hosting service bundle that is best for small businesses. It gives such types of projects everything they need for a site to be up and running in no time. Moving from Wix to WordPress will require you to handle some things on your own. With that said, it’s definitely the right move in the long run.
If you came to love one of the Wix templates, you should know that there is no real way to take it into WordPress. Take this into consideration if the main reason for you to pick Wix was visuals.
However, you will be able to get a considerable number of WordPress theme builders that would let you create and recreate almost any look for your WordPress site.
Let’s go on with the preparation for your big move from Wix to WordPress.
Preparations for the Conversion
When moving a project from Wix to WordPress, one needs to consider some things. The first thing you have to do is get the new WordPress website ready for its upcoming conversion.
The time that the conversion would take depends entirely on the size of your Wix site and whether you want to take your SEO settings from Wix with you. It also depends on what level of familiarity you have with WordPress. In case you are a novice when it comes to WordPress, you might want to check our WordPress tutorial.
Purchase Hosting
When you are with Wix, you would be using bundled hosting, and thus, when you move your website away, you would need a new way to host it. In addition to a hosting provider, you would have to buy a domain name for your business or switch your previous one from Wix. If you are searching for a fully managed WordPress hosting service, FastComet is precisely what you need. With us, you also get managed security, out-of-the-box WordPress optimization, as well as premium support.
Register Domain
There are two ways to obtain a domain name:
- Register the domain name yourself - choosing a Registrar is the first thing to do. There are hundreds of them, which could make your choice a little tricky for you. You need to make sure that you make an educated choice before making it.
- Get your hosting provider to register your domain for you - definitely the better option. Most hosting providers already have approved Registrars they work with, and thus the providers have all the essential information for the registering process already on hand. With FastComet, you get the lowest possible prices for domain name registrations as a value-added extra to all other services that come with our packages. This way, you are saving some resources in the form of cash, which is always lovely. For some information on domain names - check our post on How Important is a Domain Name for the business.
How to Transfer a Domain from Wix to WordPress
If you have an existing domain with Wix, you can move it with ease. Certain web hosting companies (such as FastComet) offer free domain transfers as a value-added extra. Not only that, but we also add one free year to your domain’s expiration date. To transfer away from your Wix domain, proceed with the following steps:
- Sign in to Wix;
- Find the link My Domains;
- Click the relevant domain;
- Click on the tab Advanced;
- Click Transfer Away from Wix;
- Click Send Code.
Install Your WordPress
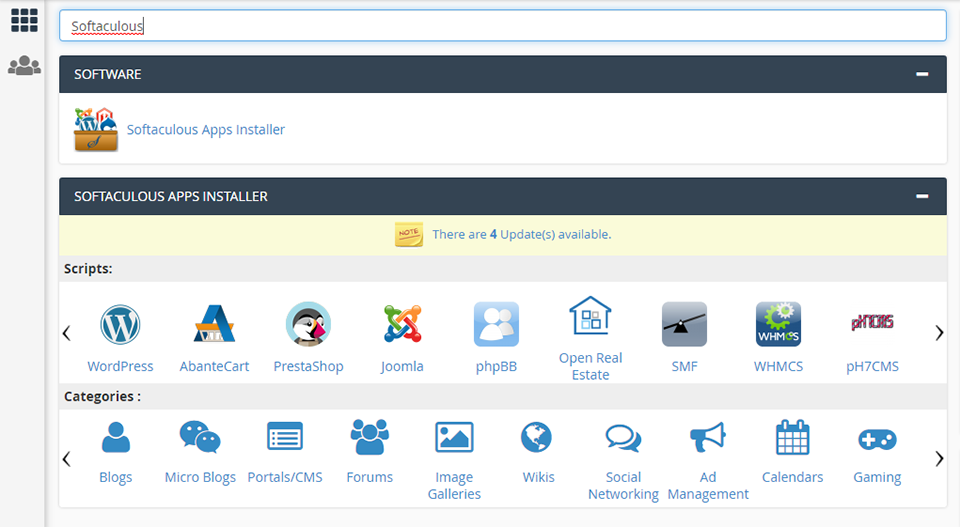
Prior to moving your Wix website files, you would need a fresh WordPress installation. Installing WordPress on your website would depend on the hosting environment you have chosen. However, if you are a FastComet client, the easiest way to install WordPress would be via the 1-click Softaculous installer in cPanel.
Now you will have your WordPress installation and the login credentials that allow you to access your website’s backend. The URL would be something like http://example.com/wp-admin (where example.com is a placeholder for your registered domain name).
You have the power to customize your WordPress site by using themes and plugins.
Select a Theme
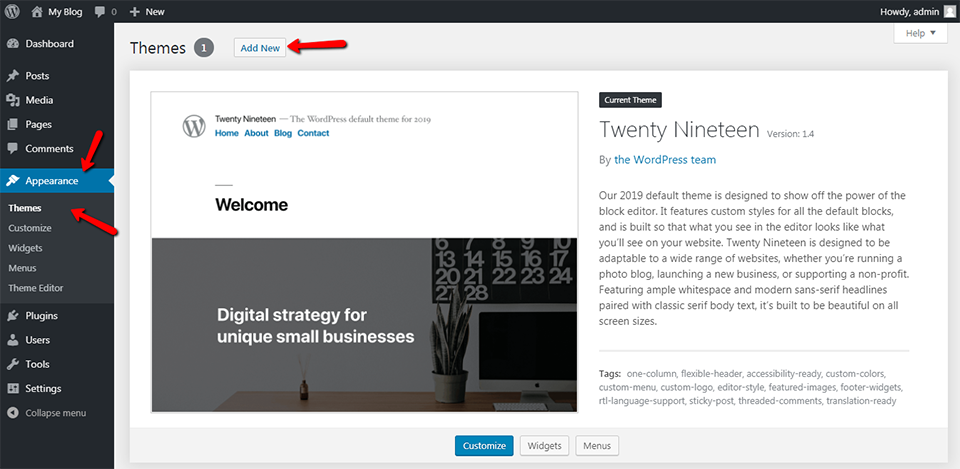
There are plenty of available free WordPress themes that you will have to choose from, and you can install them from the WordPress Dashboard. To do this, go to Appearance → Themes → Add New.
Beyond the free themes selection, there’s also a lot of paid themes available. Typically, such themes are of higher quality. They are feature-rich and have more customization options.
In case you are looking for a premium theme, you should check out the following marketplaces:
- ThemeForest;
- Elegant Themes;
- Studiopress;
- Theme Directory;
- WordPress Premium.
You have a good chance of finding a WordPress theme that is mimicking your existing Wix site design.
It’s actually not too hard to customize your theme. You can navigate to Themes → Customize and basic changes from there. Another option would be visiting the theme’s documentation for additional extensive walkthroughs. The time to start the transfer of your Wix site over to WordPress is here.
Option 1 – Manual Migration
Migrating your Wix site into the world of WordPress can be as simple as copy-pasting a piece of content. If you’ve had some experience with a word processor (Notepad, Wordpad, etc.), you have probably done this before.
By choosing the manual migration, you will have copied every piece of content to your brand new WordPress site, composed in the exact way you want everything to be. If you have a small site, this is the way you should go.
However, this method also has a disadvantage - it can be tedious. You will most likely need to fix all the formatting of your pages after you paste your content, which is why if you have several dozen pages to migrate manually, the procedure could take a lot of your time. If that’s the case, you need to consider one of the other two alternatives for moving your Wix site to WordPress.
Setup Your Pages and Posts
Our advice for you when doing a manual conversion would be to create all pages and posts in advance. Doing that would let you quickly move when you get to your next step, instead of having to stop and create every page one by one.
However, you can create your posts and pages manually by using the Add New menu option in your WordPress Admin Panel. If you are doing that, you have to be sure that all your URL slugs match those from Wix. You can speed up the process by making use of the WordPress plugin called Mass Pages/Posts.
Once you have installed and activated your plugin:
- Click on its menu item and find Settings;
- Enter all top-level pages’ names you have, separating them with commas, not spaces. Feel free to enter the real titles of your pages. Doing that will create the URL slugs for them as well;
- Go through all other options and enter your desired content. You can enter placeholder text for the moment;
- Check the type of post you create - whether it’s a post or a page. Those two are very different from one another, especially when it comes to WordPress;
- Click Create, and you have your site populated with posts.
If you are not using the pro version of the plugin and you want to have a publishing date on your posts, you will have to do this manually.
Copy/Paste Your Wix Content
Copy-pasting is probably the most tedious step when performing a manual conversion. Here, you need to:
- Copy all the relevant text manually and then paste it into the equivalent page within your new WordPress installation;
- If your pages were containing images, you need to bring them over as well, which has to be done manually, meaning you need to save the images and then reupload them to the WordPress media library;
- Fix internal links. If you’ve copied a Wix page that was linking to other Wix pages on your website, the links will still be pointing back to Wix. You need to go through all those links and replace them with your new WordPress ones. Since you have all-new WordPress pages, you can change the links and use the URL slugs without your domain. For example, if you have https://example.com/wix-vs-wordpress, you can use only the part /wix-vs-wordpress as the replacement, which makes fixing the internal links a lot less tedious then it could be. Doing that will keep your links working, in case you decide to change domains in the future.
Remember that you have to repeat these steps for every page and every post from your Wix site.
Option 2 – Import your Wix Content to WordPress via RSS
RSS - stands for Rich Site Summary. It’s a format for delivering web content that is an object of regular changes. It’s used primarily for news-related websites, blogs, and other publishing websites.
Also, this is the Semi-automated method. So, if you use an older Wix version, go ahead and follow the steps below:
Find Your RSS Feed
- First, you will have to open the existing Wix RSS feed that you have. To do this, add ‘/feed.xml’ to your URL’s end;
- If your site is example.com it will become, ‘example.com/feed.xml, ‘or ‘example.com/feed ‘;
- Now you will also know if your current Wix website has an RSS feed.
Save the RSS File
Once you have the RSS feed open, right-click on the page itself and select Save as. Depending on the browser, you might need to change the file extension, because you could be saving the file as a .txt. You need the file extension to be .xml before you save it on your local machine.
Import the RSS File Into WordPress
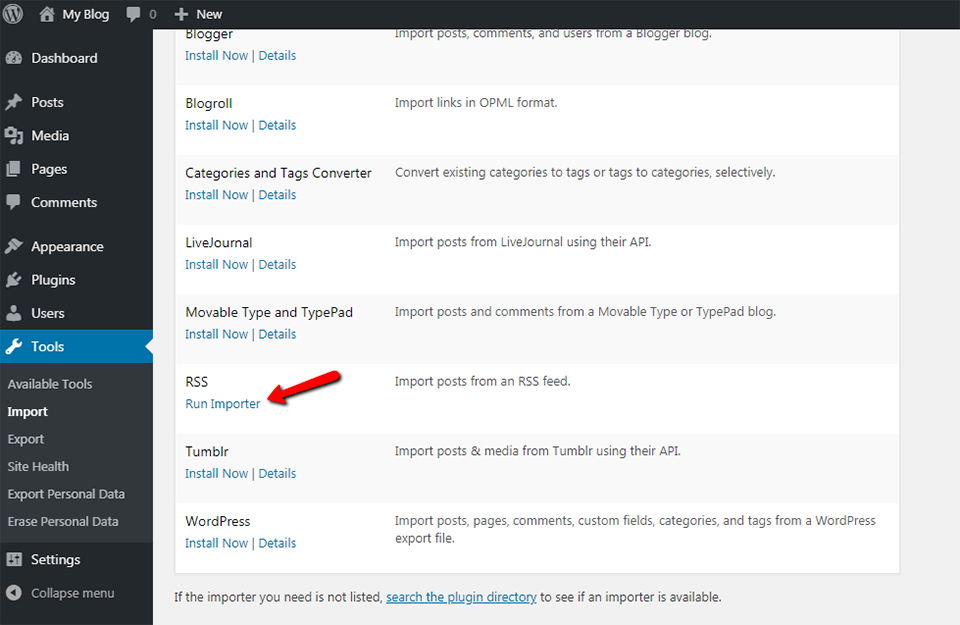
- Go to the WordPress Dashboard → Tools → Import:

- Locate the RSS importer - click Run Importer:
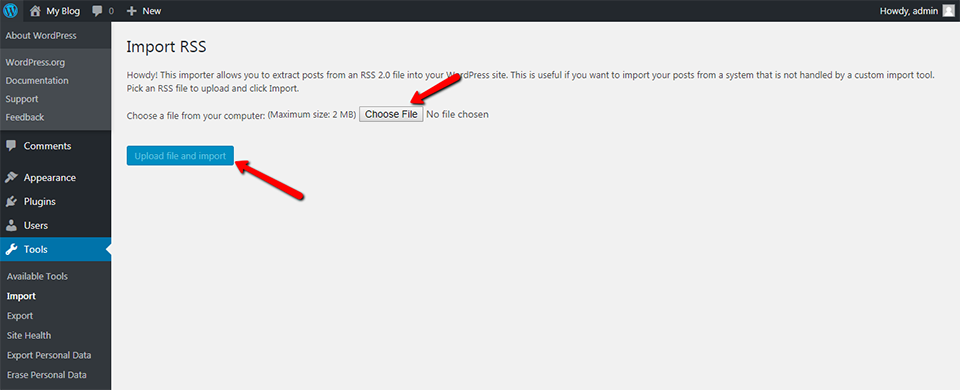
- The next screen enables you to upload the RSS file that you have stored on your personal computer:
- Once the importer finishes its job, you will have to check if all your posts are uploaded correctly;
- Go to Posts → All Posts, and find out whether you have successfully migrated your existing blog. There could be some formatting issues you will have to clean up, but hopefully, all your Wix posts are now on your new WordPress blog.
The RSS migration transfers over only your posts, and not all your pages, so you will still have to move pages manually.
Create your Wix pages on WordPress
Without having a direct method to migrate your Wix site’s pages, you need to do the old-school copy-paste:
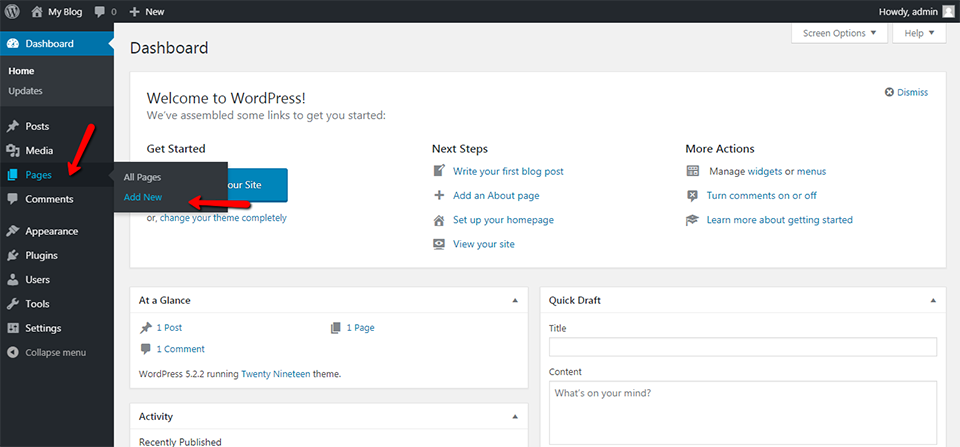
- Open your pages on Wix, copy their content, and then paste it into WordPress by going to Pages → Add New.
- Paste the content from Wix into your WordPress page.
- Repeat this for every page of your migrating site.
Add Your Images to WordPress
The RSS feed migration copies over your content, but Wix is still the host of your images.
There are two ways you can transfer images:
- Download all images from Wix and save them to your local computer. Then, upload the images to WordPress by going to Media → Add New;
- The second option is by using a plugin which would download and your images. The plugin you are looking for is Import External Images. After you have installed and activated the plugin, go to Media → Import Images → Import Images Now. This action would upload all images to your library, switching over your existing image links.
Option 3 – Automated Wix to WordPress Transfer with the CMS2CMS Plugin
The CMS2CMS plugin automatically transfers over your Wix site to WordPress.
Keep in mind that it’s a premium plugin, but as a small investment, it will handle everything for you. The CMS2CMS plugin does the entire migration in less than 20 minutes.
Follow the steps below:
Install the Plugin
- Navigate to the WordPress Dashboard → Plugins → Add New. Type “CMS2CMS“ in the search bar;
- Click Install Now and Activate;
- Download CMS2CMS.
Create a CMS2CMS Account
- To open the plugin go Plugins → Wix to WordPress;

- Create an account, or log in if you already have one.
Connect Your Wix Site
Now, you will connect to the Wix website that you have.
Enter the URL of your Wix site and click on Verify Connection. In case you’ve entered the correct URL, you are ready for the migration.
Run the Migration from Wix into WordPress
Now you can set migration settings. Choose all the content you wish to migrate and the pieces of content you don’t need.
For an extra fee, you are going to have more migration settings such as:
- Migrating metadata;
- Transferring images;
- Setting up 301 redirects;
- What you have to do is click on Start Free Demo Migration - it will provide a helpful report that shows whether there are any errors during the migration.
- You get your quote. You can add migration features or purchase migration insurance in case something goes wrong during the whole process.
- If you are happy with your settings for the migration and your final price, you can go ahead and click on the button Complete Migration;
- Your migration will be initiated as soon as the payment has been processed.
Post Wix to WordPress Migration
No matter which method you have chosen, there are always things you should do before your site is public.
Here are four things to help clean up your WordPress site:
Create a New WordPress Menu
Your main navigation menu is to help visitors navigate around your WordPress site:
- Go to the WordPress Dashboard → Appearance → Menus;
- Name the new menu and click on Create Menu;
- Select all your created pages from the left-hand side and then click Add to Menu. Once your menu is complete, all you have to do is click on Save Menu.
- To put the menu on your WordPress website, click on Manage Locations. Depending on your chosen theme, you will get different possible locations to add your menu. If displayed at the top of your WordPress site, the menu will be called Header Menu or Main Menu. We have a tutorial on Creating Menus Using Theme Options.
Redirect Your Wix Website to WordPress
Redirect your old Wix website to the new WordPress site. That way, when someone lands on the Wix site, they will immediately be taken to your WordPress.
However, in case you used a subdomain to build your Wix site, you won’t be able to make use of the redirect feature. Also, if you’ve used the CMS2CMS plugin and paid for the extra redirect feature, your work would be done.
Otherwise, go ahead with your redirect:
- Copy the following code into a text editor of your choice:
var hashesarr = {
"#!about/ghit7”:’/about/‘,
"#!contact-us/fe37”:’/contact/',
“#!dog-article/c6hg”:’/dog-article/'
 };

for (var hash in hashesarr) {
var patt = new RegExp(hash);
if (window.location.hash.match(patt) !== null) {
window.location.href = hashesarr[hash];
    }
}
The first part of this string, “#!about/ghit6”, needs to be your old URL from Wix, and the second part, ‘/about/,’ is your new WordPress URL.
- Change these for every existing URL on your Wix site that you are moving;
- Save the file as redirect.js and upload it to your
/js/directory on the server you are using; - Edit the
functions.phpfile, so the file you have created would run; - Open the
functions.phpfile and then add the following lines of code:
function wpb_wixjs () {
wp_enqueue_script( 'wixredirect', get_stylesheet_directory_uri() . '/js/redirects.js', array(), '1.0.0', true);
}
add_action('wp_enqueue_scripts', 'wpb_wixjs');
Save and upload the new functions.php file, and all redirects will be in place.
Add the Essential WordPress Plugins
One of the many things making WordPress an exceptional CMS is the variety of plugins available, including those for speed, security, and performance.
To get started optimally, you need to install the following free plugins:
- Wordfence –protects your WordPress site against malicious activities;
- Yoast SEO – helps with optimizing a website’s on-page SEO;
- W3 Total Cache – a caching plugin that speeds up your site a great deal.
There are plenty of plugins to choose from, and sometimes it can be hard to decide which are the best for your site. Typically, it’s not the worst idea to install a whole lot of them, but you should rather install only the ones that you actually need.
When choosing your plugins, you must check their last updates and read some reviews about them.
Do a Final Site Run-through
If your Wix site was large, you have likely used a few plugins to assist you with migrating your site content into WordPress. While plugins can be a great time-saver, they will not always work flawlessly.
It’s a good idea to take a look over your new WordPress site and make sure that everything is working correctly. Double-check all your internal links, menu items, and media files.
Double-Check Existing Media and Content
You have to do a final run-through of your new WordPress site. There might be some formatting or link errors that occurred during the transfer, which can be frustrating, but it’s completely normal;
Go through every page to make sure everything looks and functions the way it’s supposed to;
Make sure you review all pages and posts before publishing them live. It will help you catch all errors and make sure that the formatting and presentation look proper in the browser window.
This final phase could take longer than expected, but keep in mind that it’s necessary.
Check Broken Links
After moving your Wix website, you need to take at each of its internal links, which includes any links to your pages, posts, and media items. If you have updated the permalink structure, it’s most likely that you would have a few broken internal links. Make sure that you go through every post and page to edit all links that need corrections.
If you would prefer not to go through each page one by one and hunt for broken links, you can get help from the Broken Link Checker plugin. Once installed, the plugin seeks out links in all your site’s content.
If the Broken Link Checker finds broken links, it will show them in three places:
- Broken Link Checker widget in WordPress Dashboard;
- Broken Link Checker menu item under Tools → Broken Links;
- In the Broken Link Checker module in your WordPress Dashboard.
Broken Link Checker is quite helpful – it lets you update all broken links directly through its interface, instead of having to navigate to the source and make changes.
We do not recommend keeping this plugin activated after you have used it to find and fix your broken links. We’ve learned that it could slow down the site a great deal, so it should be activated only when you need to search for broken links.
There is also an alternative to keeping the plugin installed and deactivated. You can use the online tool called Free Broken Link Checker. Check your site often with it (once a month or two), and see if your outbound links are not working.
Conclusion
The whole Wix to WordPress migration process can be a bit complicated, but the guide above should help you do it. By switching to WordPress, you get more freedom and control over your site and data, in addition to the enhanced speed and security.
Still, in case there is something unclear, or if you need some additional assistance, you can always count on our 24/7 technical support. Open a support ticket and make sure to explain what you have tried already. This way, our technical support experts will be faster in the further investigation of any issue. In case you are not yet a FastComet client, feel free to check our FastCloud pricing.
We hope you find this article useful. Discover more about FastCloud - the top-rated Hosting Solutions for personal and small business websites in four consecutive years by the HostAdvice Community!

WordPress Hosting
- Free WordPress Installation
- 24/7 WordPress Support
- Free Domain Transfer
- Hack-free Protection
- Fast SSD Storage
- Free WordPress Transfer
- Free CloudFlare CDN
- Immediate Activation