How to Transfer Away a Domain Name from JustHost to FastComet
Updated on May 30, 2023
If you already have a great domain name, but you’re not happy with your JustHost domain registrar — no need to worry! You can easily transfer your domain to another registrar. One of the best things about transferring your domain over to FastComet is that you can manage all your domain settings and billing from your FastComet account. You will have everything you need in one place. Additionally, you can use the domain name as a Private DNS, or you can choose to set it up with Google Apps. Furthermore, we send all our clients emails when their domains are close to expiration to avoid any downtime because of missed domain renewal. You will be no exception.
Here at FastComet, we make it super easy to transfer a domain registered with JustHost by guiding you through each step with simple instructions.
This post includes:
Prepare to Transfer the Domain Safely and Easily
Before you continue with the domain transfer, take note that whenever a domain name is transferred away, the nameservers associated with it stay the same during its transfer from a registrar to another. Say your domain is using the default JustHost nameservers, they will be preserved during the domain transfer, which is why you will not be able to change them until the transfer is finalized.
This means that if you switched to another web hosting provider and your website was already migrated, make sure that your domain name is pointed to the new hosting provider before initiating a domain transfer. Again, you won’t be able to change the nameservers until the domain transfer is complete.
Keep in mind that Domain Name Registration and Web Hosting are two separate services. The domain name transfer process will not migrate your website automatically. If you’re a FastComet customer and you want to transfer your website from JustHost, go ahead and submit a migration request from your client area. Our transfer experts will move your existing website(s) and email(s) free of charge, seamlessly, and without any downtime.
Special Offer
Once the domain name transfer is completed you can take advantage of our special offer. We will renew your domain for one year free of charge.
The details listed here are only for transferring your domain’s registration to another registrar. The transferring of the hosting for your site is a completely different process. Read more about the process in the following article: How to transfer your website to FastComet.
Review Domain Name Transfer Requirements
- Due to ICANN's Transfer Policy, domain names must have been registered for more than 60 days in order for them to be eligible for transfer. This 60-day registrar lock is to prevent fraud and theft of domains;
- You cannot transfer your domain if it's within 60 days of а previous transfer;
- Usually, the domain name should have more than 15 days before its expiration date;
For more thorough information, you can check our tutorial on domain transfer requirements.
Prior to attempting to transfer a domain away from JustHost, you must complete the following steps.
Steps to Transfer A Domain From JustHost
You should start by accessing your JustHost account where your domain is currently registered.
There are a few things you need to do before transferring your domain. First, follow these steps to access your domain settings:
- Log into your Just Host Domain Manager.
- Choose Domains in the main menu at the top of the page
- Scroll down and select the domain you want to transfer from the list on the left.
- Several tabs for the domain will appear to the right, which you’ll use to view and update your settings. These tabs are:
- Main
- Renewal Options
- Contacts
- Privacy Options
- Name Servers
- Transfer EPP
-
- Lock
If you only see three tabs, the domain has already been registered. The registrar of the domain can be found in the Main tab.
Review Contact Information
As required by ICANN, your contact information is included on your domain's record in the WHOIS database. The gaining registrar will use the information on the domain's record to email critical information about the transfer to the administrative contact, so double-check it. It's best to avoid using an email address associated with the domain; instead, use a public email service like Gmail.
If saving your changes will result in a Change of Registrant request, you will only see the option to opt-out of the 60-day transfer lock. The Change of Registrant process (steps 7, 9, and 10) will not apply if the option is not available.
Follow these steps to update your domain's contact information:
- Click the Contacts tab to the right.
- To view the information for each contact, check the boxes for registrant, admin, and billing. Depending on which box(es) you've selected, you can view and edit each individually or all at once.
- Make any changes to the information for each contact as necessary, then double-check the information to verify that you've entered the new owner's correct email address for the registrant and admin.
Do you see the option to opt out of the 60-day transfer lock? If not, click Update Contact Information to save your changes. If it's there, updating the contact information will initiate a Change of Registrant request, which requires both parties to approve of the changes before the updated record can be submitted to the registry. Follow these steps to continue:
- Check the box to opt-out of the 60-day transfer lock. This is optional, but highly recommended.
- Click Update Contact Information to save your changes.
- Locate the verification email and click the link to approve the changes.
- The new owner must locate their verification email and click the link to approve the changes.
Update Name Servers
You can register your domain with one company and host your website with another, so you can keep hosting your website here if you prefer. However, if you've already transferred your website files to a new host, you should update your name servers now to avoid downtime during the transfer. Because you cannot make DNS changes while the transfer is in progress, you must do so now.
- Click the Name Servers tab.
- Select Use Custom Nameservers.
- Enter the settings for your new hosting provider.
- Click Save Nameserver Settings.
As soon as you save your changes, your new DNS settings will begin to propagate. Each ISP updates at a different rate, with most updates taking between 24 and 72 hours to complete globally. Your emails will be unavailable during this time, and web traffic will be routed to either the old or new host, depending on the visitor's ISP.
Unlock The Domain
Domains are locked by default to prevent unauthorized transfers. You must unlock the domain before it can be transferred to a new registrar.
- Click the Lock tab.
- If the domain is locked, click Unlock.
Note
Up until April 2021, removing the Domain ID Protection (aka Domain Privacy, Private Registration, etc.) was one of the requirements for a domain transfer. The requirement was in place because when you transfer a domain name from another registrar to FastComet, ICANN requires us to send a transfer verification email to the current registrant's email address. In case you initiate a domain transfer while still having ID Protection enabled at your current domain registrar, there is a high probability the transfer verification email won't be delivered. That has now changed. As of April 2021, you do not need to pause or disable Domain ID Protection when you transfer your domain name. The domain transfer can proceed with ID Protection enabled.
Obtain EPP/Auth Code
Next, you need the EPP code, which other registrars may refer to as the Authorization or Auth code. It's essentially a unique password for the domain, made up of letters, numbers, and special characters, which you'll give to the gaining registrar to authorize the transfer.
- Click the Transfer EPP.
- Copy or otherwise make note of the code so you can give it to the gaining registrar to initiate the transfer request.
Remember, it's case- and character-specific; so if you choose to copy/paste the code, make sure there aren't any additional spaces at the beginning or end.
You've now finished prepping your domain for transfer.
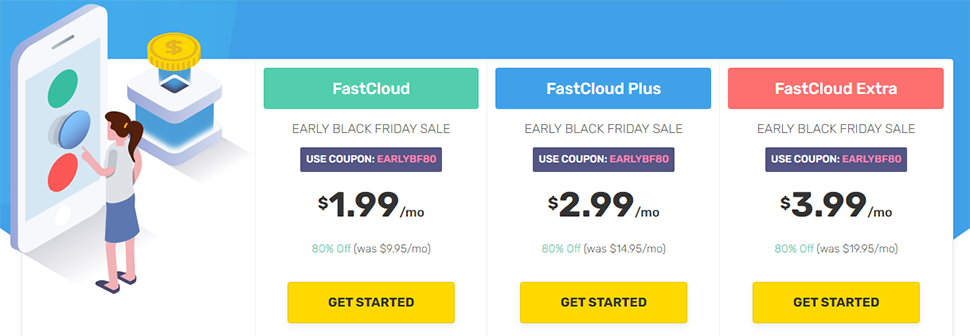
Purchase Your FastComet Hosting Plan
The first thing you should do (if you haven’t already) is to choose from our hosting plans. You can check our price list on your own, but you should consider contacting one of FastComet’s Customer Care specialists, who will help you pick the best plan for your online project.
Note
If you already have an existing website that you plan to move over, check the correct steps to transfer both your Domain Name and Website to Avoid Downtime
- Once you have chosen your starting plan with FastComet, you can click on the GET STARTED button:
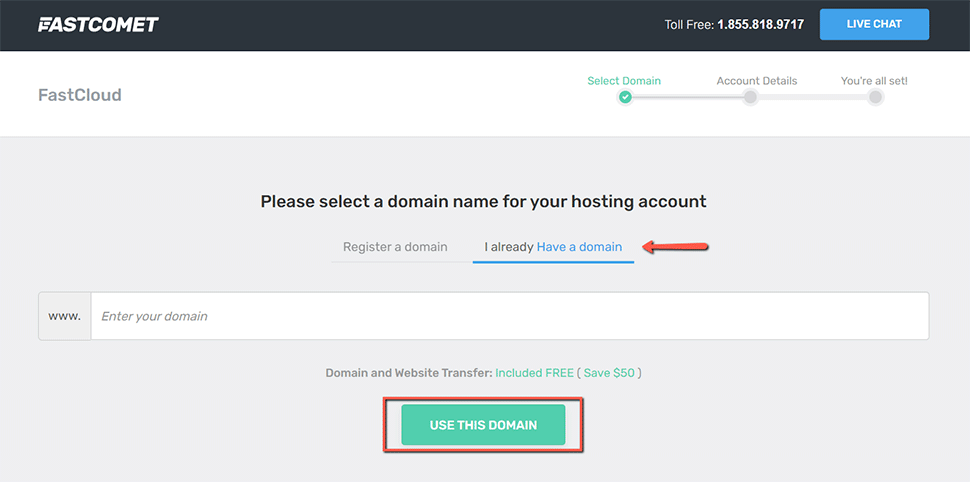
- Next, choose the option “I already Have a Domain,” and then click on the USE THIS DOMAIN button:
Note
Choosing "I already Have a domain does not initiate the domain transfer. You need to do that additionally, as we explain further below in this post.
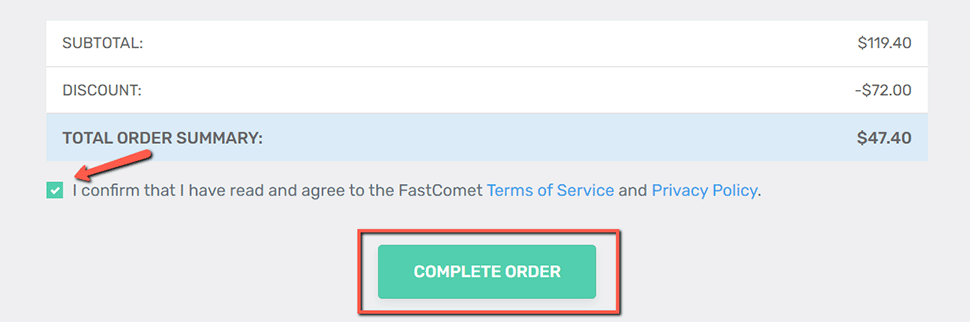
- You will get to a screen where you have to input all your contact and billing info. Make sure that all the information is correct. Once you are ready, please go through our Terms of Service and Privacy Policy. If you agree with our terms, check the box, and finish by clicking on the button COMPLETE ORDER
Update the Nameservers to Point to FastComet
The transfer needs time to process. As your previous provider should release the domain to FastComet, it is a good idea to point your domain to the FastComet nameservers or via A record to the IP address, provided to you in your Welcome email, so that be able to start working on your website.
Changing your name servers while your domain is being transferred may cause the transfer to fail. Be sure that you have updated your name servers before the transfer begins so that your domain will be working as soon as possible.
Note
When you make changes to your DNS, please allow up to 24 hours for propagation after making the change. Thus, we recommend performing no changes on your website during that time as once the propagation is over, they may not be saved on the new server.Submit a Domain Transfer Request to FastComet
As you may have already seen during purchasing your FastComet hosting plan, we provide domain transfer services to all existing customers. After transferring your domain to FastComet you get access to our user-friendly domain management interface and you can take full control of your domain.
To initiate the transfer process for your domain name, please make sure that you have access to your domain administrative email address. In case you no longer have access to that email address you may request to have that email changed by your current domain registrar.
When you have done everything in this post up until now and you are sure that all requirements are met, continue with the following steps:
- Login to your FastComet Client Area;
- Click on the Domain Transfer link under the Domains section in your Client Area:
![]()
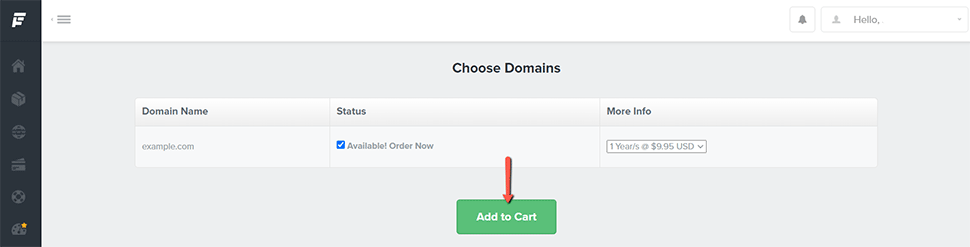
- Input your domain and select your domain extension to check if the domain transfer is available for your domain:
![]()
If you don’t find your extension on the list, contact our technical support for further information. You can do that by submitting a new support ticket.
- If your domain is available for transfer, click on the Add to Cart button to proceed:
- Insert your Authorization (EPP) Code in the field shown in this screenshot:

- If all requirements for the successful domain transfer are met, you should receive your domain transfer confirmation email shortly.
Note
After changing your domain name servers, the new ones will be set after the domain transfer is complete. Your domain will not be modified by our registrar during the transfer.
Approve the Transfer
Domain transfers can take up to five days to complete, but once the transfer is pending, you can expedite the process by approving it manually.
- Log in to your JustHost Domain Manager.
- Scroll down and select the domain pending transfer from the list on the left.
- Click the Transfer EPP tab to the right.
- Click Approve. The transfer will go through immediately, though it may take a few minutes (up to an hour) for the gaining registrar to detect the change.
Check the Status of a Domain Transfer
Domain transfers can take 5 - 7 days to complete. You may contact us at any time to inquire about your transfer status.
We hope you find this article useful. Discover more about FastCloud - the top-rated Hosting Solutions for personal and small business websites in four consecutive years by the HostAdvice Community!
Related articles
- How to Transfer Away a Domain Name from Site5 to FastComet
- How to Transfer Away a Domain Name from InMotion Hosting to FastComet
- How to Transfer Away a Domain Name from Wix to FastComet
- How to Transfer Away a Domain Name From SiteGround to FastComet
- How to Transfer Away a Domain Name From HostGator to FastComet

SSD Cloud Hosting
- Free Domain Transfer
- 24/7 Technical Support
- Fast SSD Storage
- Hack-free Protection
- Free Script Installation
- Free Website Transfer
- Free Cloudflare CDN
- Immediate Activation