How to Make Sticky Posts in WordPress
Updated on Oct 2, 2019
Do you need a way to show off your most important or most favorite posts at the top of your blog? By default, WordPress displays the newest post first. With the addition of more content, all older posts move down, and you eventually put them in archives.
But if you wanted to showcase some of your posts on the front page for a more extended period of time, there is a way to do that too. Here is where the sticky post feature comes into play. This is to show you how you can make sticky posts in just a few easy steps.
What you will find:
What is a Sticky Post?
Sticky posts are self-explanatory - they stick at your blog page’s top. Unlike all regular posts, the sticky ones will stay at your top page for as long as you have the sticky status enabled on the particular post.
When to Use a WordPress Sticky Post?
The primary use of a sticky post is to highlight valuable content on your site. The sticky post feature in Gutenberg allows users to feature their best articles on the top of their blog pages, no matter the publish date. There are mainly two content types that you may want to make into sticky posts.
1. Pillar Articles - the Best Content on Your Blog
Pillar articles are the ones you cherish the most. They include the most popular posts, comprehensive guides, as well as in-depth, informative articles.
Pillar articles are the best method when you wish to introduce your new visitors to the blog. With them, you can quickly generate leads and increase your page views. You should highlight them across your blog and make sure all new users can find them with ease.
Here’s an example: you have a comprehensive article that covers a specific topic explained in details. You should make it a sticky post. Such an article would be of great help to everyone, especially newbies.
Nobody wants their best article to drop off the front page. The main problems with this are two:
- Articles that are lower down the order naturally receive less traffic;
- An article’s SEO ranking can suffer, further depleting traffic — this is because your homepage usually has the most link juice, and articles that are not linked from the homepage acquire less ‘juice.’
In general, if a particular article is the main conversion driver, you need to do everything you can to drive more traffic to it.
2. Critical Content by Time-relevancy
Another post type that you should probably make a sticky one is a time-relevant post such as announcements, giveaways, product updates, etc.
Let’s say you have announced a significant update and you did that via a blog post. You will definitely want people to see that post as soon as possible. Similarly, if you have an active giveaway for a month, you would like your clients to be able to see it before its expiration.
Once the time relevancy on a sticky post has expired, you can either turn it back to normal or replace it with a new one.
Let’s go ahead and see how to do the sticky post magic in two easy steps.
Making WordPress Posts Sticky in 2 Steps via Gutenberg
Since WordPress 5.0, the CMS comes with the new block editor Gutenberg. The editor has built-in functionality to stick any blog post to the top. All of the standard WordPress themes support the sticky post feature and will highlight them on the top of your blog page.
The first thing to do is edit the post that you wish to be sticky or create a new one and choose that option.
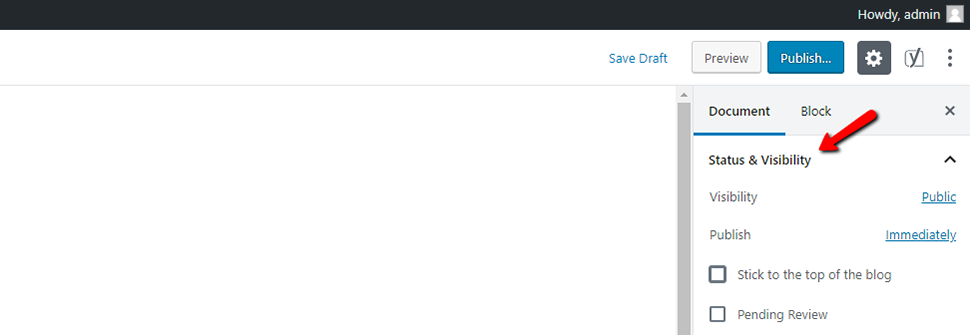
- On the post edit screen in Gutenberg, look to the right-hand sidebar. You will see your Document settings. Click on the Status and Visibility option:
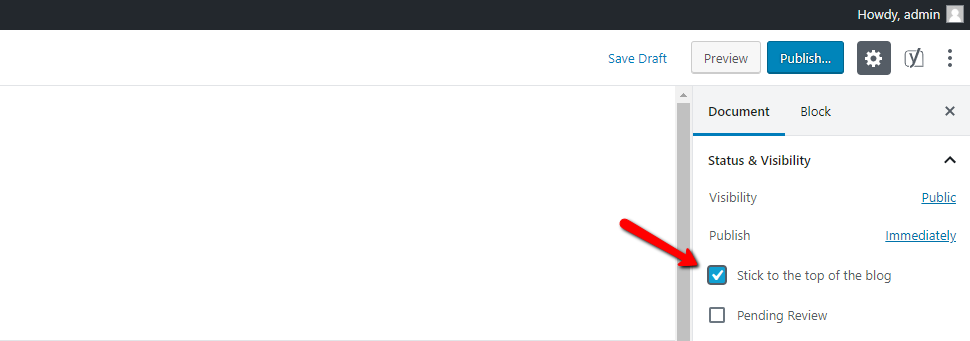
- You will see a checkbox that says Stick to the Front Page or similar. Check the box, and when you save or publish your post, it will be sticky:
- To make one of a few sticky posts be at the top of the chain:
- Go to Quick Edit settings of your post;

- Change the date to today's date; If you have published other sticky posts today, change the time to the current time;
- Click OK, then click the Update button.
That’s all! Your post is now going to stick to the front page of your blog.
Use the Quick Edit Option to Make an Older Post Sticky
To make an older post sticky, you can follow the same steps and click Update. You can also use the Quick Edit feature in Gutenberg:
- Go to Dashboard → Posts → All Posts;
- Search for the specific title;
- Click on the Quick Edit option below the title;
- You will see the quick edit options, which include a sticky post checkbox at the bottom-right side. Check the box and click the Update button:
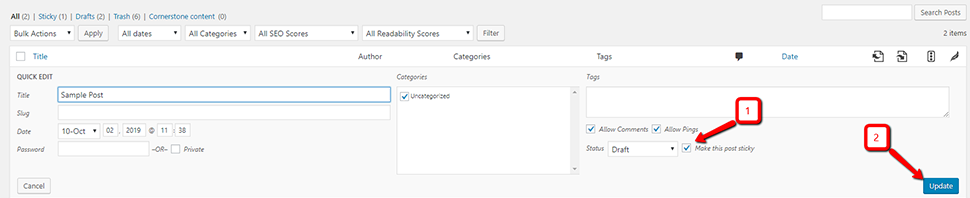
- All done!
Keep note that you can pre-apply the sticky note option on your drafts, which is in case more than one person work with the blog and you wish for them to know your intentions. It’s also useful if you think you could forget to do it when the time comes.
In Conclusion
The sticky notes feature in WordPress might seem to be something small, but as we mentioned, it can be beneficial in making your blog more helpful and comprehensive. Use it whenever you think you have something everyone should read. People are essentially grateful when they get to read some interesting and helpful information, especially if the topic is important to them.
We hope you find this article useful. Discover more about FastCloud - the top-rated Hosting Solutions for personal and small business websites in four consecutive years by the HostAdvice Community!

WordPress Hosting
- Free WordPress Installation
- 24/7 WordPress Support
- Free Domain Transfer
- Hack-free Protection
- Fast SSD Storage
- Free WordPress Transfer
- Free CloudFlare CDN
- Immediate Activation