How to use phpMyAdmin
Updated on Mar 13, 2019
Probably most of our users are well familiar with what phpMyAdmin is and how to use it as it is the most used Open Source database administration tool specifically for MariaDB databases. Still, if you have never heard of it and you are feeling confused using it, we will cover it briefly in the next few lines of this tutorial.
Frequently Asked Questions:
So, what is phpMyAdmin and where can you find it?
As the name suggests, this is an actual PHP application that is used to administrate all of the databases for your web hosting account. By using phpMyAdmin, you can perform basically any action allowed by the Database Management service (MariaDB).
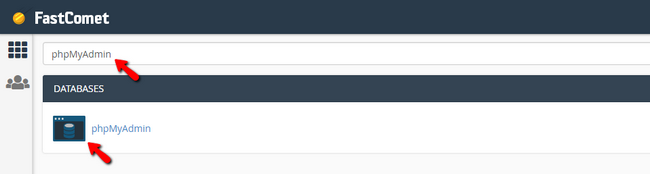
phpMyAdmin is provided with every web hosting package we offer since it is part of the default set of features supported and maintained by cPanel. This means that you will have to login into the cPanel service for the concrete web hosting package and then either use the Search option at the top or find the phpMyAdmin feature under the Databases section of features.
The feature will then open in a new tab of your Internet Browser and will be displayed in the default language for your cPanel account.
What is the structure of phpMyAdmin?
Every time a new tool is being used, there is a learning curve before the same can be utilized to its full potential. phpMyAdmin is not different, and you will have to be fully familiar with its powers. The first step from that process is to understand its architecture.
phpMyAdmin is separated on 3 main areas Left Sidebar, Top Horizontal Navigation, and the Main Content area.
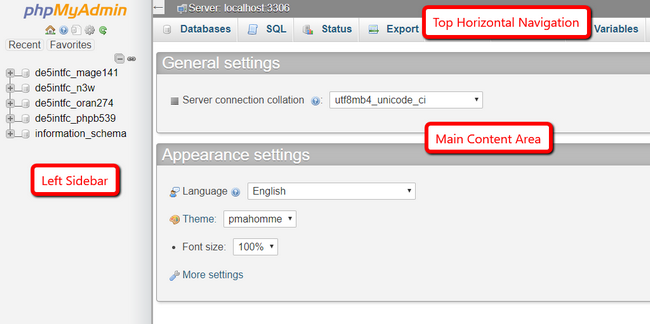
In the Left Sidebar area, you will find a list of all the databases your cPanel user owns. They are conveniently stored in a Tree View just so you can expand every database. The expanding action will bring all the tables that are stored in the database.
The top Horizontal Navigation menu is as the name suggest the area where you will find links to every option phpMyAdmin offers.
And finally, the Main Content Area is the place where all the content of the page will be displayed. This means that no matter if you are accessing an option from the Top Horizontal Navigation or a Database Table from the Left Sidebar, the content will always be presented in this content area.
How to analyze the size of a database using phpMyAdmin?
Once you have identified a database with abnormal or close to the limit for the used Web Hosting package size, you will need to analyze the database so you can find out what is causing that size increase. Since every database includes tables for separating the data added to the database, analyzing the database will mean that you will need to analyze its tables.
To do that, you will have to access phpMyAdmin and locate the large database by its name from the Left Sidebar area. Clicking on it will load all the tables stored by this database in the Main Content area of phpMyAdmin.
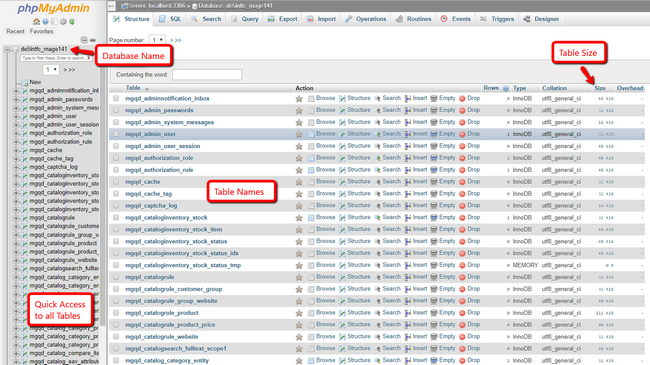
For each table, you will see different options, but before using those, you will have to sort all these tables by their size. This can be easily achieved by directly clicking on the Size column title button.
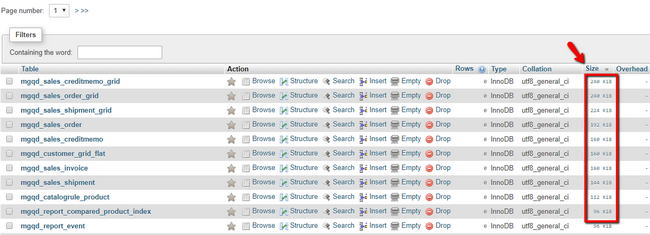
This will order all the results by their actual size on disk. In most of the cases, you will immediately see a few tables which combined are probably causing 80% of the overall database size. If not and if all the tables on the first page are with equal or at least similar size then you will have to review further what is generating that size with the help of a local expert developer who will be able to explain what these tables are for and why they are taking so much space.
How to create Database Backup?
Before taking any actions on a table, it is important to create a backup. Of course, FastComet offers free backup service, however for extra precaution, you should create a backup of the database on your own, and in this section, we will cover that part.
As we have mentioned phpMyAdmin is the most used Database Administration software, and as such it provides functionality for generating database backups. To access that functionality, you will have to click on the Export link from the top Navigation Menu.
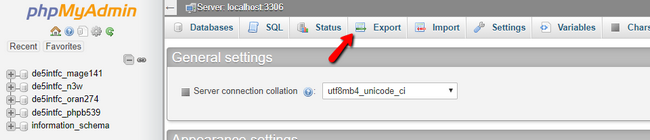
This will lead you to the "Exporting databases from the current server" page where the only thing you will have to do is to click on the Go button.
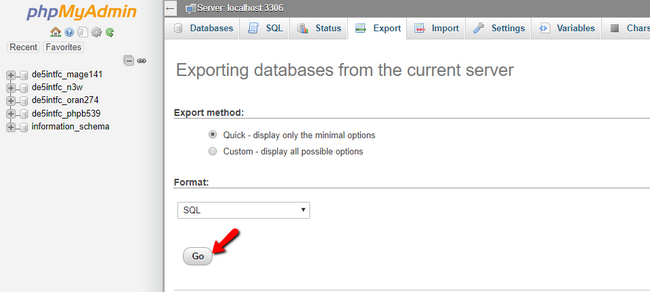
The exportation process will then begin and you can monitor it via the Downloads section of your browser since the backup of your database is directly exported on your local computer. Once finished you will have a fully functional dump of your database which in case of emergency you can restore easily.
How to reduce the size of Database Tables?
Now that you have an actual backup of your database you can start clearing the largest tables.
As we have already explained each database contains tables and each table contains rows of data. The more columns and rows a table have the larger its size would be. So it is important to understand that:
Warning
Clearing a database means to remove rows of data from its tables, NOT remove the actual tables!
Before you can continue, you should gather as much information as possible regarding the tables you would like to clear. Please keep in mind that some tables contain non-critical data such as cache or logs for example and can be safely deleted, however, others contain critical for your website configurations or even customer data. So it is critical for you to properly identify the purpose of the table you are clearing and most importantly, how your website will behave after clearing set table.
Furthermore, most of the applications also provide great forums where you can meet their communities and ask for assistance. Of course, you can always rely on our Technical Team for providing you with information on what can be cleared.
Alright, considering that you have actually confirmed a table for clearing, what should you do to clear it?
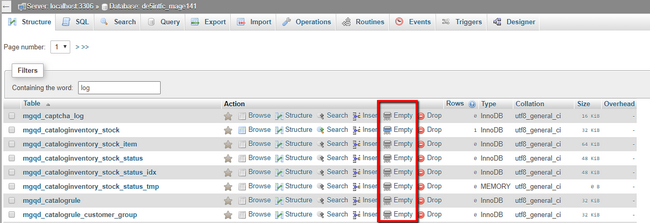
Acknowledging that you have clicked on the database from the Left Sidebar and you see all the tables in the Main content area of phpMyAdmin, you will have to only click on the Empty button.
Warning
Please ensure that you do not mistake this button with the Drop button next to it. Clicking on the Drop button will delete the current table which might break your website, while Emptying the table will only cause for the entries in it to be deleted while the table structure is preserved.
Once you hit the Empty button, you will be prompted for confirmation and then once confirmed the table would be cleared reducing its size to 0.
That is all! You should consider that this procedure can be repeated for each table that you CONFIRM FOR CLEARING as instructed.
Attention
Please note, that you must optimize your tables after you reduce their size in order to see the correct size value. You can read more about table optimization in the next paragraph of this tutorial.
How to Optimize Database Tables?
In the context of MariaDB databases, often performing too many DELETE or UPDATE SQL statements will result in sectors of the database being left empty but still counted to the overall size of the database. To re-order the data and clear that unused space an Optimize operation needs to be executed against the tables of the database.
Database table optimization includes few procedures that are performed by phpMyAdmin on the selected tables. The most important procedure, however, is the table data defragmentation. As you may or may not know defragmentation is a process of re-ordering data so it can take less space on the storage unit and also so it can be more easily accessed.
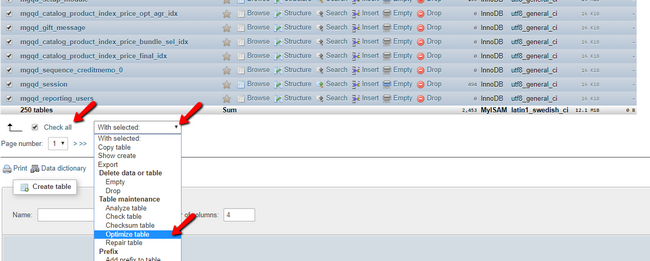
To Optimize a database table, you will have to first select it by clicking on the checkbox before the table name in the Main Content area.
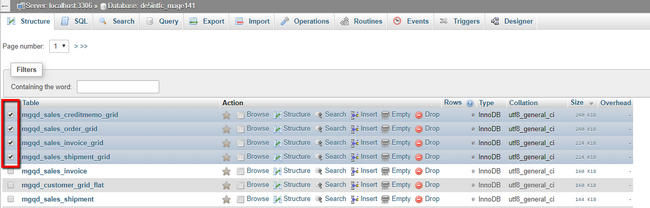
Since the optimization process cannot actually harm your database tables, we strongly suggest that all of the tables should be selected. You can do that at the bottom of the tables list using Check all.
Once the tables are selected, it is time to optimize those. Right next to the Check All option you will see a drop-down titled "With selected". That drop-down contains all the actions you can perform with the selected tables. The action you are looking for is of course "Optimize Table".
Once clicked the optimization process will begin and after some time it will finish providing you with the relevant information about the status of the process.

In the next tutorial, you can check the best practice when dealing with oversized databases. While not frequently mentioned there, phpMyAdmin continues to be a viable tool in managing databases which can save you a lot of hassle and time, if used correctly.

Optimized SSD Web Hosting
- Free Domain Transfer
- 24/7 Technical Support
- Fast SSD Storage
- Hack-free Protection
- Free Script Installation
- Free Website Transfer
- Free Cloudflare CDN
- Immediate Activation