How to Upload Files in Ilias
Updated on Jun 30, 2023
ILIAS's goal is to provide a flexible environment with integrated tools for online learning and working. As opposed to many other Learning Management Systems (LMS), ILIAS goes beyond the notion that learning is restricted to courses. It's essential to understand how to upload files and effectively manage your file settings as the administrator of an LMS.
For this post, we are using a fresh test installation of ILIAS. Everything is shown as it’s set by default.
This post includes:
How to Upload Files in ILIAS
There are two methods for uploading files in ILIAS.
- Drag&Drop;
- Select the file(s) directly.
As you can see, both are methods you are probably already familiar with. Right now, a title and a description can be added to every file, as well. That is possible for both single-file and multiple-file uploads.
Here are the steps you need to take to upload files to ILIAS:
- In your ILIAS Dashboard, you go to Repository → Repository HOME;

- Then, click on Add New Item, and then choose File. Here is where you can either drag and drop your file(s), or select them from your computer and upload them;
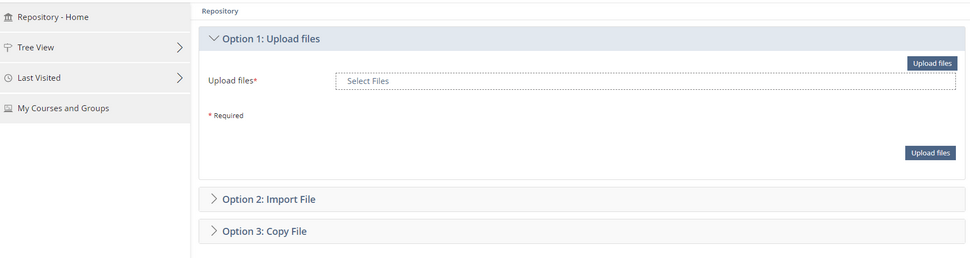
When using the repository while uploading files, you have two additional options - Import File and Copy File. Import File will allow you to upload a .ZIP file which you can then decompress. Copy File will allow you to duplicate an already existing file in the repository;
After you have uploaded the file(s), you can immediately change their name and description as you prefer. Click on the downward arrow next to the file and select Settings;
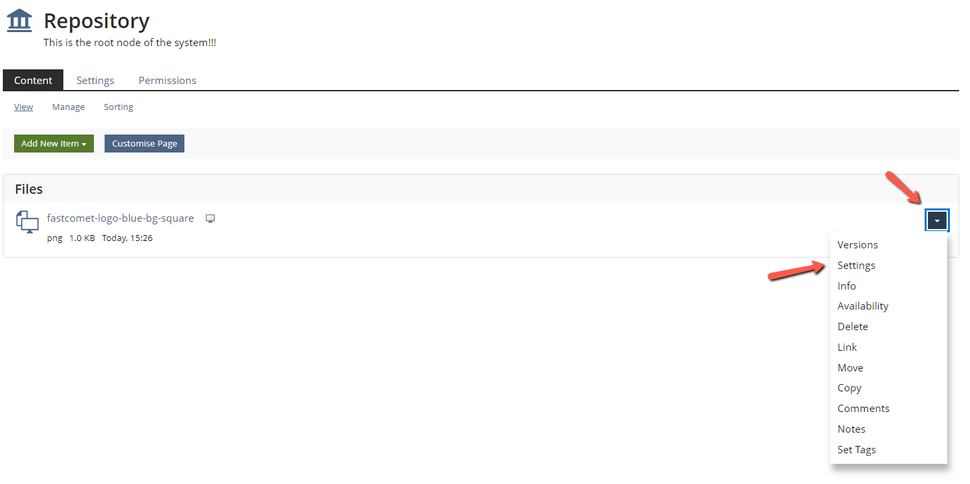
Finally, clicking directly on a file in the repository will open it in a new tab so you can preview it.
How to Manage File Settings in ILIAS
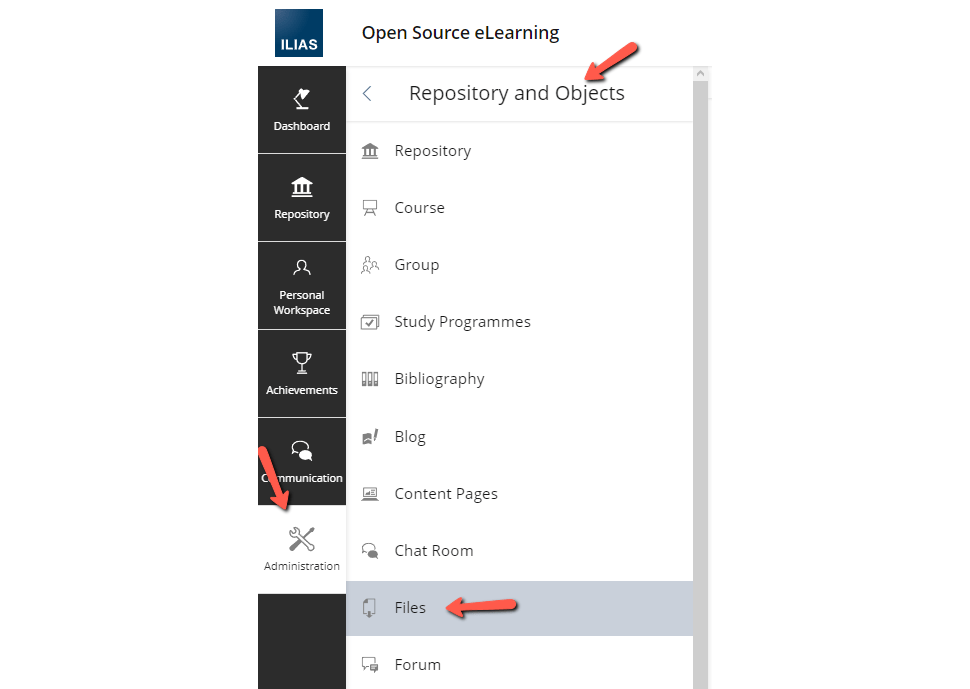
Managing your file settings in ILIAS is not too complicated. The first thing you need to do is go to Administration → Repository and Object → Files.
There are a few settings available on the page, and we will go over them:
- Download using uploaded filename - Forces all files to use the name that was assigned to them before uploading rather than the one that has been assigned since.
- Global Limit - This is a required setting which dictates the size of a file (or a batch of files) a user can download.
- Web-enabled Files - File types placed in the field will be displayed directly in your browser window, while file types not in the field will only be downloadable.
- Enable Preview - Supported file types will be previewable.
- Number of preview images per file - Dictates the maximum number of preview images created for each file.
Next, if you go to Repository from the same menu you accessed Files previously, you will see several other settings relating to file management.
- Download of multiple objects - this self-explanatory tick will allow users to download multiple files or folders at once, instead of having to do it one at a time.
- Limited Length of Descriptions - defines the number of characters a file description can be.
Finally, all tabs from the left have a Permissions tab themselves. There, you can configure the capabilities of different types of users.
After making changes in any tab, don’t forget to click Save.
Conclusion
ILIAS is like a library that offers reading, writing, and working materials and content wherever the repository is located. ILIAS can be operated as an open knowledge platform with content that may be made accessible to users who are not registered rather than as a locked warehouse.
It's crucial to understand how to upload and manage files correctly. We hope that this article has been sufficiently instructive and that you now understand how to manage files in ILIAS.
We hope you find this article useful. Discover more about FastCloud - the top-rated Hosting Solutions for personal and small business websites in four consecutive years by the HostAdvice Community!

SSD Cloud Hosting
- Free Domain Transfer
- 24/7 Technical Support
- Fast SSD Storage
- Hack-free Protection
- Free Script Installation
- Free Website Transfer
- Free Cloudflare CDN
- Immediate Activation