How to Install an SSL Certificate via cPanel
Updated on Aug 29, 2024
Installing SSL certificates in cPanel is a simple process for account owners with Shared, VPS, or Dedicated Server accounts. cPanel releases include the SSL/TLS Manager (or simply SSL/TLS, since that is the tool's name in cPanel) available to all cPanel users. The interface allows you to create, view, and upload private keys, Certificate Signing Requests (CSR), and certificates (CTR) and activate an SSL certificate on your website. Additionally, our hosting services come with two SSL certificate vendors, which are free for all our customers: AutoSSL and Let's Encrypt.
Certain businesses necessitate the use of a Dedicated/Private SSL certificate. A Dedicated SSL certificate is required if you process customer information directly on your website rather than using a payment gateway like PayPal. The free Let's Encrypt or AutoSSL certificates we provide are sufficient for many sites. Additionally, a valid SSL certificate inspires trust in your website and will show it as secure. Otherwise, a user's browser will warn them that the website is insecure, which can deter people.
If you want a Dedicated/Private SSL, we also offer the premium Comodo PositiveSSL, which we will install for you upon request. It's also free for one year when you are a FastCloud Extra member.
Another option is to purchase a third-party SSL certificate. Afterward, you can use the cPanel SSL/TLS Manager to complete the SSL installation process independently. We will go over all of these options in this article.
This post includes:
Install an SSL Certificate Manually
Firstly, the most basic method of installing an SSL certificate is the manual one. It is a bit more time consuming, since you have to generate all necessary certificate components yourself. Read on, and we will show you how!
Generate a Private Key
Before you begin, you will have to generate some Private Keys. Keys are used to encrypt and decrypt information when connecting securely. You will need a different key for each SSL certificate you wish to use.
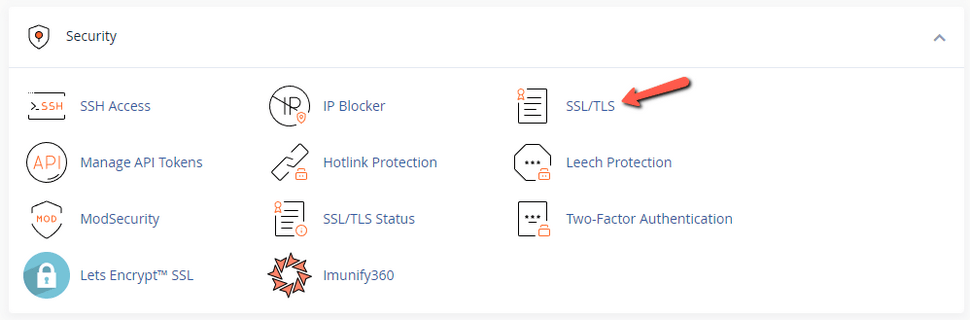
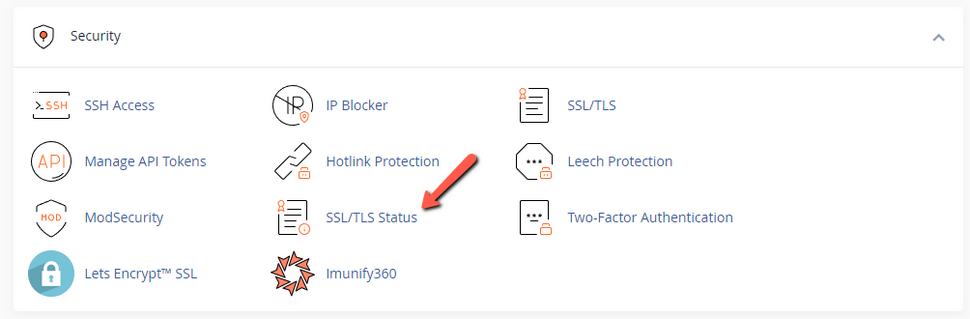
- Log into your cPanel and click SSL/TLS in the Security section;
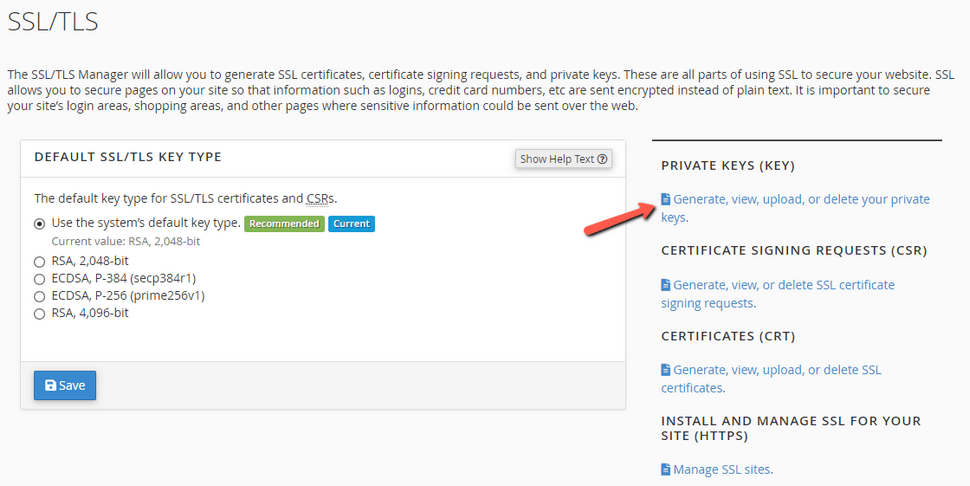
- Click on Generate, View, Upload, or Delete your private keys;
- Leave the key as a 2048-bit one, and fill in all the details that the page requests from you.
- Now with your Private Key generated, click on Return to Private Keys. You should see the key you created in the list;
- You can use a key you already have in the Upload a New Private Key section. Paste the key in the empty field or upload it from a file.
Generate a CSR
You need a Certificate Signing Request (CSR) to get an SSL certificate for your website. Here is how to create one:
- Open the SSL/TLS tool in cPanel again;
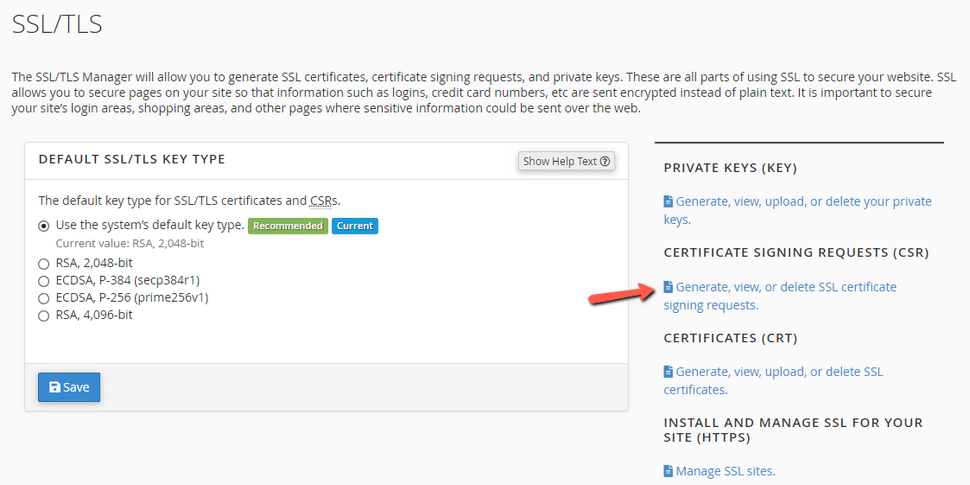
- Click on Generate, view, or delete SSL certificate signing requests;
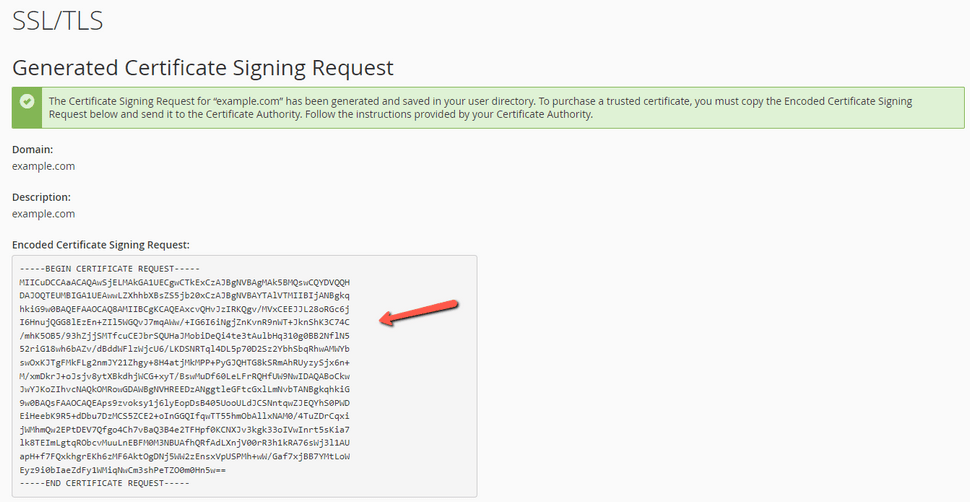
- You should see several fields, so fill them out and click Generate. You should now see the generated CSR. Copy everything you see in the Encoded Certificate Signing Request box, including the BEGIN and END parts and their dashes;
- Next, provide the CSR you generated to the vendor from which you will purchase your certificate. If you are asked the server type your CSR was generated on, you'd want to select RedHat Linux.
When you have the CSR, you can provide it to the Certificate Authority from which you will purchase the certificate. We offer a premium Comodo SSL certificate if you want to purchase one. If you purchase your dedicated SSL from a third-party vendor, use Redhat/Linux and SHA 2 for the encryption settings. If you would like to purchase a certificate from us, please follow these steps:
- Login to your FastComet Client Area (my.fastcomet.com);
- Go to Products → Order → Product Addons;
- Find Personal 256bit WildCard SSL and click on Add to Cart;
- Complete your order by using the preferred payment method.
The Comodo SSL certificate can be a standard SSL certificate or a wildcard one. The wildcard one will also allow the certificate to cover a domain's subdomains. On the other hand, the normal one can be installed only on one domain or subdomain.
Install an SSL Certificate
After receiving your SSL certificate, you can proceed with the installation.
- Open cPanel and click on SSL/TLS;
- Click on Generate, view, upload, or delete SSL certificates;
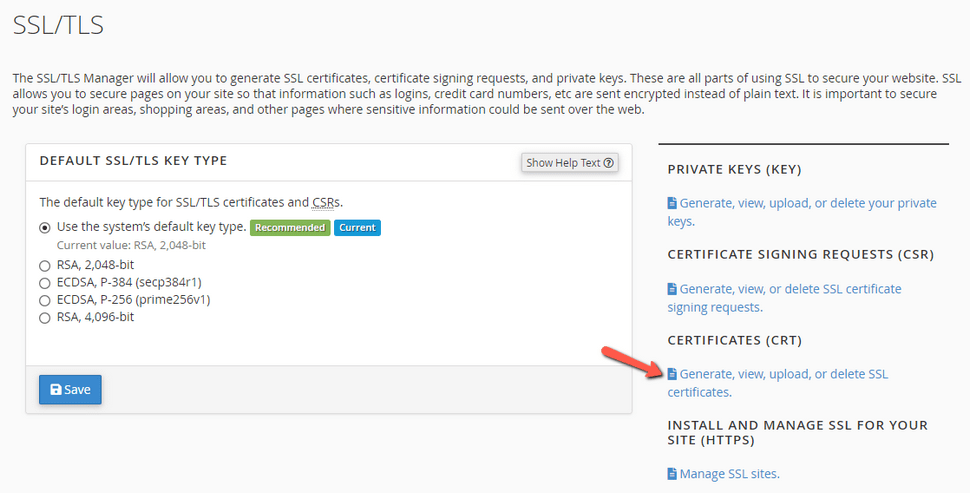
- Paste your certificate info into the Paste your certificate below box and click Save Certificate. Alternatively, click Choose File to browse your local files and click Upload Certificate.
Activate SSL Certificate on Website
Now that you have a obtained an SSL certificate and added it to your cPanel account, you should be ready to activate that certificate for your website.
- Open SSL/TLS;
- Click on Manage SSL Sites;
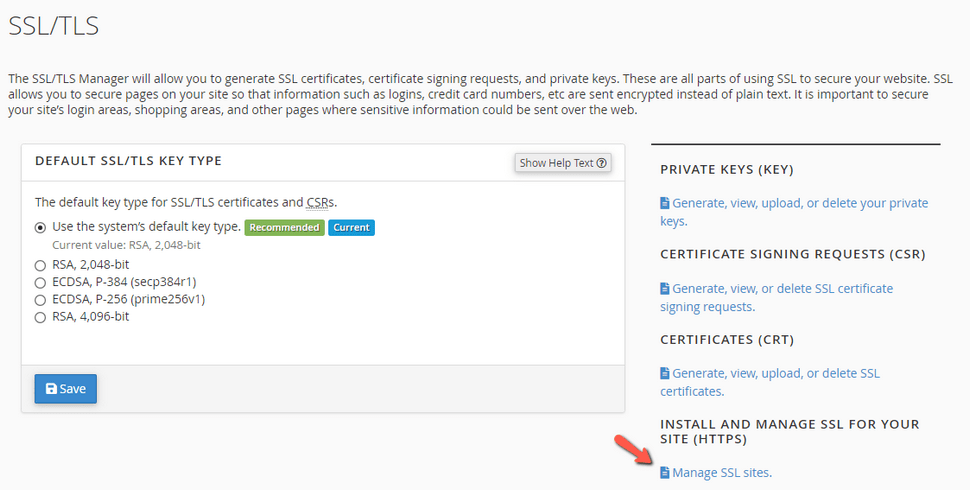
- From the Domain drop-down, select the domain you're installing your SSL certificate on, and then click Autofill by Domain. Remember that the domain must be hosted on the cPanel you are installing the certificate.
- Click on Install Certificate.
You will then see confirmation that the SSL certificate was installed.
Generate a Self-Signed SSL Certificate
Sometimes you might be unable to issue an SSL certificate for your website due to various circumstances. In such cases, a self-signed certificate can be a temporary solution. A self-signed certificate will eliminate the warning screen that appears in a browser when a website is not secured. It will not secure the website, so keep that in mind. Nowadays, some admin dashboards require an SSL certificate. Otherwise, they are inaccessible. WordPress' dashboard is one example: you can only open it if your website has an SSL certificate.
To generate a self-signed certificate, please follow these steps:
- Open your cPanel and go to SSL/TLS, as before;
- Click on Generate, view, upload, or delete SSL certificates.
- Scroll down to the Generate a New Certificate section and fill out all of the details for your self-signed SSL certificate. Then, click Generate.
- On the next page, copy everything from the Encoded Certificate text box, including the BEGIN and END parts and their dashes.
This will generate a self-signed certificate for you, which you can install by following the steps from earlier.
Install an SSL Certificate via Let's Encrypt or AutoSSL
Our hosting services have two automated SSL certificate installers: Let's Encrypt and AutoSSL. Each of them makes the installation of a certificate very straightforward. This part will tell you how to use both to secure your websites.
Warning
To issue a certificate via either Let's Encrypt or AutoSSL your domain must be hosted on the issuing server. If you are trying to use your cPanel with us, your domain must point to your hosting plan via A record. We have an excellent tutorial on what DNS records are, including the A record itself. Additionally, if you are using CloudFlare you might need to pause its services while installing the SSL certificate. CloudFlare masks the domain's A record, which can cause installation issues.
Let's Encrypt
Attention!
This part of our guide is outdated. The Let's Encrypt plugin for cPanel has been discontinued and is no longer available. All Let's Encrypt certificates are now handled by AutoSSL. For more information, please read our blog post on the topic.
To issue an SSL certificate via Let's Encrypt, you have to do the following:
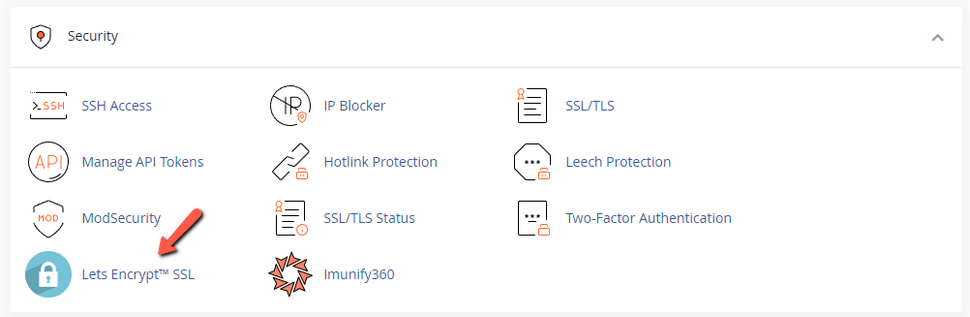
- Open your cPanel;
- Head over to the Security section and click on the Let's Encrypt SSL icon;
- Under the Issue a new certificate section, click the +Issue button for the domain you want to secure;
- Choose which subdomains you want the certificate to cover. Remember that these subdomains must have an A record assigned to them in the domain's DNS zone. Otherwise, the SSL installation will not be successful. If your domain is pointing to your hosting plan with us via Nameservers, then it is very likely that these subdomains already have A records assigned to them. Next, choose http-01 as the validation method;
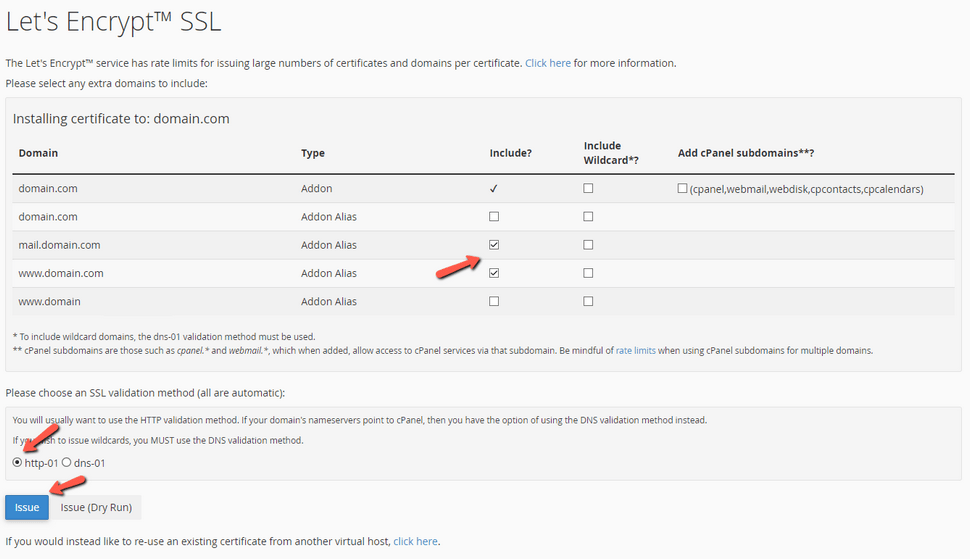
- Once everything is done, hit Issue. If your domain and its subdomains point to the issuing host correctly, the certificate will be issued successfully, and you will see it in the list of installed certificates. If the process fails, double-check if your domain and its subdomains use the correct IP in their A records. Alternatively, you can untick the subdomains you don't need or don't have A records and try installing it again.
Let's Encrypt certificates will also renew automatically before they expire. They are valid for 90 days and will renew several days before that.
AutoSSL
Like the Let's Encrypt plugin, AutoSSL can install free SSL certificates on your domain and its subdomains. The issuing vendor for AutoSSL is still Let's Encrypt, so your domains will still be secured by their reliable certificates. The domain and its subdomains must point to the issuing host via A record here as well. Otherwise, the issuing will fail.
Installation
Here are the steps you need to take to issue one.
- Log into your cPanel;
- Click on SSL/TLS Status in the Security section;
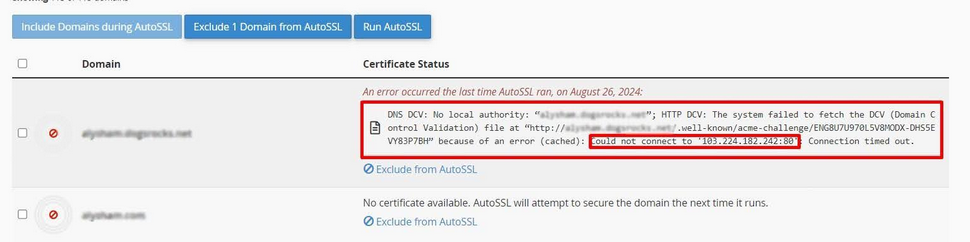
- You will see a list of all domains on the current cPanel account. You can choose which ones you wish to include in AutoSSL and which ones to exclude by using the tick boxes and the respective buttons, or individually from the button next to each one. The included domains will not only get an AutoSSL certificate installed on them but that certificate will also be automatically renewed before it expires.

- Click Run AutoSSL to install an SSL certificate on your chosen domains. After a few moments, you will see a message informing you of what happened with your SSL certificate instalation request.
A successful message will mean everything was executed correctly. If you get an error message, read it carefully; it should tell you the issue. Typically failure to install an SSL certificate indicates an incorrect A record. Check it, and try again. In the screenshots above you can see that each domain has a green padlock next toit and is "AutoSSL Domain Validated." Those things indicate a successful installation. Here is an example of what it looks like when a certificate installation fails.
Uninstallation
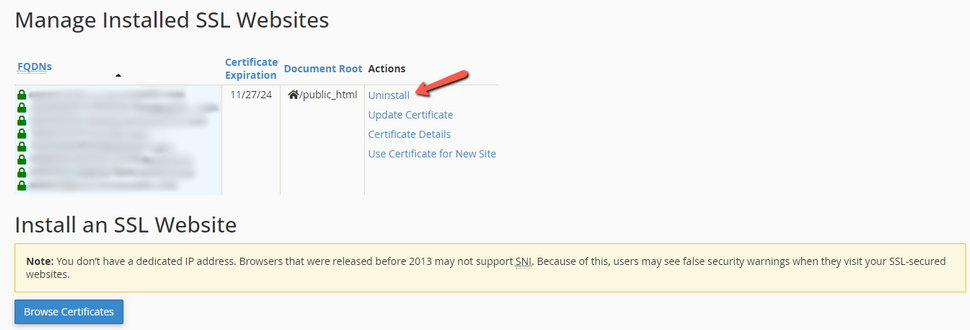
In case you wish to remove the Let's Encrypt SSL certificate installed by AutoSSL you can do so very easily. To begin, log into your cPanel account and then go to SSL/TLS in the Security section.

Then, click on Manage SSL Sites at the bottom of the right-hand side menu. In there you will find all installed certificates. To remove one, simply click Uninstall. You can also view all relevant information about the certificate from that page.
As you can see, AutoSSL is extremely easy to use and will also keep your SSL certificates up-to-date.
Conclusion
SSL certificates are vital nowadays. Having one will not only secure the connection to your website but will also instill confidence in your visitors that your website is trustworthy. Installing one is not difficult, and we hope that this guide will be helpful when you do it.
We hope you find this article useful. Discover more about FastCloud - the top-rated Hosting Solutions for personal and small business websites in four consecutive years by the HostAdvice Community!

cPanel Hosting
- Free Domain Transfer
- 24/7 Technical Support
- Fast SSD Storage
- Hack-free Protection
- Free Script Installation
- Free Website Transfer
- Free Cloudflare CDN
- Immediate Activation