How to restore a backup of b2evolution
Updated on Dec 10, 2015
A restore of a b2evolution backup may be required if something goes wrong with your website and you wish to restore it to operational state again. The process is easy and it does not require much configuration, but we recommend completing each step carefully to ensure a proper restore of your website.
The steps for a full b2evolution restore are:
Restore the b2evolution Files
The first step is to restore the files of your b2evolution website on your account. For that purpose, first choose the location, where you would like to restore the website. In most cases, this would be the public_html/ directory of your account, if you wish to access your website using the primary domain of your account directly. However, this may differ, depending on your personal preferences.
Also, make sure that the directory, where you are uploading the files of your backup, is empty. This is important as if there are files from the previous installation, this may cause a conflict.
Upload Files
There are two ways of uploading your files to the server - using an FTP client, following our FTP tutorial, or uploading directly through your cPanel account > File Manager, following our cPanel tutorial.
Restore the b2evolution Database
To restore the database of your website, you first need to create a new and empty database on your account. You also need to set a user with full privileges to the new database.
MariaDB Configuration
You can create a new database and a user assigned to it via cPanel. Simply follow our Database Wizard tutorial for information on that.
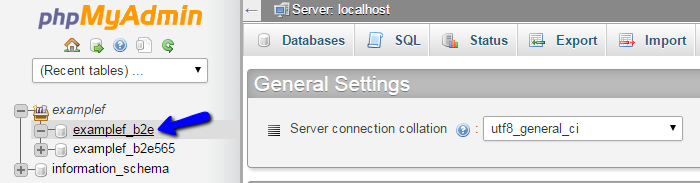
When you have a new database created, you can access your cPanel account and locate the Databases section. Click on the phpMyAdmin service to proceed further.

From the list of available databases on your account, select the one that you have created above.
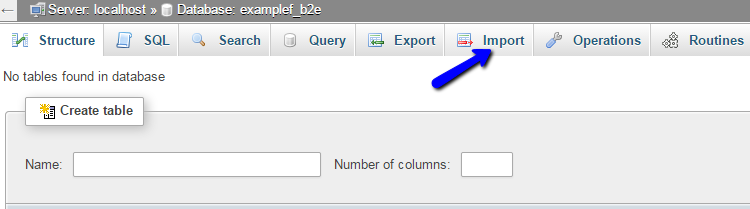
Click on the Import button at the top-menu.
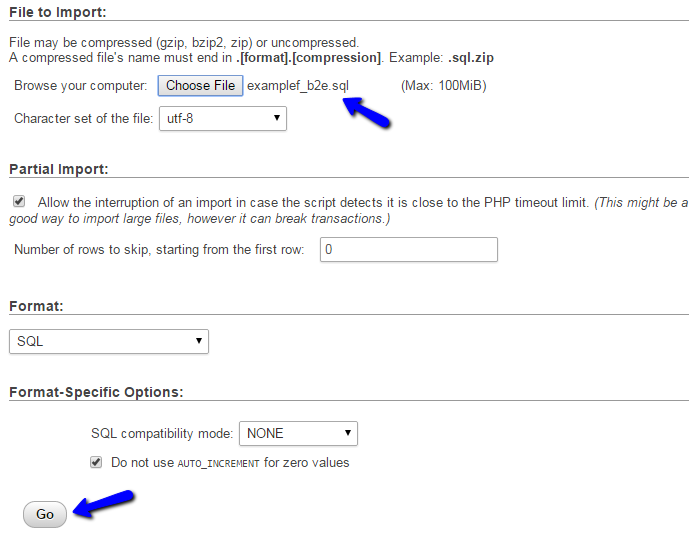
To select the dump backup of your database from your local computer, click on the Choose File button. After that, hit the Go button to initiate the import process.
Link the Files and Database
Up until now, you will have two things done already. The first thing is a location on your account, where you have restored the files of your b2evolution backup. The second thing is the restored backup of your b2evolution database. Now, to complete the full restore of your website, you need to link them together.
You can do that by editing the main configuration file of your b2evolution website. To access it, first access the location of your b2evolution website via FTP or directly through the File Manager service within your cPanel account. Then navigate to /conf/_basic_config.php. The file contains a few vital options for your website.
In the main configuration file, you need to edit two of the options in it. The first thing is the database details it is using and edit the user, password, name and host options.
/**
 * MariaDB DB settings.
 * Fill in your database details (check carefully or nothing will work!)
 */
$db_config = array(
        'user'     => 'examplef_b2e',     // your MariaDB username
        'password' => 'p4ssw0rd',     // ...and password
        'name'     => 'examplef_b2e',  // the name of the database
        'host'     => 'localhost',    // MariaDB Server (typically 'localhost')
);
The second place that you can edit is the baseurl option for your website. If you are changing the URL of your website, you need to edit that. However, if you are using the same location as before, you can skip this change as it will not be necessary.
$baseurl = 'http://examplefcom.com/'
When you adjust the changes in the configuration file of your b2evolution website, the restore is fully completed. You can test that by accessing your website via your favorite web browser.

b2evolution Hosting
- Free Installation
- 24/7 Support
- Free Domain Transfer
- Hack-free Protection
- Fast SSD Storage
- Free Windu Transfer
- Free Cloudflare CDN
- Immediate Activation