How to Install ZeusCart manually
Updated on Mar 13, 2019
In this tutorial we will guide you on how to install Zeuscart on your hosting account using FTP and following the Zeuscart installation wizard.
To install ZeusCart Manually, you need to follow these steps:
Step 1 Download and extract the Zeuscart Archive
o start with the Zeuscart installation process let's first obtain the installation package which can be downloaded via the Official ZeusCart Download page.

If you get redirected to a GitHub page you will need to find and click “Download ZIP” and save the file on your local computer.
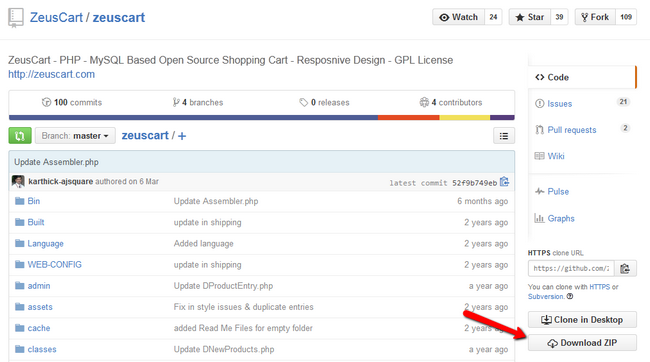
When the download process is complete please extract the archive on your local computer in a separate folder so you can have it prepared for upload on your web hosting account with us.
Step 2 Upload the installation files on your hosting account
Start your favorite FTP client and connect to your Web Hosting Account with us. The first thing you should decide before uploading the Zeuscart installation files is under which folder of your account you would like to have Zeuscart installed.
For example, if you would like to have your store accessible directly via your domain name example.com you should use the public_html directory to upload your files. In case you would like to have your store setup into a subdirectory such as /store/ and have it accessible via example.com/store/, you should create a directory called 'store' under the public_html folder and upload your files there.
Working with FTP
To learn more on how to install a FTP client and access your hosting account via FTP, please visit our step by step FTP tutorials.
When you are ready to proceed with the upload under the desired location, simply drag and drop all files and folders from the 'upload' directory of the Zeuscart archive to your hosting account folder. Note that this should be done within your FTP client.
It might take up to a few minutes to have all files and folders uploaded to the server. As soon as the process is complete you should see the following list of files and folders under your hosting account folder:
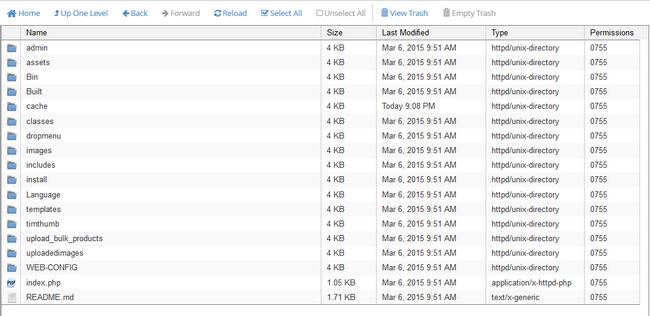
If all the folders are correctly uploaded with permissions "0755" and all the files are also presented you are ready to access the Zeuscart Installation Wizard.
Step 3 Access the ZeusCart Installation wizard
The Zeuscart Installation wizard gives you the ability to finalize your Zeuscart installation in an 8-step process. Open your favorite browser and access your hosting account via your domain name. This should direct you to the Zeuscart installation page.
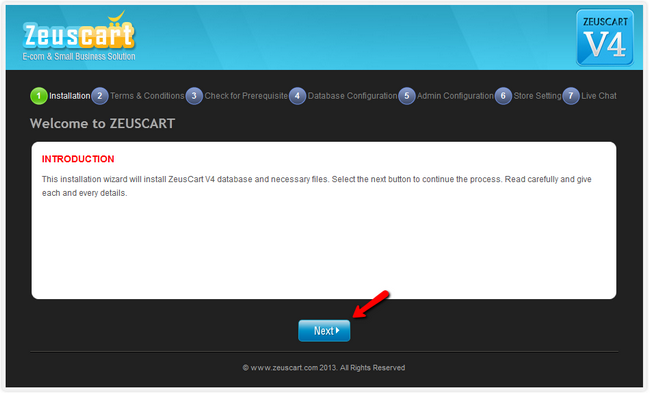
This page will be an introduction to the installation process. You only need to click the "Next" button.The next step requires from you to read and accept the License Agreement. When you are ready to proceed click on the "Next" button.
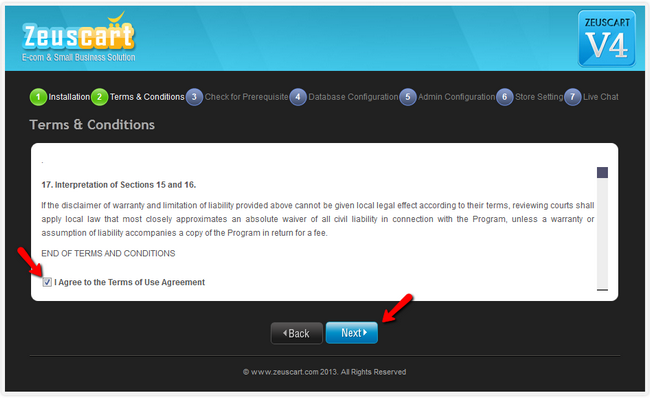
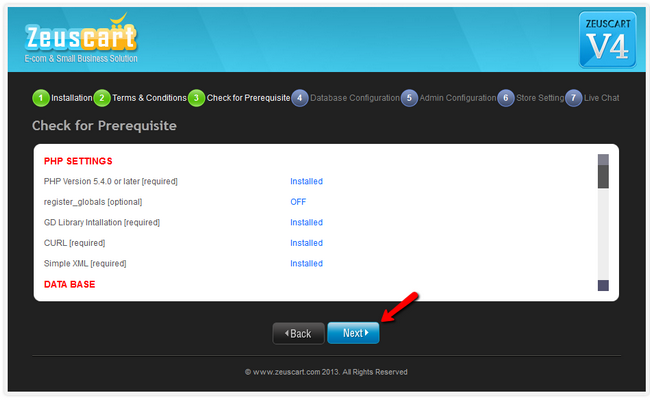
This page checks you to see whether you have all the settings completed. As your ZeusCart Hosting package with FastComet already covers all of the prequisits you can click the "Next" button.
On Step 4 you will be prompted to do the "Database Configuration". Note that you must create your database beforehand using the ‘MySQL® Database Wizard’ in your cPanel.
- Database server name - The name of the database server. The name you should use here is ‘’localhost’’.
- Database Name - This is what you have named your database. Enter the database name without quotes or spaces.(must be the full name e.g: user_Zeus123)
- Database User name - The username for accessing the database. (must be the full user name e.g: user_admin)
- Database Password - The password required for accessing the database.
- Datebase With Sample Data - At the storefront you can view sample products when select this check box
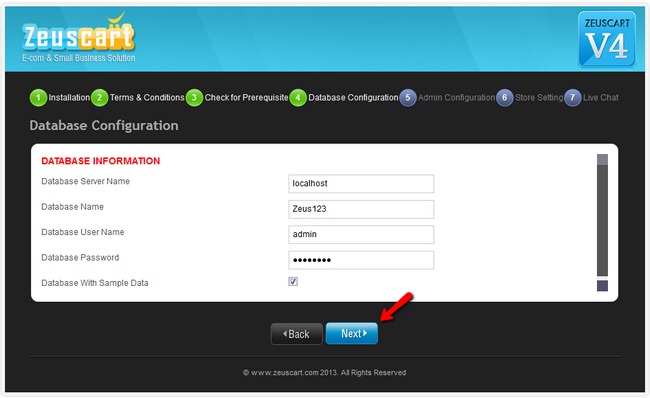
After you have filled all of the required information click on the "Next" button.In the next step you will configure your Admin Dashboard credentials and contact form.
- Domain Name - Enter your domain name. For Example: www.your_site.com
- Admin Email - Enter the email address where you would like to receive notifications when someone places an ad or uses the 'Contact Us' form.
- Admin User Name - Enter the user name you would like to use to log in to the administration area.
- Password - Enter the password you would like to use to log in to the administration area.
- Confirm Password - Re enter the password for verification.
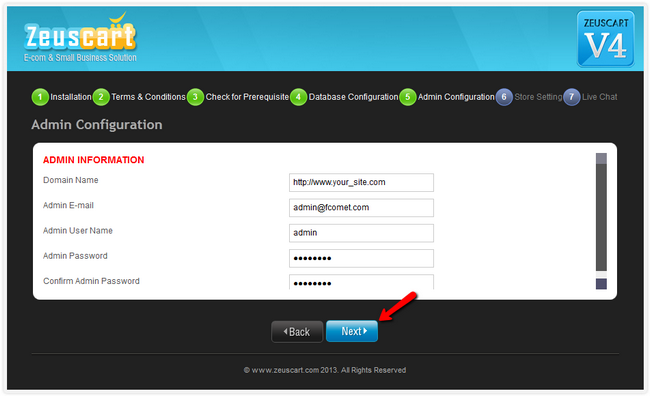
After you have filled all of the required information click on the "Next" button.In the next step you will configure your Store.
- Select Language: Select the language which you want to run the store end.
- Currency Name: Enter the primary currency you wish to use for your entire site. Based on the currency you have selected only all the transactions will be processed.
- Currency Token: Enter the token of your currency. You can consider it as the symbol of currency.
- Currency Code: Select the code for the currency name that you have you entered from the list box.
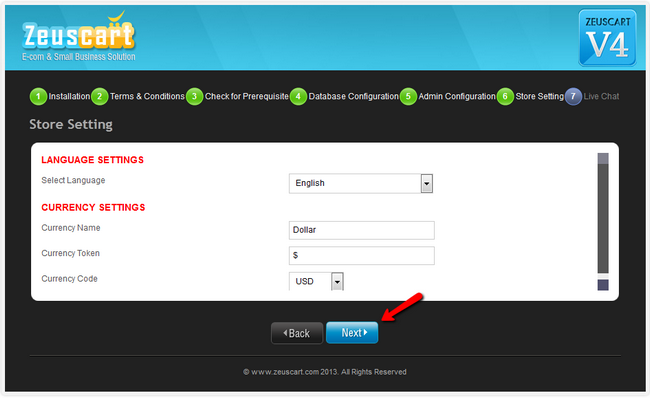
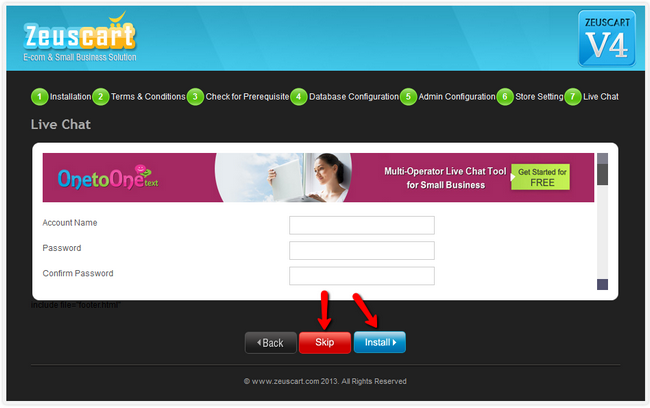
After you have filled all of the required information click on the "Next" button. The last step is for configuring the default OnetoOne Live Chat. You can skip this step if you would like to use another Live Chat service such as Zopim Live Chat.
This will finalize the installation process and you will see the final screen of the Zeuscart Installation Wizard, from which you can access the admin dashboard for your shop.
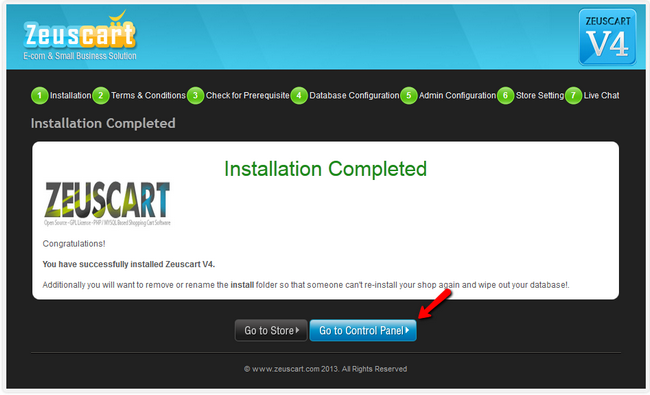
For security reasons, please access your hosting account via FTP and remove the "install" folder in your shop directory.
On this page...

Zeuscart Hosting
- Free Installation
- 24/7 Zeuscart Support
- Free Domain Transfer
- Hack-free Protection
- Fast SSD Storage
- Free Cloudflare CDN
- Free Zeuscart Transfer
- Immediate Activation
