Shipping Settings in WP eCommerce
Updated on Mar 13, 2019
The shipping settings of your store are important for your clients and you. Good shipping coverage and possible shipping discounts will encourage more users to become clients and will improve your conversion rate.
To be able to be to configure the Shipping settings WP eCommerce, you need to complete the following steps:
Let’s begin!
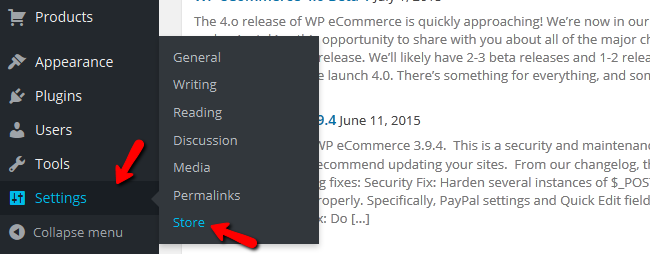
Step 1 Accessing the Shipping Settings page
To configure your shipping rates and options you will need to access your WordPress admin dashboard and navigate to Settings>Store>Shipping.
As this page is split in three parts, each with its own Save Changes button, click the one for the shipping settings section to save the changes made there. The first section of settings is the "Shipping Settings" section containing the following settings:
- Use Shipping - Enable this if you are selling physical products
- Shipping Origin City - The name of the city in which your store is situated
- Shipping Origin Zipcode/Postcode - The Zipcode of the region your store is located in. (If this is different from the city your store is, it might break some shipping calculators)
- Shipwire - Integrate Shipwire into your shipping
- Free Shipping Discount - Check the box if you wish to enable free shipping
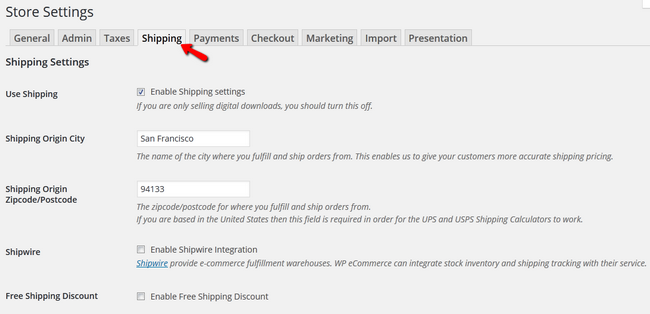
The next section of settings is the "Shipping Modules" section and the Shipping calculators are either Internal or External.
Step 2 Configuring the Internal and External Calculators settings
Internal Calculators use settings you have set up based on price, region or weight.You can choose from these different shipping calculators and customize each one of them.The first module is "Table Rate". In it you can add price ranges and set individual shipping rates for each price range. You can add additional fields by clicking on the "+" buttons.
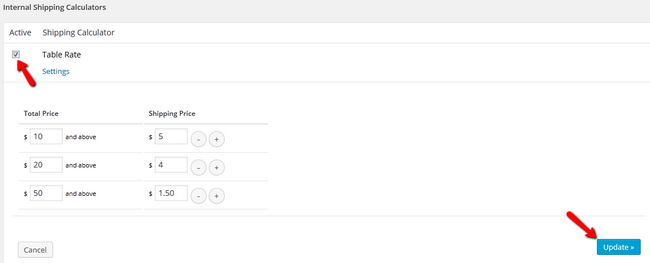
Click on the Update button once you are ready so the performed configurations can be saved.
The second module is "Flat Rate". You can set flat shipping rates depending on the region of the buyer. If you put 0 in a field, that will make shipping free for that region.

To apply the changes hit the Update button again.
The last shipping Module is "Weight Rate". In this module, you can set shipping rates depending of the weight of the product. It is very handy if you sell food supplements or other weight attributed goods.
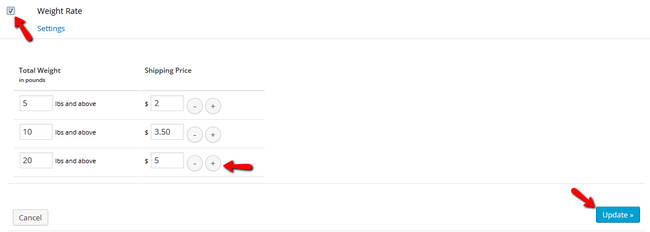
Again, you can add additional fields by clicking on the + button. Then specify the weight(lbs) and the shipping rate and click Update. \
Finally when you are ready with all the settings, please click on the Save Changes button at the end of this page so you can have all these modules and their settings saved.
External Calculators are managed by delivery systems like UPS and FedEx (US only and costs additional $79.00) and include in the calculation services these system provide like product packaging and delivery methods (standard, express, next day air, etc).
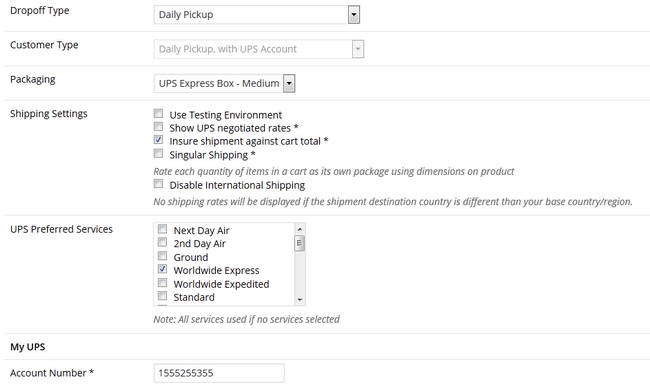
You will need to make an account for each individual delivery system you use and feed your Account ID/API key provided upon registration to your Store shipping configuration.
Don’t forget to click the Update and Save Changes buttons once you are done configuring the external shipping calculator.
Congratulations! You now have a working shipping configuration that calculates and presents the client with the additional shipping cost for his order!
On this page...

WP eCommerce Hosting
- Free Installation
- 24/7 WP eCommerce Support
- Free Domain Transfer
- Hack-free Protection
- Fast SSD Storage
- Free Cloudflare CDN
- Free WP eCommerce Transfer
