Changing the folder
Updated on Sep 12, 2016
If you are maintaining a development version of your store or the so called staging version you will come to a moment when you would like to deploy the changes from your staging version to your live website. In order for this to happen you will need to move the files of your application to their new location and then to reconfigure the PrestaShop 1.6 platform with the new URL. The process is quite straight and in the next few lines of this tutorial we will describe it in details.
To move the PrestaShop 1.6 application into another folder:
step
Move the Files to the New Location
Let's assume for a moment that the staging version of your Store is located in a subfolder called staging for example and accessible with yourdomain.com/staging while the live version of your website is accessible with yourdomain.com. The files for both of these versions should be located respectively into the public_html folder (for yourdomain.com) and into the public_html/staging folder (for yourdomain.com/staging). The goal in this step would be to move the files from the staging folder directly into the public_html folder.
In order to achieve that you will need to connect to the FTP service for your account using your favorite FTP client. More information on how to use the FTP service and how to manage the files for your account via that service you can find in our FTP Tutorials section.
Assuming that you have connected correctly to the ftp service for your account you should now download the files for your Store on your local computer.
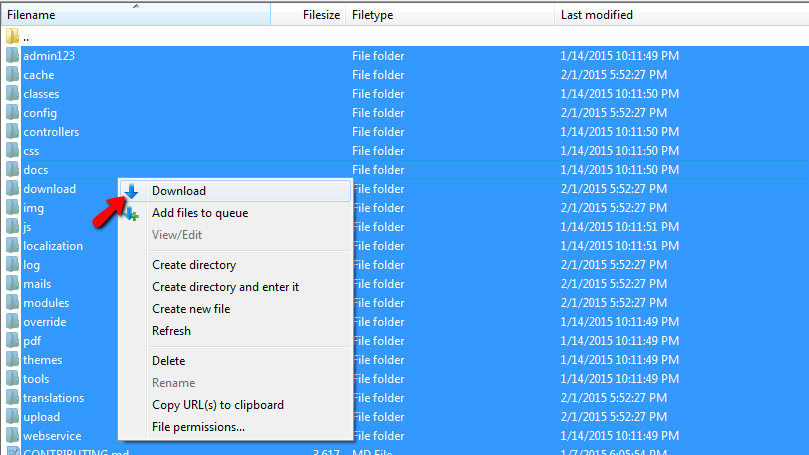
Now that you have the files downloaded on your computer it is time to change the folder from public_html/staging to public_html and to upload the files you have just downloaded. This will cause for all the files into the public_html folder to be overwritten with those from your staging version. Of course if you are prompted with a warning for the overwriting process you should select the necessary options for all the files to be overwritten.
step
Reconfigure PrestaShop 1.6 with the new URL
Since the staging version is accessible at yourdomain.com/staging and your production version with yourdomain.com you will need to change that in the configuration of your Store with the new URL. Here is the tricky part however. In order for the staging version to operate with a different database than the production version and in the same time for the URL to be changed you will need to duplicate the database of your staging version into a new database and then to reconfigure the production version of your store with the new database. This can be achieved quite easily if you follow our other tutorial on how to backup and restore the database of your Store.
You should end up with a completely new database configured with the production version of your website and now it's the time for the final change which is the change of the URL your production version uses.
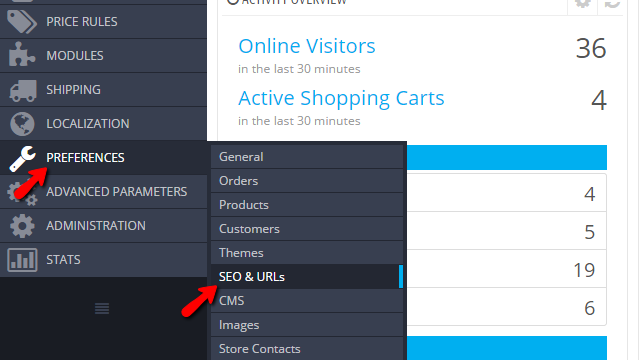
In order to achieve this you will need to access the Back Office of your Store on the production version and navigate to Preferences → SEO & URLs.
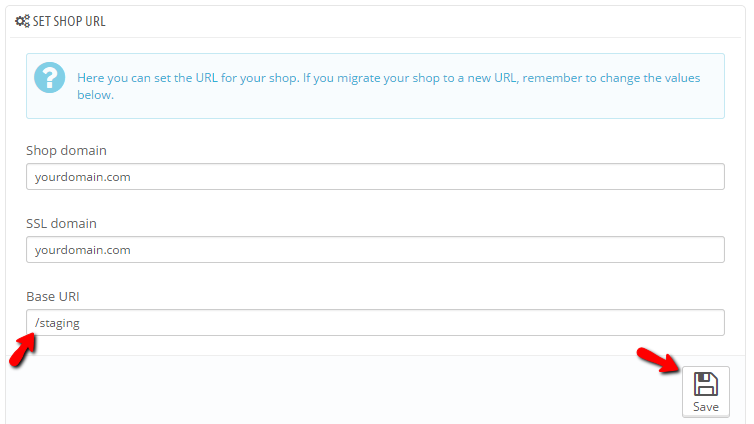
There you will need to scroll down a bit until you find the Set Shop URL section where you will be able to see the current configuration with the staging folder. Please clear the content of the Base URL field and save the changes so the Shop domain and the SSL domain can remain the same as your actual domain name.
Once you save this configuration you will have the process of moving your Store from one folder to another finished successfully!
Congratulations! You now know how to change the folder where your PrestaShop 1.6 based Store is installed!
On this page...

PrestaShop 1.6 Hosting
- Free Installation
- 24/7 Tech Support
- Free Domain Transfer
- Hack-free Protection
- Fast SSD Storage
- Free Cloudflare CDN
- Free Website Transfer
- Immediate Activation
