How to Restore a CS-Cart Backup
Updated on Mar 13, 2019
This tutorial will review the process of restoring a full CS-Cart backup on your account. This process may be required if something went wrong with your website and you would like to restore it to the last operational state. There are two types of backups that you can restore.
The first one is using the Restore Manager available on all FastComet CS-Cart plans. This method will allow you to restore a daily or a weekly backup of your website. The second method is to restore a manual CS-Cart backup and we will review this process so you can get a better understanding of how it works.
To Restore a CS-Cart Backup, you must:
step
Restore the CS-Cart Files
The first step is to restore the files of your CS-Cart installation. If you wish to restore your website on the primary domain of your account, this means that you need to upload the files of your CS-Cart backup to the public_html/ directory of your account. This location may be different if you are restoring your backup in a subfolder or on a subdomain.
Also, ensure that all previous files are being removed from the directory, where you would like to restore CS-Cart. This is important, in order to ensure no issues come up during the process.
Upload Files
There are two ways of uploading your files to the server - using an FTP client, following our FTP tutorial, or uploading directly through your cPanel account → File Manager, following our cPanel tutorial.
step
Restore the CS-Cart Database
The second step is to restore the database of your CS-Cart backup. For this purpose, you will need to create a new database and a user assigned to it with full privileges.
MySQL Configuration
You can create a new database and a user assigned to it via cPanel. Simply follow our MySQL Wizard tutorial for information on that.
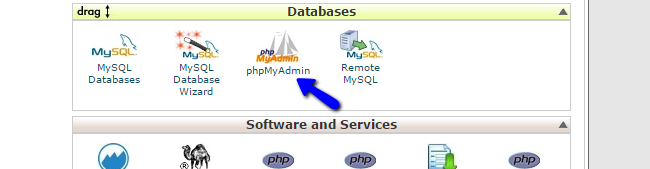
When you have your new database created, you can proceed with the import of your CS-Cart database backup. Access your cPanel account and navigate to the Databases section. Click on the phpMyAdmin icon to proceed.
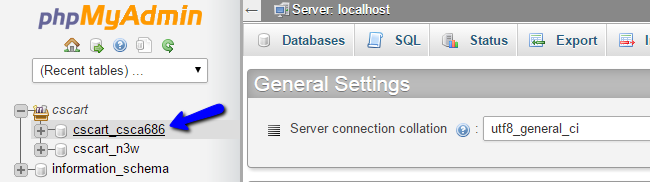
The system will display a list of all available databases on your account. They will be presented on the left side of the screen for an easier review. Click on the database you have created.
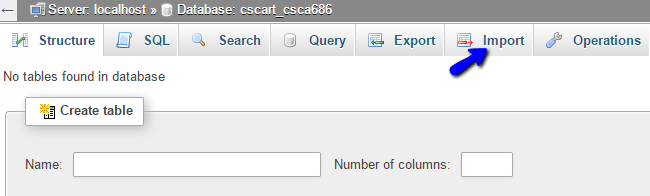
As this is a new database, no data will be present on it. Click on the Import button to proceed with the restore.
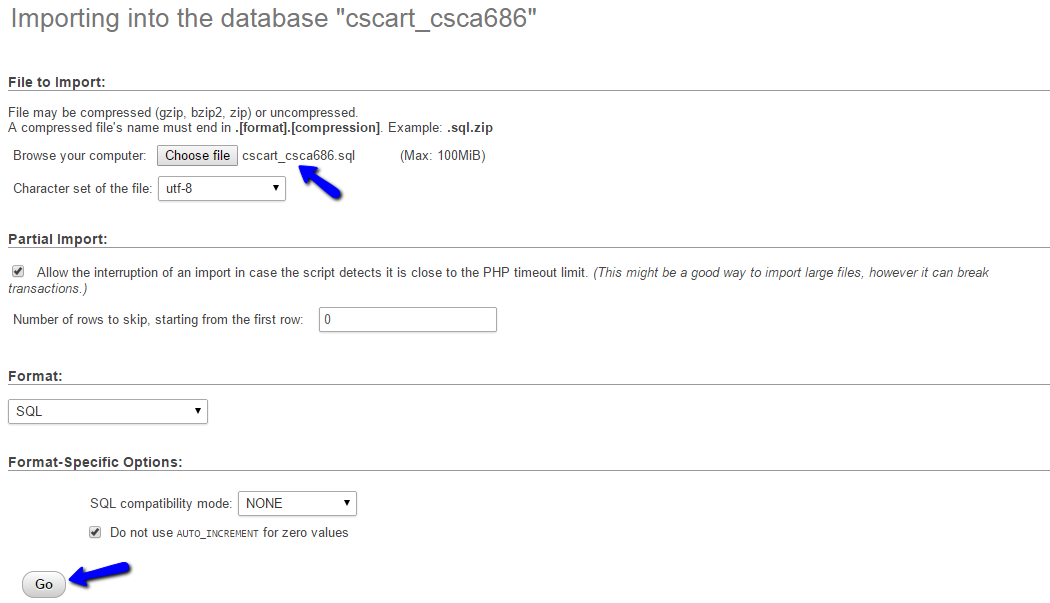
Click on the Choose File button to select the database dump of your CS-Cart backup from your local computer. Click on the Go button to proceed with the restore.
step
Link the Files and Database
Up until this moment, you will have a location on your account that contains all files of your CS-Cart backup. You will also have a database, which contains the data for your website. To complete the configuration, you need to link them together.
First and foremost, you need to get familiar with the CS-Cart configuration file and the data it holds. You will have to edit the database details, in order to reflect the latest changes. The lines of code that you actually need to change the highlighted so you can spot them easily.
/*
 * Database connection options
 */
$config['db_host'] = 'localhost'
$config['db_name'] = 'cscart_n3w'
$config['db_user'] = 'cscart_n3w'
$config['db_password'] = 'p4ssw0rd'

$config['database_backend'] = 'mysqli'

// Database tables prefix
$config['table_prefix'] = 'cscart_'
On this page...

CS-Cart Hosting - free features
- Free CS-Cart Install
- 24/7 Expert Support
- Free Domain Transfer
- Hack-free Protection
- Fast SSD Storage
- Free CubeCart Transfer
- Free Cloudflare CDN
- Immediate Activation
